Everything about desktop menus

The Menu Bar is one of the main user interface elements in desktop apps (macOS, Windows and Linux). The user interface is in charge of displaying all the available options (Commands) normally grouped by subject or application area so the user can see and choose all the available actions that can be applied on the active item, Window or in the context of the App.

In this tutorial, we will see how to create static menus with the help of the Menu Editor included in the Xojo IDE; how to react to the menu selected by the user; how to create the menus dynamically at runtime; and how we can clone and display complete menu hierarchies on any position within a Window or Control derived from the DesktopUIControl class. Read each section and watch the accompanying videos (in Spanish with English subtitles).

In order to follow this tutorial, you should feel comfortable with the basics of Object Oriented Programming (OOP) and Event Driven Programming like the concepts of Classes, Subclasses or Delegates. If this is not the case, you can read about them in this Overview of OOP and/or watch these videos: Object-Oriented Programming Concepts, Intro to OOP 101 and Intro to OOP 201, Advanced OOP Concepts.

The Menu Editor

It is possible to create all the menu bar hierarchy from code, but it is usually easier to edit the project menu bars from the Menu Editor. In order to access the editor, select the menu bar you want to edit from the Project Browser. These are the main items available in the Menu Editor toolbar:

../../../_images/everything_about_desktop_menus_menu_editor_command_bar.png
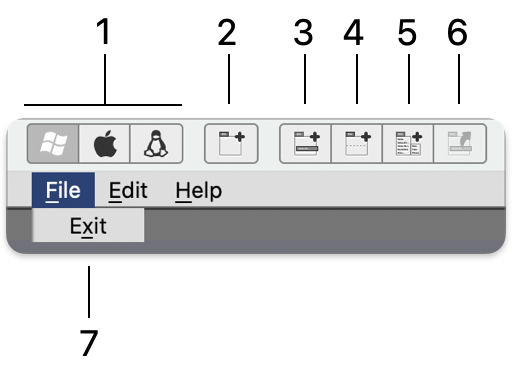
  1. Click on these icons to see the approximate appearance of the menu bar on any of the supported operating systems. Note that this is just an interpretation and not the real appearance they will show once you deploy the app.

  2. Click on this icon in order to add a new first level menu item to the menu bar. You can change any first level menu item position by dragging it to another place. The moved menu item will bring with it all the menu items under its hierarchy.

  3. Click on this icon to add a new menu item on the selected first level menu item. You can modify its position by dragging it to the new place. You can even drop it under other first level menu hierarchy.

  4. Click on this icon to add a new separator item on the selected first level menu hierarchy. As with the previous options, it is also possible to change its position. Optionally, you can convert any menu item into a separator selecting it and changing its Text property to a dash line ("-").

  5. Click on this button to add a new submenu in the selected main menu. Optionally, you can convert any menu item into a submenu switching the Submenu option to the On position under the Behavior section of the Inspector Panel. In the same way, you can convert a submenu item into a regular menu item switching this option to the Off position. Note that if you already had added menu items to the submenu, they will be lost once you change it to a regular menu item.

  6. Click on this icon to convert the selected menu item to a first level menu. If the selected item is a submenu, then the available menu items under his hierarchy will be moved too. It is not possible to convert a first level menu with all the items under it to a submenu.

  7. Under Windows and Linux it is possible to assign accelerator keys to the menu items in order to execute the selected item. Note that Xojo will detect the accelerator keys from left to right, so if you use the same accelerator key by mistake in more than one menu item, it will be detected only for the leftmost menu. You can assign the accelerator key to a menu item, along other menu item properties, via code or using the associated Inspector.

When the Menu Editor previews the Menu Bar for the macOS operating system, you will see that it adds the Apple menu and the My Application menu; however you can't add new menu items directly to this menu. Instead, you will have to add the menu item to the first level menu where you want it to show up for Windows and/or Linux, using then the Inspector Panel to change its associated Super class from DesktopMenuItem to AppMenuItem. This is what you probably will want to do in order to add the About My App… and the Preferences menu item for your macOS apps.

In the case of the Preferences menu item for your app, you can assign the PrefsMenuItem subclass so it looks active by default and with the proper keyboard shortcut already assigned on macOS.

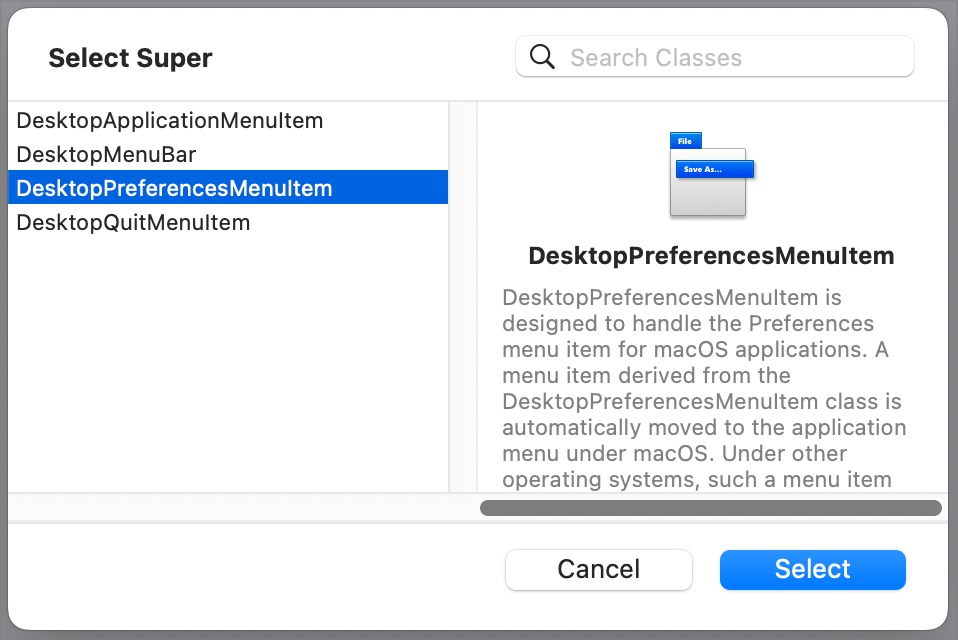
If you want to check all the available DesktopMenuItem subclasses you can choose from, click on the pen icon associated with the Super field on the Inspector. This picture shows the resulting window:

../../../_images/everything_about_desktop_menus_menuitem_subclasses.png

Setting special keyboard shortcuts

Setting a regular keyboard shortcut for your menu items is really straightforward; but, what if you want to use some of the special keys or symbols as the "delete" key or the "right arrow" key? Xojo has considered these cases too, so you only have to set the following values to the Key property on the Inspector Panel or the KeyboardShortcut property when creating new menu items on the fly from code:

  • F1-F15. Function key for that range. For example: F1.

  • Tab. Graphical representation of the Tab key.

  • Enter. Graphical representation of the Enter key.

  • Space. Textual representation for the Space bar key.

  • Del. Graphical representation for the Delete key.

  • Return. Graphical representation for the Return key.

  • Bksp. Graphical representation for the Backspace key.

  • Esc. Graphical representation for the Escape key.

  • Clear. Graphical representation for the Clear key.

  • PageUp. Graphical representation for the Page Up key.

  • PageDown. Graphical representation for the Page Down key.

  • Left. Graphical representation for the Left Cursor key.

  • Right. Graphical representation for the Right Cursor key.

  • Up. Graphical representation for the Up Cursor key.

  • Down. Graphical representation for the Down Cursor key.

  • Help. Graphical representation for Help (closing question mark).

  • Ins. Insert.

For example, the following line will set the Command + Help keyboard shortcut to a menu item:

MyMenuItem.KeyboardShortcut = "cmd-help"

Setting icons to menu items

In addition to the text, keyboard shortcuts and accelerator keys, it is also possible to assign an icon that helps to identify the main purpose of the function or command to every menu item of the menu bar.

You can use any of the pictures added to the project for that, and set the picture to the menu item through the Icon option of the Inspector Panel for the selected menu item, or using the Icon property from code. The only thing you need to be aware of is that Xojo will not automatically resize the assigned picture to an acceptable size for his use in combination with the menu item, so you should use a Graphical Editor to generate the pictures you intend to use in your menus with the following recommended sizes:

  • 16 x 16 pixels. 1x size.

  • 32 x 32 pixels. 2x size in HiDPI mode.

  • 48 x 48 pixels. 3x size in HiDPI mode.

In addition, some of the current operating systems guidelines for their UI propose the use of monochromatic icons for this purpose, but you are free to use pictures of any supported color depth. It is also preferable to use PNG images with transparent background.

Localizing the menu items

Of course you can use localized texts for the menu items. For that, remember to set all the text constants under a Module added to the project, enabling them as Dynamic constants, and to assign the localized text values for every supported language. Then, you just have to use the #moduleName.ConstantName syntax under the Text field of the Inspector Panel for every menu item you want to localize.

For example, if our project would have a LocalizedValues module with a dynamic constant in it with the name kPreferences, then we would be able to use the localized value in the Text value of a DesktopMenuItem using the following syntax:

#LocalizedValues.kPreferences

While if you want to achieve the same from code, then you should use this:

MyMenuItem.Text = LocalizedValues.kPreferences

How to set the action for static menus

If you run your app after designing the menu bars and set them to your project window, then you will see that all the menu options will be grayed or inactive, even with their AutoEnabled property set to On. This is because you still need to set the action to execute for every one of the menu items in first place. To do this:

  • Select the window that needs to handle the menu action or the App object from the Project Browser and add a Menu Handler to it from the Insert menu.

  • As result of the previous action, you will see a new Menu Handlers section in the Project Browser, showing the Code Editor associated with the new menu handler.

  • Select the menu item you want to link with the code execution for the Menu Handler from the popup menu of the Inspector Panel. Or start writing the name of the menu item in the DesktopMenuItem Name field, and use the autocomplete feature to select the desired menu item.

In addition to the window objects and the global App object, you can also add Menu Handlers to the DesktopContainer instances added to the project. In this case, you have to enter the exact name of the menu item in the Inspector Panel after adding the Menu Handler.

Action response hierarchy for menus

Since the windows of the project and the App object can use the same menu bars, implementing menu handlers for the same menu items in every one of these (and it is even possible that the DesktopContainers used in the Windows layout can also react to the selection of a menu item), which one is in charge of executing the code of the menu handler? This is the order that will follow the event after a menu item selection:

  • If the frontmost Window has a DesktopContainer that implements a Menu Handler for the selected menu, then this will be the executed code. In order to stop the event propagation, the menu handler has to return the value True; otherwise, the event will be propagated to the containing window.

  • If the frontmost Window has a Menu Handler for the selected menu item, then this will be the executed code. If not, the App object will receive the event and if it has a Menu Handler for that menu item then it will execute the code.

  • If there is not a DesktopContainer or Window that can catch the event of the selected menu item, then the App will execute the menu handler for the menu item, in case it has it implemented.

As you can see, depending where we decide to implement the menu handler, or if we decide to stop or not the event propagation, we can execute different actions in response of the same menu item selection from the menu. For example, it is a good idea to add to the App object the menu handlers for menu items that should be available along all the app execution, no matter which window is the active window or the user interaction.

Creating menu items from code

So far, we have seen how to add and set static menus with the help of the Menu Editor and the Menu Handlers. That is, implicit instances of the menu items with static code. However, you may need to create, display (and delete) menu items on the fly. Some practical cases for this are when you don't know, for example, the amount or type of available items to show under a menu; or the options you want to make available to the user depending a type of license. For these and other use cases, the Xojo framework provides all we need to create new menu items and even to create complete menu bars from scratch that you can assign to the app windows on the fly!

All the menu items are created by default from the DesktopMenuItem class; so the following code in the Opening event of the App object will add a new menu item named MyMenu, displaying the text "My Menu Option" and reacting to the "Cmd-U" keyboard shortcut:

Var newMenuItem As New DesktopMenuItem
newMenuItem.Name = "MyMenu"
newMenuItem.Text = "My Menu Option"
newMenuItem.KeyboardShortcut = "cmd-U"

We can also use the Class Constructor omitting the name assignation to the new instance, although you probably will want to add a name to every one of your DesktopMenuItem instances, more on this later. The following code shows how to use the DesktopMenuItem constructor:

Var newMenuItem As New DesktopMenuItem("My Menu Option")
newMenuItem.kKeyBoardShortcut = "cmd-u"

However, creating a new menu item instance doesn't imply that it will be displayed on a menu bar as a first level menu or under the hierarchy of any of the already available menu items. You still need to add it in code. For example, if we use the default menu bar added with every new Desktop Xojo project, the following line of code will add the created menu item as a first level entry in the menu's rightmost position:

Me.MenuBar.AddMenu(newMenuItem)

We also can set the exact position we want to display our menu item using the AddMenuAt method, and passing as its first parameter the 0 based index value. For example, we can use the following line of code to display our menu item as the rightmost entry in the menu bar:

Me.MenuBar.AddMenuAt(0, newMenuItem)

If you run both examples on macOS you will notice that it doesn't display the set keyboard shortcut, which makes sense. Under Windows, the first level menu items of the menu bar will display their keyboard shortcut in case they have one assigned. In fact, they will react to the keyboard shortcut always they have the corresponding Menu Handler. Now try this code in both macOS and Windows and/or Linux:

Var newMenuItem As New DesktopMenuItem("My Menu Option")
Me.MenuBar.AddMenu(newMenuItem)
Me.MenuBar.AddMenuAt(0, newMenuItem)

When this code is executed on macOS the app will exit unexpectedly, displaying the following error message:

../../../_images/everything_about_desktop_menus_error_menuitem.png

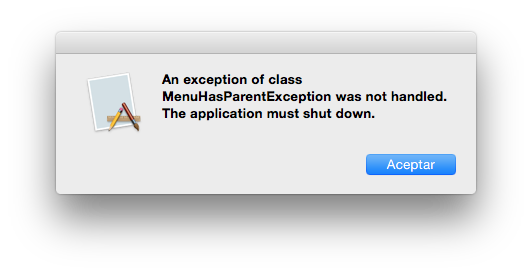
This is because macOS apps can't use the same menu item several times. Under Windows and Linux this is not the case and the previous code will run without problem. If you need to use the same menu item several times for macOS, Windows and/or Linux deployments, then the best solution is to use the Clone method instead.

As you can expect, the Clone method clones the item menu that invokes it and this is really powerful in order to clone complete menu hierarchies from first level menus or submenus, but not for menu bars!

For example, the following code will fix the previous problem; and will work just fine under macOS, Windows and Linux:

Var newMenuItem As New DesktopMenuItem("My Menu Option")
Me.MenuBar.AddMenu(newMenuItem)
Me.MenuBar.AddMenuAt(0, newMenuItem.clone)

How to create submenus from code

Until now we have limited ourselves to add new menu items as first level entries to the menu bar but how can you add new menu items under first level entries or in order to create a submenu? For this, the DesktopMenuItem class provides two methods, 1) we can get it using its object name (and not the menu item displayed text), or 2) using the zero based index as the position that such menu item has in the hierarchy it belongs to.

However, if we want to add new menu items to other menu items created using the Menu Editor, then it is even easier! In this case we can use the menu item names from our code (remember, they are global objects). For example, if we use the default menu bar added to the project, then we know that we have a menu named FileMenu (you can check the menu item names in the Project Browser). We can add a new menu item "Open…" from code using this code:

Var openMenu As New DesktopMenuItem("Open…")
openMenu.name = "openMenu"

FileMenu.AddMenu(openMenu)

In addition, we also can use the before mentioned methods. These will be especially useful when creating dynamic menus from code:

Var openMenu As New DesktopMenuItem("Open…")
openMenu.name = "openMenu"

Var sourceMenu As DesktopMenuItem = Me.MenuBar.Child("FileMenu") ' We get the DesktopMenuItem reference whose name is "FileMenu"
If sourceMenu <> Nil Then sourceMenu.AddMenu(openMenu)

Use the Index method for cases where you prefer to use this approximation because the menu item you want to refer to has no object name or we don't know its name in advance. For example, the menu "File" has the index zero in the default menu bar because this is the one placed in the leftmost position:

Var openMenu As New DesktopMenuItem("Open…")
openMenu.name = "openMenu"

Var sourceMenu As DesktopMenuItem = Me.MenuBar.MenuAt(0) ' We get a reference to the DesktopMenuItem whose index is 0.
If sourceMenu <> Nil Then sourceMenu.AddMenu(openMenu)

As you can deduce, we can create submenus using simply the methods Append or Insert on other menu items added (or that we will add) to first level menu item entries. For example, this code will add two new entries to our "Open" menu (write this code in the Opening event of the App object):

Var openMenu As New DesktopMenuItem("Open")
openMenu.Name = "OpenMenu"

Var firstSubmenuItem As New DesktopMenuItem("Last File")
firstSubmenuItem.Name = "firstOpenSubmenuItem"

Var secondSubmenuItem As New DesktopMenuItem("Select File…")
secondSUbmenuItem.Name = "secondOpenSubmenuItem"

openMenu.AddMenu(firstSubmenuItem)
openMenu.AddMenu(secondSubmenuItem)

FileMenu.AddMenuAt(0, openMenu)

How to set the action to menus created from code

We have already seen how easy it is to set the Menu Event to the statically created menu items; but, how can we assign the action that should be executed by a menu item created from code? We have two options for that, and probably the fastest and most versatile is using the AddHandler command. This command allows us to assign the Event execution to the Delegated Method of our choice.

The designated method has to provide the same amount and type of parameters that is expected by the original Event, where the first additional parameter will be the one representing its own type of the Sender object (the one whose MenuBarSelected event we are substituting, DesktopMenuItem in this case). The designated method also has to return the same type as the original Event, if this is the case (Boolean for the DesktopMenuItem MenuBarSelected).

In order to see how this works, add a new method to the App object using the following signature:

  • Method Name: ActionMethod

  • Parameters: Sender as DesktopMenuItem

  • Return Type: Boolean

  • Scope: Public

Next, write the following code in the associated Code Editor for the Method:

MessageBox("Option Selected: " + Sender.Text)
Return True

Let's modify our previous example code to assign the action executed by every submenu entry:

Var openMenu As New DesktopMenuItem("Open")
openMenu.Name = "OpenMenu"

Var firstSubmenuItem As New DesktopMenuItem("Last File")
firstSubmenuItem.Name = "firstOpenSubmenuItem"

Var secondSubmenuItem As New DesktopMenuItem("Select File…")
secondSUbmenuItem.Name = "secondOpenSubmenuItem"

AddHandler firstSubmenuItem.MenuBarSelected, AddressOf ActionMethod ' We assign the Delegate Method as the Action to execute
AddHandler secondSubmenuItem.MenuBarSelected, AddressOf ActionMethod ' We assign the Delegate Method as the Action to execute

openMenu.AddMenu(firstSubmenuItem)
openMenu.AddMenu(secondSubmenuItem)

FileMenu.AddMenuAt(0, openMenu)

Run the example app. You'll notice that now the submenu items are active because they have their Action set. Try to select these menu items in order to see how it executed the code from the Delegate Method. In addition, it is possible to assign the same delegated method as the Action for several menu items. The second option we have is to create our own subclasses based on DesktopMenuItem and implement the MenuBarSelected Event on these with the code they have to execute. Then, we just need to create the new menu item instances from our subclasses. On one hand, the main advantage of this approach is the reuse and encapsulation it provides, while in the other hand it is less flexible and versatile when compared with the AddHandler approach.

Let's see the subclass approach in action applied to our example.

First, add a new Class to the project and use the following data in the Inspector Panel for the added class:

  • Name: MySubMenuItem

  • Super: DesktopMenuItem

When done, you will notice in the Project Browser that the icon displayed for our new subclass changes to show the one associated with the DesktopMenuItem instances. With our new subclass still selected, access the contextual menu and select the Add to "MySubMenuItem" > Event Handler… option. Choose the MenuBarSelected entry in the resulting window and write the following code in the associated Code Editor:

MessageBox("Option Selected: " + Me.Text)
Return True

Return now to the Opening event of the App object and modify the code so it makes use of the new subclass:

Var openMenu As New DesktopMenuItem("Open")
openMenu.Name = "OpenMenu"

Var firstSubmenuItem As New MySubMenuItem("Last File") ' We create the instance from our DesktopMenuItem subclass, using the inherited Constructor
firstSubmenuItem.Name = "firstOpenSubmenuItem"

Var secondSubmenuItem As New MySubMenuItem("Select File…") ' We create the instance from our DesktopMenuItem subclass, using the inherited Constructor
secondSUbmenuItem.Name = "secondOpenSubmenuItem"

openMenu.AddMenu(firstSubmenuItem)
openMenu.AddMenu(secondSubmenuItem)

FileMenu.AddMenuAt(0, openMenu)

Run the example app again and you will notice that the submenu entries will run their events, providing the same result.

How to hide and destroy menu items: visible, remove and close

Now you know how to create and add static and dynamically created menu items, even how to provide the code executed in response to user selection; but, how do you hide or destroy menu items displayed in the menu bar?

First, let's differentiate between not seeing and removing a menu item from a menu. The Visible property determines exactly that: if the affected menu item will be visible or not as part of the menu hierarchy; in this case the object still will be available for use (and reference) during the app execution. That is, we still will be able to reference a menu item whose Visible property has been set to False. On the other hand, when we remove a menu item from a menu hierarchy, we will be destroying the object from memory, so we will not be able to reference it in the future. If we need the functionality provided by a removed menu item, then we will need to create a new instance from scratch.

The DesktopMenuItem class (and, thus, all the subclasses derived from it) offers two methods (with variants) we can use to remove (destroy) menu items: Remove and Close. The first method is available in two variants: the first variant accepts as parameter an Integer value representing the zero based index for the menu item we want to remove; while the second version of the method expects to receive as its parameter a reference to the menu item to remove. For example, these two pieces of code will provide the same result, removing our secondSubmenuItem from the menu hierarchy. In order to make this a bit more interesting, add a new button to the example project window and write the following code into its Action Event:

Var sourceMenu As DesktopMenuItem = FileMenu.Child("openMenu") ' We get a reference to the DesktopMenuItem whose name is "openMenu", including its menu hierarchy

If sourceMenu <> Nil Then sourceMenu.RemoveMenuAt(1) ' We remove the DesktopMenuItem placed in the second position of the submenu hierarchy

If you don't want to deal with index values, you can use the second version of the Remove method:

Var sourceMenu As DesktopMenuItem = FileMenu.Child("openMenu") ' We get a reference to the DesktopMenuItem whose name is "openMenu", including its menu hierarchy

If sourceMenu <> Nil Then sourceMenu.RemoveMenuAt( sourceMenu.Child("secondOpenSubmenuItem") ) ' We remove the DesktopMenuItem whose object name matches the provided as parameter

In addition, we also can use the Close method. For example, this will have the same effect in our submenu:

Var sourceMenu As :doc:`DesktopMenuItem</api/user_interface/desktop/desktopmenuitem>` = FileMenu.Child("openMenu") ' We get a reference to the DesktopMenuItem whose name is "openMenu", including its menu hierarchy

If sourceMenu <> Nil Then sourceMenu.Child("secondOpenSubmenuItem").Close ' We Close (or remove) the DesktopMenuItem whose object name matches the provided as parameter.

Display menus anywhere!

The DesktopMenuItem class provides a really powerful method: PopUp. This method allows us to display any DesktopMenuItem, including complete menu or submenu hierarchies, in any position inside a DesktopUIControl object, providing for that the X and Y coordinates as pixels values. When combined with the Clone method we can implement menus for practically any control under any circumstance. In addition, the PopUp method will return as result the DesktopMenuItem entry selected by the user, if any.

With the following example we will put this feature in action, displaying our OpenMenu every time we click on the app window. So, let's start adding the MouseDown event to the default Window1 object of the App. Next, write the following code in the associated Code Editor:

Var menu As DesktopMenuItem = FileMenu.Child("OpenMenu") ' We get a reference to the menu object and all its hierarchy

If menu <> Nil Then
   Var selection As DesktopMenuItem = menu.Clone.PopUp(x, y) ' We clone the menu and display it in the same coordinates where the user clicked
   If selection <> Nil Then MessageBox(selection.Value) ' We verify if the user has selected a menu item option, displaying its text if is a valid object
End If

Return True

Enabling and disabling menu items

As we have seen, the DesktopMenuItem class uses the AutoEnabled property with the True value by default, so the instances will be displayed as selectable they always have an associated Menu Handler or Delegated Method. However, you will probably want to decide on the fly which menu items should be active based on several conditions and variables. This is something we can do implementing the MenuBarSelected Event Handler in any of the project Windows that should decide about the menu items of their associated menu bars, the App object and, of course, the DesktopContainers.

In order to see this feature in action, let's add our own feature to copy text that will be enabled only if there is text to copy in a text field added to the default window of the project. First, we will add our own "Copy Text" menu item under the Edit menu that is available in the default menu bar of the project. Write this code in the Opening event of the Window1 object:

Var MyCopyTextVersion As DesktopMenuItem = New DesktopMenuItem("Copy Text")
MyCopyTextVersion.Name = "MyCopyTextMenuItem"
MyCopyTextVersion.KeyboardShortcut = "Cmd-Shift-C"

AddHandler MyCopyTextVersion.MenuBarSelected, AddressOf ActionMethod

EditMenu.AddMenu(MyCopyTextVersion)

Of course, we need to add the ActionMethod delegated method we already used in a previous example, but for the Window1 object in this case. Here is where we will execute the action. Create the ActionMethod using this signature:

  • Method Name: ActionMethod

  • Parameters: Sender as DesktopMenuItem

  • Return Type: Boolean

  • Scope: Public

And write the following code in the associated Code Editor:

Var cb As New ClipBoard
cb.Text = TextField1.Text
cb.Close

Return True

Add now a new DesktopTextField control to the Window1 layout. Next, add the MenuBarSelected Event to the Window1 window and type the following code in the resulting Code Editor:

Var sourceMenu As DesktopMenuItem = EditMenu.Child("MyCopyTextMenuItem") ' We get a reference to our DesktopMenuItem using its name.

If sourceMenu <> Nil Then sourceMenu.Enabled = TextField1.Text <> "" ' We enable the menu item only if there is text in the TextField.

Run the app and you will notice that menu option is always disabled when the text field is empty, and enabled when you put some text in the text field. When we select the menu item (or use the associated keyboard shortcut), then the textfield text will be copied to the clipboard, so you can paste it into any app that accepts text.

Add now the MenuBarSelected Event Handler to the App object and type this code:

EditMenu.Child("MyCopyTextMenuItem").Enabled = True

Run the app again and now you will notice that the menu item is always active no matter if the textfield has text or is empty. This is because the event chain responsibility executes the handler on the frontmost active window (if implemented) first, and then the one available in the App object (if implemented). Thus, double check for this when dealing with the EnableMenuItems handlers for your menu items!

See also

:doc:` </api/user_interface/desktop/desktopmenuitem>` class