Creating menus
Most apps have a Menu Bar. The location of the menu bar varies by platform. On Mac, there is only a single menu bar and it appears at the top of the screen. On Windows, each window can have its own menu bar. Linux can work either way, depending on the distribution.
When you create a desktop project, a default menu bar is added automatically, called MainMenuBar. For most applications this is usually sufficient. You create additional menu bars by adding them to your project using the Insert > Menu Bar command on the toolbar or menu.
Menu Editor
The Menu Editor is used to create your menu bars. A menu bar consists of top-level menus (called menus) and their items (called menu items). Regardless, both are subclasses of DesktopMenuItem.
The default menu bar, MainMenuBar, has two menus: File and Edit, each with their own menu items.
Use the toolbar buttons to add menus and menu items.
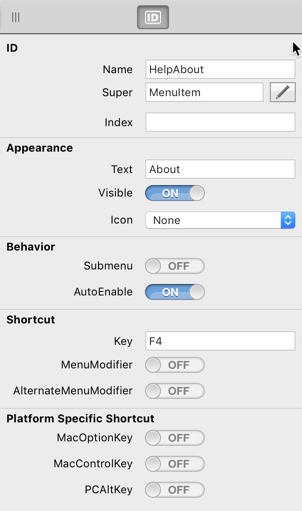
Menu items that are added to a menu have several properties that are useful. In particular, you can set the Text for the menu (this is what appears in the menu itself) and an icon for the menu. By default menu items have their AutoEnabled property set to ON. This means that the menu will automatically be enabled when the menu is clicked, if the menu handler (see below) contains code. Lastly, you can specify the keyboard shortcut for the menu.
Keyboard shortcuts
You can assign keyboard shortcuts to menu items, but remember that the operating system looks for a shortcut starting from the leftmost menu. That means that if you assign the same keyboard shortcut to two different menu items, one of them won't work. There are also several specific keyboard shortcuts that are reserved for specific functions.
You do not have to assign keyboard shortcuts to all menu items.
In the Behavior section, specify the Key to use for the keyboard shortcut. You will also typically turn on the MenuModifier property which is ⌘ on macOS and Ctrl on Windows/Linux. AlternateMenuModifier is Shift on all platforms.
To to set a keyboard shortcut for ⌘ S (macOS) or Ctrl S (Windows/Linux) you would set the Key to S and turn the MenuModifier to ON. There are several other modifiers you can also use with the shortcut:
HasMacOptionKey: Use the ⌥ key on macOS. Turning this on has no effect on Windows/Linux.
HasMacControlKey: Use the Ctrl key on macOS. Turning this on has no effect on Windows/Linux, which use the Control key by default when MenuModifier is turned ON.
HasAltKey: Uses the Alternate (or Alt) key on Windows/Linux. Turning this on has no effect on macOS.
You can also use these special values in the Key property to set non-alphanumeric shortcut keys:
F1-F15, Tab, Enter, Space, Del (Delete), Return, Bksp (Backspace), Esc, Clear, PageUp, PageDown, Left, Right, Up, Down, Help, and Ins (Insert)
You can also change the shortcut key in code by using the ShortcutKey property for the DesktopMenuItem. This example sets the HelpAbout DesktopMenuItem shortcut to be F5:
HelpAbout.ShortcutKey = "F5"
If you wanted to set its shortcut to be Ctrl 1 you would do this:
HelpAbout.ShortcutKey = "Ctrl-1"
Refer to the DesktopMenuItem page for more details on how you can set up shortcut keys in code.
Accelerator keys
Windows and Linux also have the concept of keyboard accelerators. In addition to the keyboard equivalent, which work on all platforms, you can also add a keyboard accelerator for each menu and menu item. When you designate a key as the keyboard accelerator, it is underlined in the menu name or menu item. The user can display the menu or invoke the menu item by holding down Alt and pressing the accelerator key. With a comprehensive system of accelerators, a user can use the menu system without using the mouse at all.
To designate the accelerator key, precede the letter by an ampersand ("&") in the menu or DesktopMenuItem Text property. For example, if you are creating a menu named "Actions" and you want to make the keyboard accelerator the “A”, you would enter “&Actions” in the Text property. To make the "t" the accelerator key, enter "Ac&tions".
To display an ampersand in the menu, you need to double it like this: "&&".
Accelerators do not work on Mac and are not displayed, but you still need to use a double-ampersand “&&” to display a single ampersand in a menu.