iOS Tutorial
This iOS Tutorial is an introduction to the Xojo development environment and will lead you through the development of a real iOS app. It should take you 30 to 45 minutes to complete this tutorial. We'll walk you through building a Task Manager app from start to finish. If you are new to programming and to Xojo, we recommend you first complete the iOS QuickStart.
iOS development requirements
A Mac is required to develop iOS projects with Xojo. To run/test/debug an iOS project you create in Xojo requires the iOS Simulator which is provided with Apple's Xcode development tool. You can download Xcode for free from the Mac App Store. After you have downloaded and installed Xcode, you need to run it one time to accept its License Agreement. After doing that, you can quit Xcode and will never have to use it again as Xojo will automatically launch the iOS Simulator for you. If you have not yet downloaded and installed Xcode, do that now before continuing with the tutorial.
Getting started
Launch Xojo. After it finishes loading, the Project Chooser window appears. If Xojo is already running, choose File > New Project.
Xojo lets you build several different types of apps (Desktop, Web, Console and iOS).
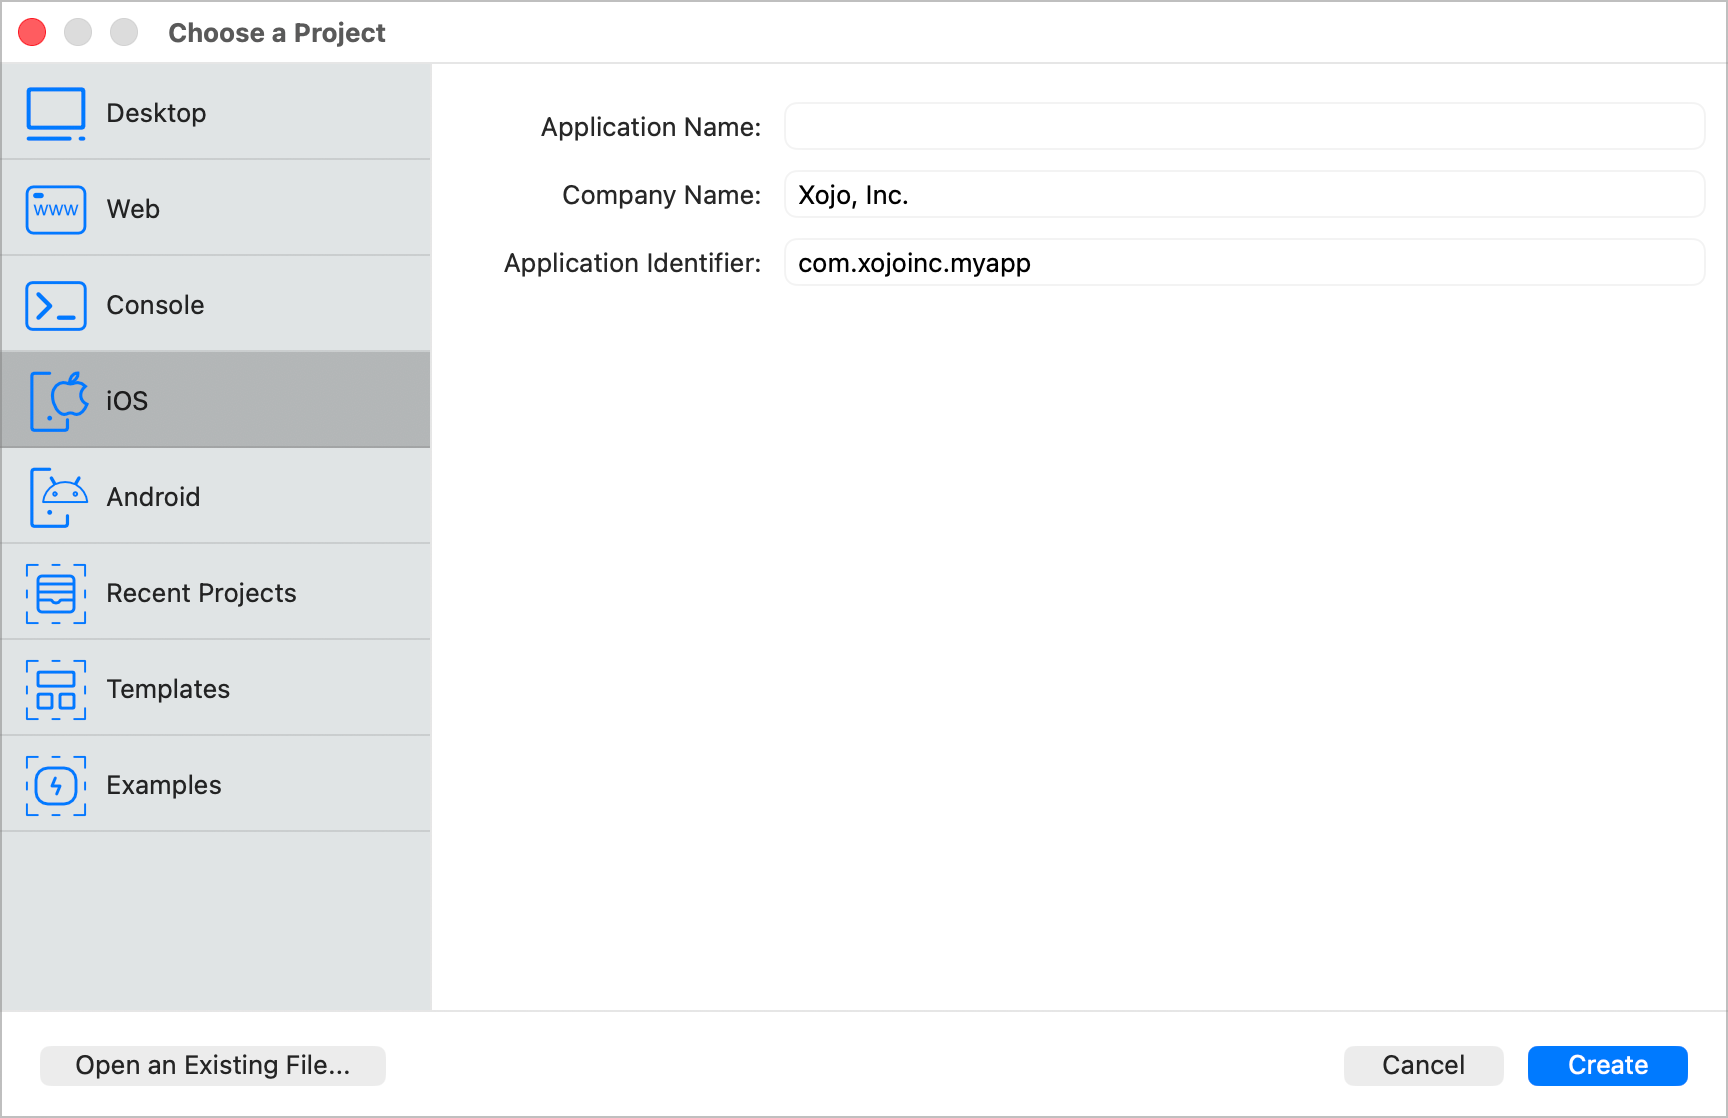
For this Tutorial, you are building an iOS app, so click on iOS.
You should now see three fields that need values: Application Name, Company Name and Application Identifier.
Application Name: the name of your app. This will be the filename of the actual app file that gets created.
Company Name: the name of your company.
Application Identifier: a unique identifier for this app. It will automatically populate using what you enter for the Application and Company Names, but you can also change it to whatever you want.
Enter
TaskManageras the Application Name.Click Create to open the main Xojo window (called the Workspace) where you will begin designing your app.
The Workspace
Xojo opens the Workspace with the default View for your app selected in the Navigator and displayed in the Layout Editor.
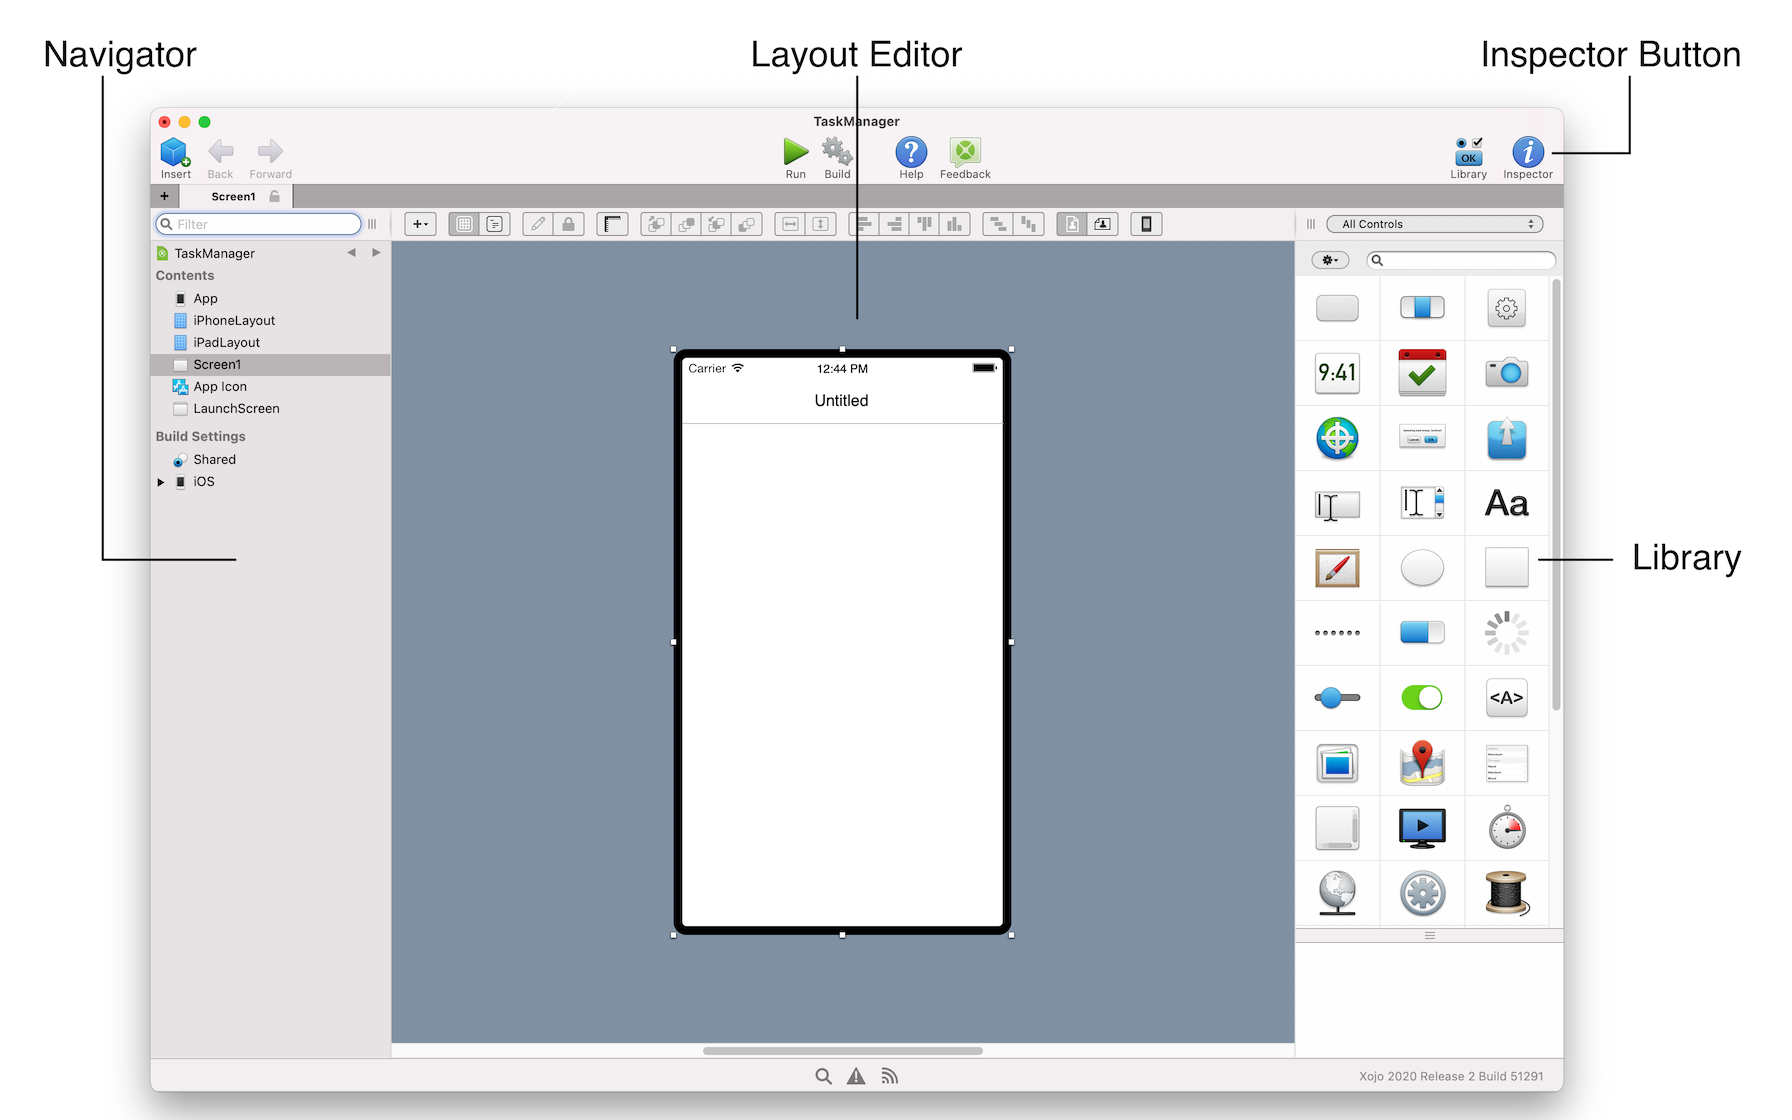
Navigator: The area on the top left shows you all the items in your project. By default you can see Screen1 (which is selected), the App object, the iPhone and iPad Layout objects and items for the App Icon and optional Launch Screen. You use the Navigator to navigate within your project.
Layout Editor: The center area is the Layout Editor. You use the Layout Editor to design the user interface for the Screens in your app. It shows the Screen and previews how it looks when the app runs on an iOS device. In this image, the Screen is blank because you haven't yet added any user interface controls from the Library.
Library: The area on the right is the Library and shows the controls and interface elements that you can add to a Screen or to the project. You design the Screen by dragging controls from the Library to the Screen layout. You can also add a control to the Screen by double-clicking it. You can change how the controls display in the Library by clicking the small gear icon and choosing a different setting.
If the Library is not visible, click the Library button on the toolbar to show it.
Inspector: Not shown in the above image is the Inspector, which allows you to see and change the properties for the selected control. This area of the Workspace window is shared with the Library. You can show the Inspector by clicking the Inspector button on the toolbar. The Inspector shows information about the selected item in the Navigator or Editor. The contents of the Inspector changes as you click on different items. You change an Inspector value by entering a new value in the field to the right of the field label.
About the app
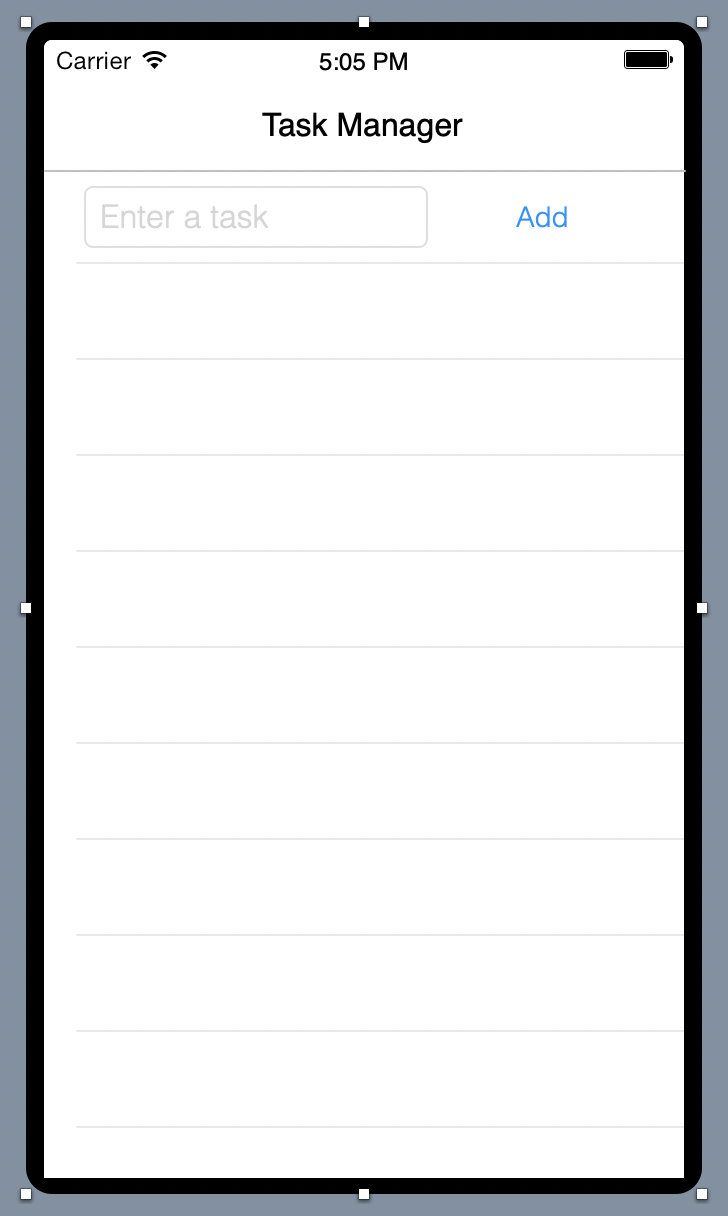
In this tutorial you will create an app to manage tasks. Not surprisingly it is called Task Manager. When finished, the app will let you add tasks, mark them as completed (and unmark them if it turns out they are not) and delete them.

Task manager
For the Task manager app, you enter tasks in the text field and tap Add to add them to the table. You can tap on individual tasks in the table to delete them or mark them as complete.
Task Manager uses these controls:
Icon |
Name |
Description |
|---|---|---|
TextField |
A TextField control is used to enter text. In this project, the task to add is entered into a TextField at the top of the Screen. |
|
Button |
A Button is used to trigger an action. This project uses a Button to add a task to the table. |
|
Table |
A Table is used to display a list of data. In this project, it is what displays the tasks entered in the TextField. |
Designing the user interface
Xojo is displaying Screen1 open in the Layout Editor. You are now going to add the controls to the Screen and position them.
Adding a button
First add the Button that is used to add a task to the table.
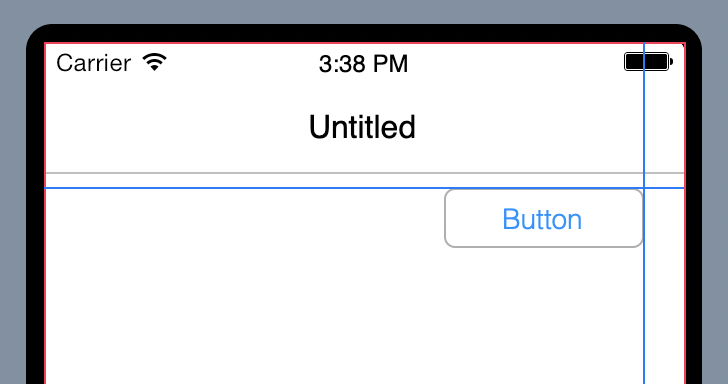
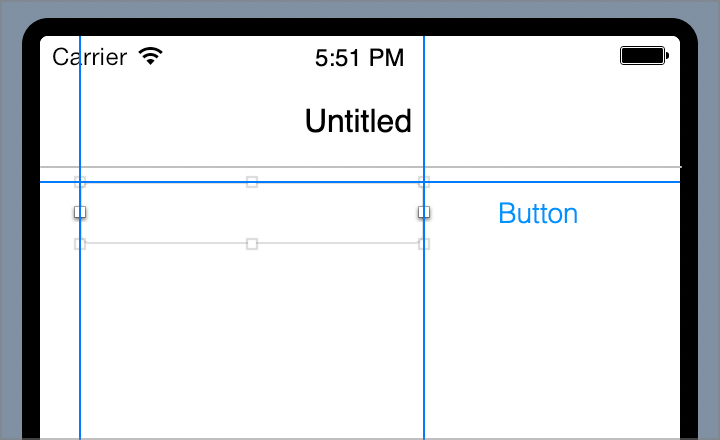
In the Library, click on Button and drag it to the Screen so that it is at the top right just below the Navigation Bar.
Use the alignment guides to position it with the appropriate amount of space between the header line and the right edge of the Screen.
Adding a text field
The TextField is where the user types the Task to add to the list.
In the Library, click on TextField and drag it to the Screen so that it is at the top left just below the Navigation Bar. As you drag you will notice alignment guides that will help you align the TextField with the Button as pictured below.
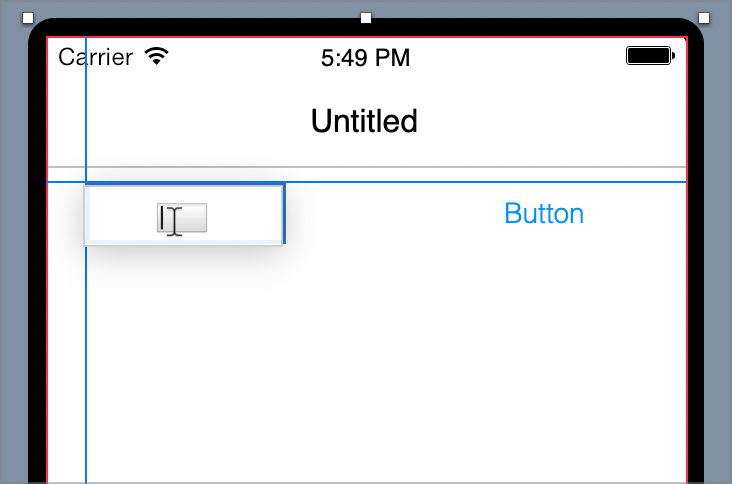
Grab the right handle of the TextField and drag it to make the control wider until you reach the button's left alignment guide.
Adding a table
The Table displays the tasks.
In the Library, click on the Table and drag it to the center of the Layout Editor below the Button and TextField. As you drag the Table onto the Screen, you will see alignment indicators that help you position the control. Drop the Table when you are happy with its position on the Screen.
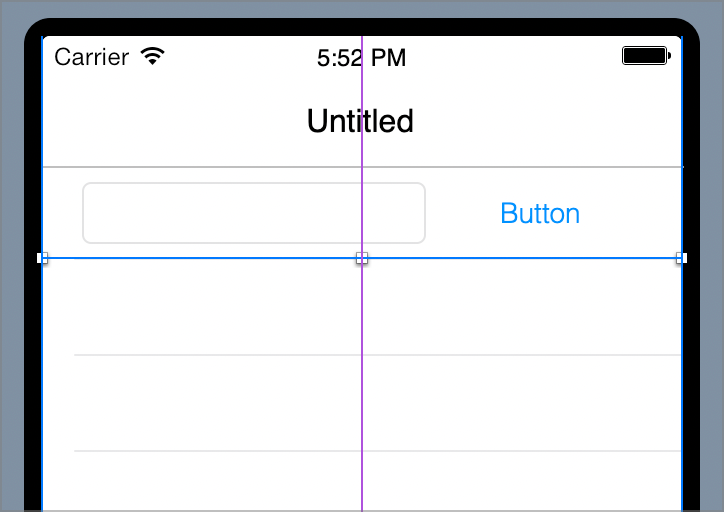
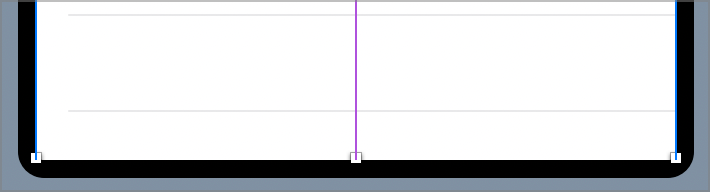
Grab the bottom handle of the Table and drag it downward to make it taller. Stop dragging when the bottom edge is right up against the bottom of the Screen:
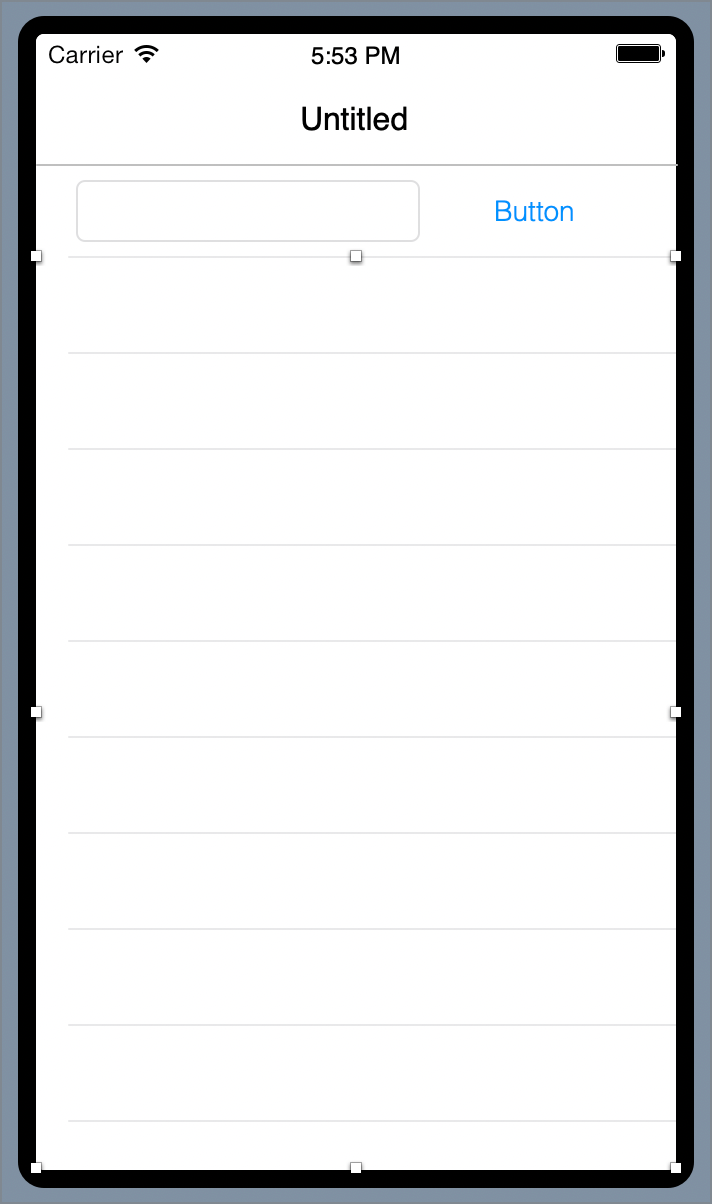
The screen layout at this point
After adding all the controls, your Screen should now look like this:
Understanding properties
What is a property?
A property is a value of a class. Changing property values allows you to change the behavior of an object such as a screen or control. For this project, you want to change various properties for the Screen and the controls you added. Some of the things you need to do are:
Rename all controls (and the Screen) so that they describe their behavior and are easy to refer to in code.
Add a Caption to the Button.
Add a hint to the TextField to help the user know what to enter.
Using the inspector
The Inspector is used to change screen and control properties. It shares the same area on the right of the Workspace as the Library.
In order to show the Inspector, click the Inspector button on the toolbar or press ⌘-I.
Changing screen properties
You need to change the Name and Title properties of Screen1:
In the Layout Editor click anywhere on the background (or phone UI) to select the Screen (rather than a control). The Inspector now shows the properties of the Screen.
Change the Name property from
Screen1toTaskManagerScreen. Press Return to see the name change in the Navigator.Change the Title property from
UntitledtoTask Manager. Press Return to see the name change in the Navigation Bar of the screen.
Changing textfield properties
The TextField is where the user types the task to add to the Table. You'll be changing the Name, Text and Hint properties.
Click on the TextField to select it so that its properties are displayed in the Inspector.
Change the Name property from
TextField1toTaskField. Press Return to see the name change in the Navigator.Change the Hint property to
Enter a task.To make it easier for the user to type, switch on the Allow Spell Checking and Allow Auto Correction properties.
Changing table properties
The table displays the tasks and will also show a check mark next to ones marked as completed. Let's change the Name property to something that is more descriptive.
Click on the table to select it and display its properties in the Inspector.
Change the Name property from
Table1toTaskTable. Press Return to see the name change in the Navigator.
Note
In the Auto-Layout section of the Inspector, look at the first row. The Edge column has the value Bottom. The Rule column should have the value BottomLayoutGuide.Bottom. If it doesn't, resize the Table control using its bottom handle until that value changes to BottomLayoutGuide.Bottom. This will ensure that the bottom of the table is locked to the bottom of the layout.
The final layout
This is what your layout should now look like after adjusting all the properties:
Running the app
Your user interface layout is now complete, so it's time to try it out. But before you go further, you should first save your work.
Save the project by selecting File > Save.
Note
This means select Save from the File menu and is the standard way choosing menu items as notated in the Xojo documentation.
Name the project
iOSTaskManagerand click Save.
To test the app you use the iOS Simulator. To get the iOS Simulator from Apple you'll have to first download, install and run Xcode once so it installs its components. You do not need to keep Xcode running or otherwise use it when developing with Xojo. To learn more about Xcode and the iOS Simulator, refer to the Installing Xcode and Apple Certificates and iOS Simulator topics.
Note
If the iOS Simulator window is quite small the first time you run your app, in the iOS Simulator choose Physical from the Window menu. That will permanently resolve the issue.
Now you can test your app:
Click the Run button in the toolbar to run the project. This builds your app and runs it in the iOS Simulator.
When your app appears in the iOS Simulator, you can interact with the buttons by clicking on them or you can type in the TextField.
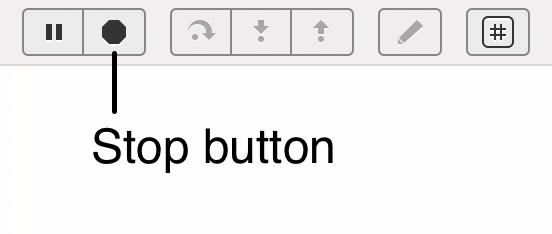
When you are finished, switch back to Xojo and click the Stop button.
Of course, Task Manager doesn't do anything yet! For that you need to add some code, which is what you'll do next.
Note
If you want to change the type of iOS device that the iOS Simulator runs your project in, choose Project > Run On then choose another iOS device from the list. You can even run directly on your iPhone or iPad by plugging it into your Mac.
Adding code
To complete the Task Manager, you will need to:
Make the Add Button add a task.
Make the Add Button only be enabled after the user has entered text into the TaskField.
Allow the user to swipe left to mark a task as completed.
Allow the user to swipe left to delete a row.
Coding the Add button
First, you're going to need to create something in which to store the tasks. Normally you could just add tasks as rows directly to the table. However, because you will want the user to be able to swipe left to mark and delete tasks, you will need to store the data elsewhere. You can do this by adding a property to the Screen. This property will be an array which is a list. Since you need to store both the name of the task and whether or not it's been completed, the array will be an array of Pairs. A Pair in Xojo is two values that go together. The left side of the pair will store the task and the right side will store True (if the task has been completed) and False if it has not. To help you visualize the array, consider the list below with three tasks, the first one which is completed:
Left |
Right |
|---|---|
Wash the dog |
True |
Mow the lawn |
False |
Clean the garage |
False |
Let's create the array to store the tasks:
To add a new property, select Insert > Property. A new property is added to the TaskManagerScreen.
In the Inspector, enter
Tasks()as the name. The () makes this an array.In the Inspector, enter
Pairfor the Type.
If you've already done the QuickStart then you know that Events are where you put code that needs to respond to an action such as a user pressing a button. Let's now make the Add button add the task to the Tasks array:
In the Navigator, click on the AddButton to select it.
In the Layout Editor, double-click the Add button.
When the Add Event Handler dialog appears, the Pressed event will already be selected which is the one you want so click OK to add it.
You are now in the Code Editor editing the AddButton's Pressed event. When the user presses the button, the button should add a row to the Tasks array using the text the user entered in the TaskField, store [False] to indicate the task is not yet completed, and clear the contents of the TaskField so they can enter another task.
In the Code Editor, enter the following three lines of code:
Tasks.Add(TaskField.Text : False)
TaskField.Text = ""
TaskTable.ReloadFromDataSource
Note
To save yourself having to do a lot of extra typing, remember that when you see an ellipsis (...) in the Code Editor, pressing the Tab key on your keyboard will auto-complete the item for you.
Arrays have functions built into them, one of which is for adding items. The first line adds the Text from the TaskField and the value False as a pair to the Tasks array. It's the : that makes them a pair. The second line clears the contents of the TaskField so the user can enter another task. The third and final line tells the TaskTable to reload all of its data so the user will see the new task they just entered. The last step to making the Add button work is to connect the Tasks array to the TaskTable control. You will do this by making the TaskManagerScreen the source of the data for the TaskTable so that its Tasks array can provide that data. You will want to do this as soon as the TaskManagerScreen opens. Thus you will use its Opening event:
In the Navigator, click on the TaskManagerScreen to select it.
Select Insert > Event Handler. The Add Event Handler dialog appears. Since the TaskManagerScreen is selected, the events that appear are for it.
The Opening event is selected by default so go ahead and press OK to add it.
Enter the following line of code to make the TaskManagerScreen the TaskTable's datasource:
TaskTable.DataSource = Self
The Self function is a generic way of referring to the object item whose method is being called. Because this is the TaskManagerScreen's Opening event, Self refers to the TaskManagerScreen. Next you need to add some methods that will connect the Tasks array to the TaskTable's datasource. This will make it possible for tasks you add to appear in the table. Methods are groups of one or more lines of code that perform a function. If you've written code in other languages, you may have called these subroutines. Normally you can name methods whatever makes sense to you. In this particular case, the datasource has specific method names it will be looking for. A group of methods that allow one thing to interface with another thing is appropriately called an Interface. You will be adding the iOSMobileTableDataSource interface which will create methods that will allow the app to get data from the Tasks array:
In the Navigator, click on the TaskManagerScreen to select it.
In the Inspector, click on the Choose... button next to Interfaces. 'The Interfaces dialog box appears.
Click the checkbox next to iOSMobileTableDataSource.
Click OK to add the interface.
Notice that a new list titled "Methods" has appeared in the Navigator. It has four methods: RowCount, RowData, SectionCount and SectionTitle. The TaskTable data source knows these method names and will call them when it needs data from the Tasks array. Your next task (no pun intended) is to enter the code into 3 of these methods that will make them do their jobs:
In the Navigator, click on the RowCount method. When the TaskTable needs to know how many rows there are in the array, it will call this method.
The line of text that appears is a comment. Click at the end of it then press Return to create a new line.
Enter the following code:
Return Tasks.Count
The Return command sends the data right back to whatever called the method. In addition to the built-in Add method you used earlier, there is also a Count function that, as you have already guessed, returns a count of the number of items in the array.
Next, you'll add code to the RowData method to return the task from the array the user selected in the table:
In the Navigator, click on the RowData method to select it.
It too has a comment so click at the end of the comment then press Return to create a new line.
Enter the following code:
Var cell As MobileTableCellData
cell = table.CreateCell(Tasks(row).Left)
Return cell
The first line creates a new variable titled "cell" of type MobileTableCellData. A cell in a table will hold one task. The second uses the table variable that was passed from the TaskTable to the RowData method. You can see this at the top of the Code Editor just above the comment. The Table variable represents the TaskTable in this case. It has a built-in method called CreateCell, which as the name implies, creates a cell. It's expecting the text you want in the cell. Remember, the text of the task is stored in the left property of each Pair in the Tasks array. Fortunately, the RowData method also is passed the row number the user tapped on in the row variable. It too can be seen at the top of the Code Editor. This is then passed to the Tasks array so that it can get the corresponding row from the array. Next use the Left property of the pair to get the name of the task which ultimately is what will be passed to the CreateCell method so that it can create a cell with that task in it. Last but not least, you again use the Return command to return the cell you created to the TaskTable. The last step before you can add tasks is a really easy one. Because Tables can have multiple sections, the TaskTable will want to know how many there are. Since our TaskTable will only have one, you can return 1:
In the Navigator, click on the SectionCount method.
Click to the right of the comment then press Return to to create a new line.
Enter the following code:
Return 1
Great. Let's give it a try.
Click the Run button in the main toolbar.
Note
If you mistyped something, instead of the iOS Simulator running, an errors pane will appear in the lower half of the Xojo Workspace window. Should this happen, look at the lines the error messages are indicating and compare them to the code in the instructions above. You probably just mistyped something. If you can't figure it out, go to the Xojo forum or contact us via email.
Your app should now be running again in the iOS Simulator.
Type a task in the TaskField and press the Add button to add it to the table. Enter a few tasks if you'd like.
When you're done, return to Xojo and press the Stop button you used last time.
Allowing row editing
In the Navigator, click on the TaskManagerScreen to select it.
In the Inspector, click the Choose... button next to Interfaces.
In the Interfaces dialog box, click the checkbox for iOSMobileTableDataSourceEditing.
Click OK to add the interface to the TaskManagerScreen.
In the AllowRowEditing method that was just added, add the following code:
Return True
Returning True in this method tells the TaskTable that the user can edit rows.
Deploying your app
There are several ways to deploy a Xojo iOS app. You can build your app with Xojo and manually copy it to an iOS device using Xcode. Or you can build your app with Xojo and submit it to the App Store. Both of these options require you to create certificates, IDs and distributions profiles with Apple and use Xcode to install them. You can find more information here:
Next steps
Congratulations, you have successfully completed the iOS Tutorial and now have a fully functional app. You learned a lot in this tutorial. You may be wondering how you'll remember it all. The good news is that you don't have to remember it. Xojo comes with documentation that will help you every step of the way. The Topics section will give you a general overview of the different parts of Xojo and of all the various controls and things you can use in your projects. The API section will give you the all the details for specific controls. After you feel you've reviewed enough of the documentation, choose a small project to build that will benefit you or others. The best way to learn is to have a reason to learn. A small project will provide that. When you need extra help, contact us at hello@xojo.com or go to our helpful community forum.
Download the completed TaskManager project.
Feedback
What did you think of this tutorial? We'd appreciate your feedback, write to us.