Desktop Tutorial
This Desktop Tutorial is an introduction to the Xojo desktop development environment and will lead you through the development of a real desktop app. It should take you about an hour to complete this tutorial. If you would like a shorter introduction to Xojo for desktop, take a look at the Desktop QuickStart. If you have experience with other programming languages, you'll also want to check out Using the Xojo language and the API sections of the Documentation.
Getting started
If you haven't done so already, now is the time to start Xojo. After it finishes loading, the Project Chooser window appears. If you already had Xojo running, choose File > New Project and click on Desktop in the Project Chooser.

Xojo lets you build several different types of apps (Desktop, Web, Console and iOS). For this Tutorial, you are building a desktop app, so click on Desktop. You should now see three fields that need values: Application Name, Company Name and Application Identifier.
Application Name: the name of your app. This will be the filename of the actual app file that gets created.
Company Name: the name of your company.
Application Identifier: a unique identifier for this app. It will automatically populate using what you enter for the Application and Company Names, but you can also change it to whatever you want.
Enter
Task Manageras the Application Name.You can leave Company Name as it is or change it.
Click Create to open the main Xojo window (called the Workspace), where you will begin designing your app.
The Workspace
Xojo opens the Workspace with the default window for your app selected in the Navigator and displayed in the Layout Editor.
There are three basic parts:
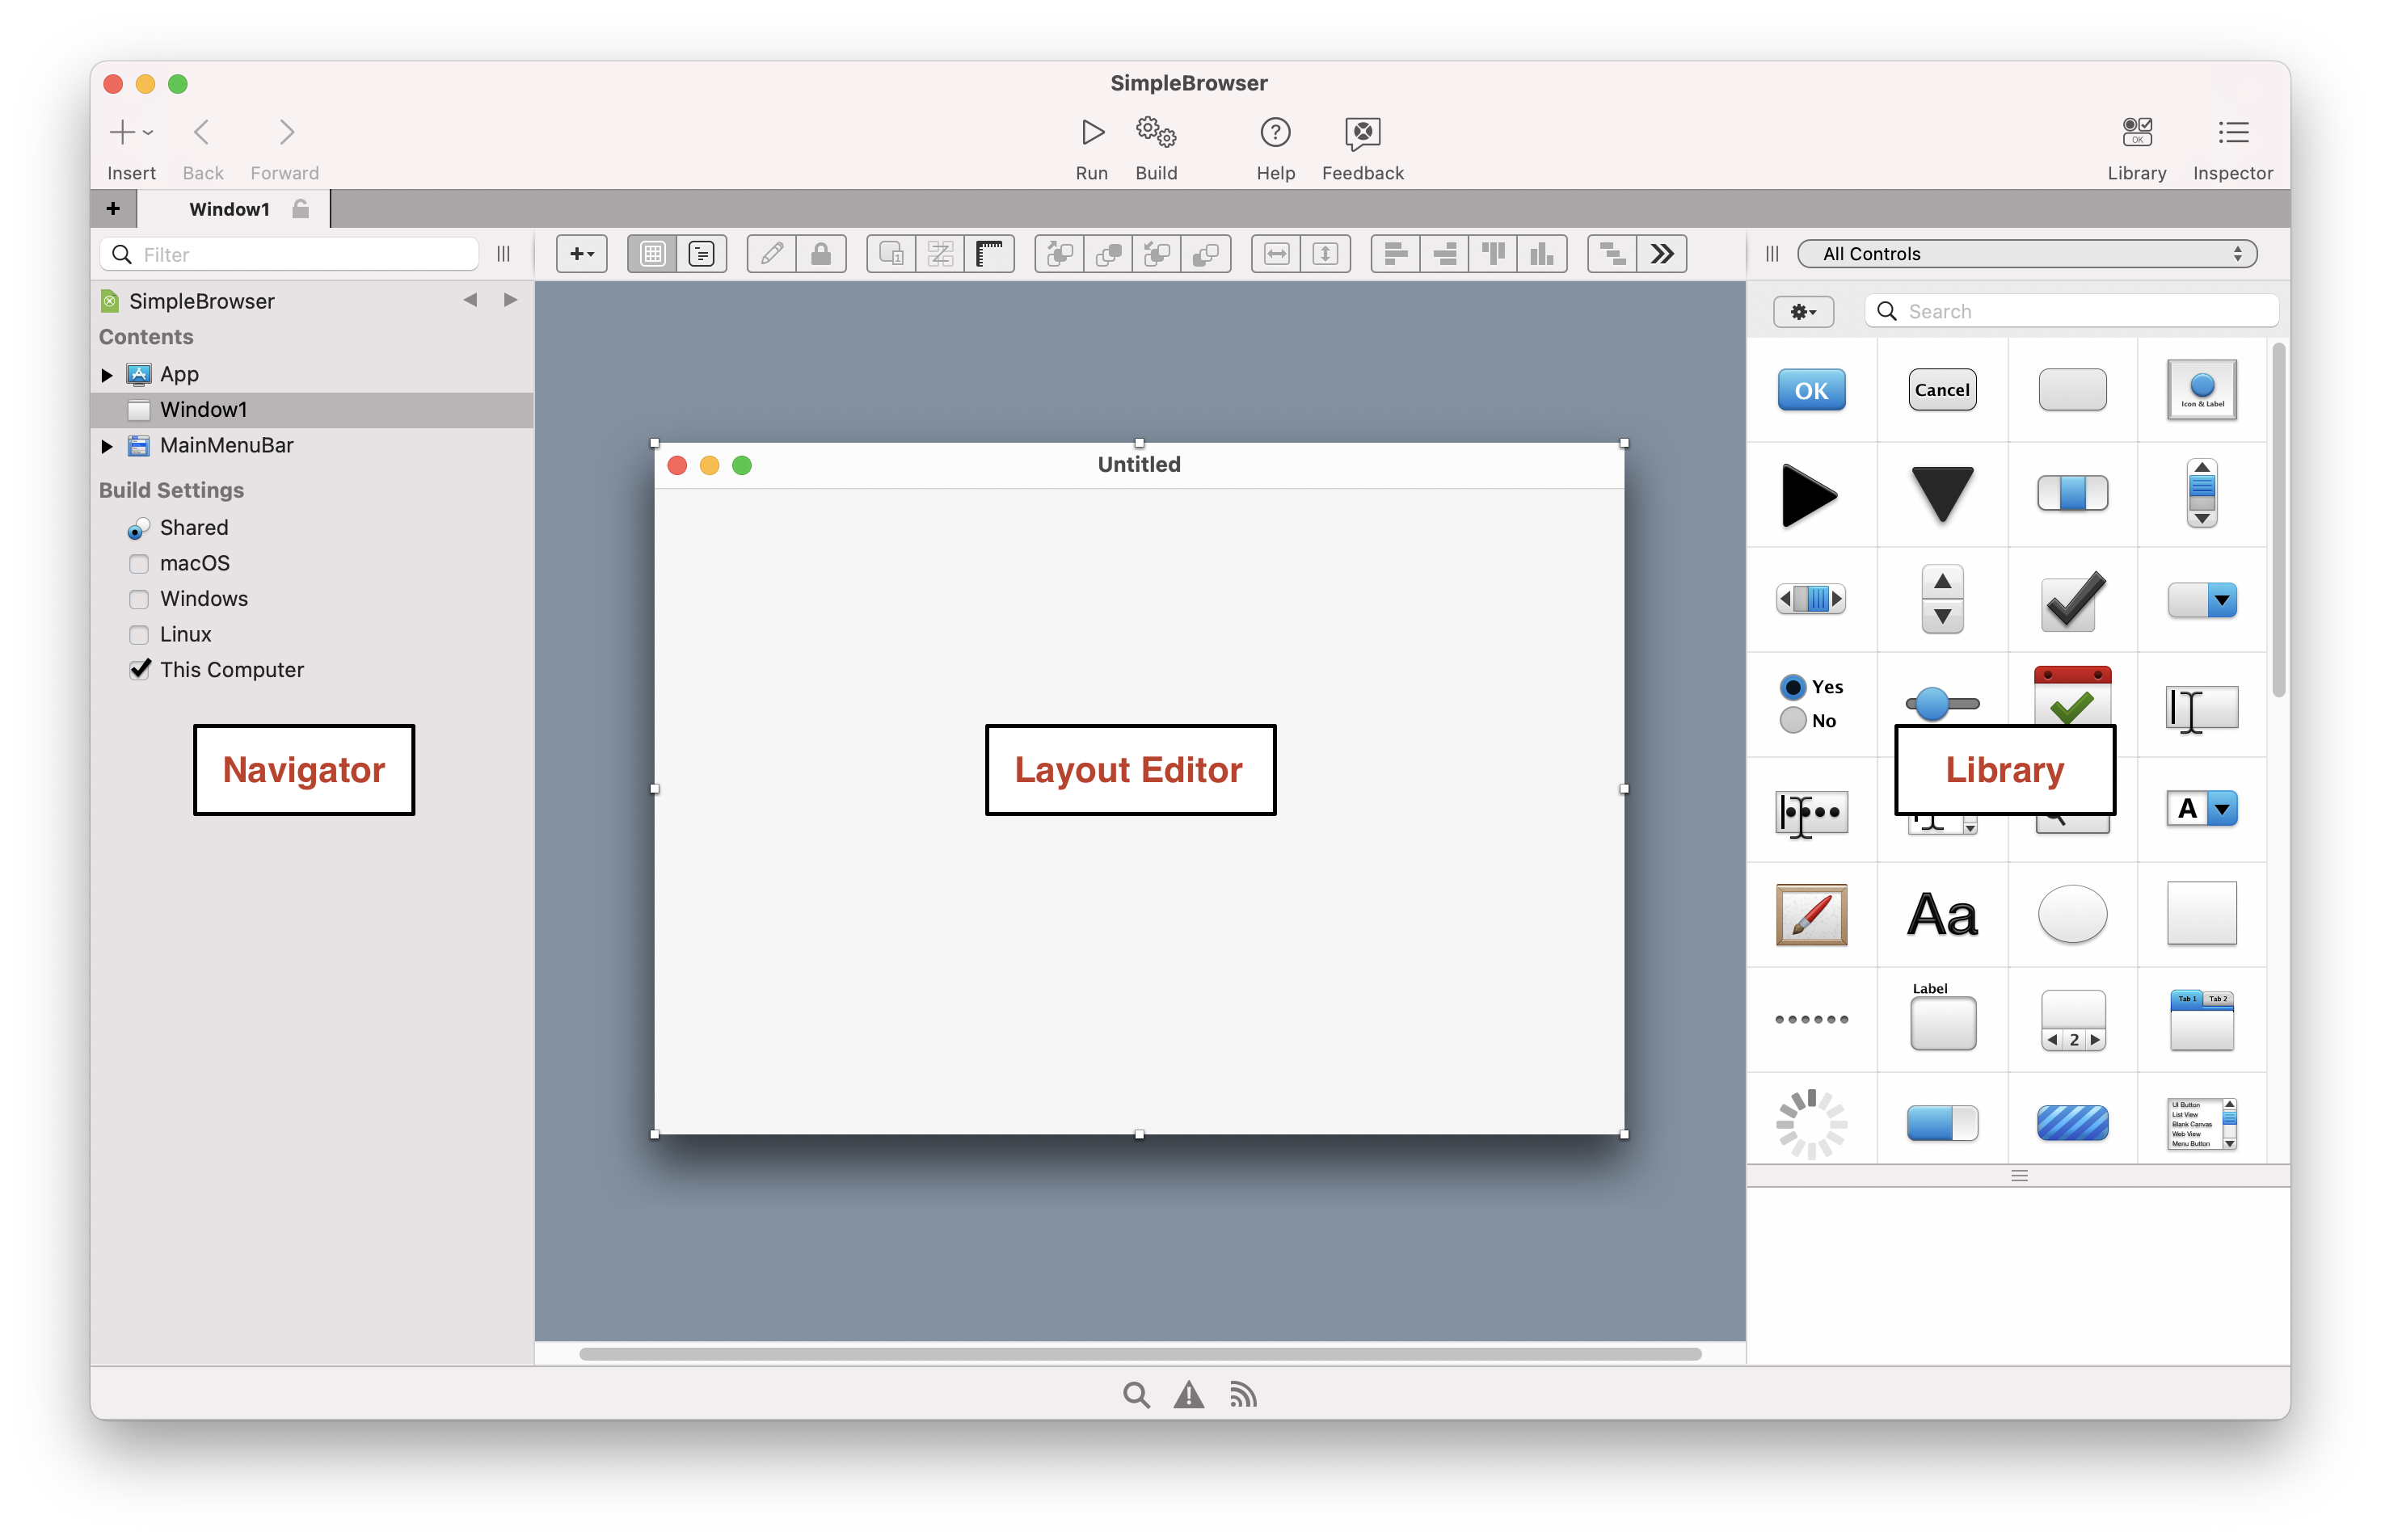
Navigator: The area on the top left shows you all the items in your project. By default you can see Window1 (which is selected), the App object and the MainMenuBar object. Use the Navigator to navigate within your project.
Editor: The center area is the Editor Area. Currently it's showing the Layout Editor. You use the Layout Editor to design the user interface for the windows in your app. It shows the window and previews how it looks when the app runs. In this image, the window is blank because you haven't yet added any user controls. The Editor Area however can also show other kinds of editors for editing code, icons and other things you might use in a project.
Library: The area on the right is the Library and shows the controls and interface elements that you can add to a window. You design the window by dragging controls from the Library to it. You can also add a control to the window by double-clicking it.
Note
If your Library looks different than the one above, that's because it was set to show icons only. You can customize yours by clicking on the small gear icon near the top-left corner of the Library and then choosing a different setting.
If the Library is not visible, click the Library button on the toolbar to show it.
Inspector: Not shown in the above image is the Inspector, which allows you to see and change the various attributes (the height, width, name and more) of any control you've added to your webpage. This area of the window is shared with the Library. You can show the Inspector by clicking the Inspector button on the toolbar. The Inspector shows information about the selected item in the Navigator or Editor. The contents of the Inspector changes as you click on different items.
About the app you're about to create
In this tutorial you will create a Task Manager, an app to manage tasks.
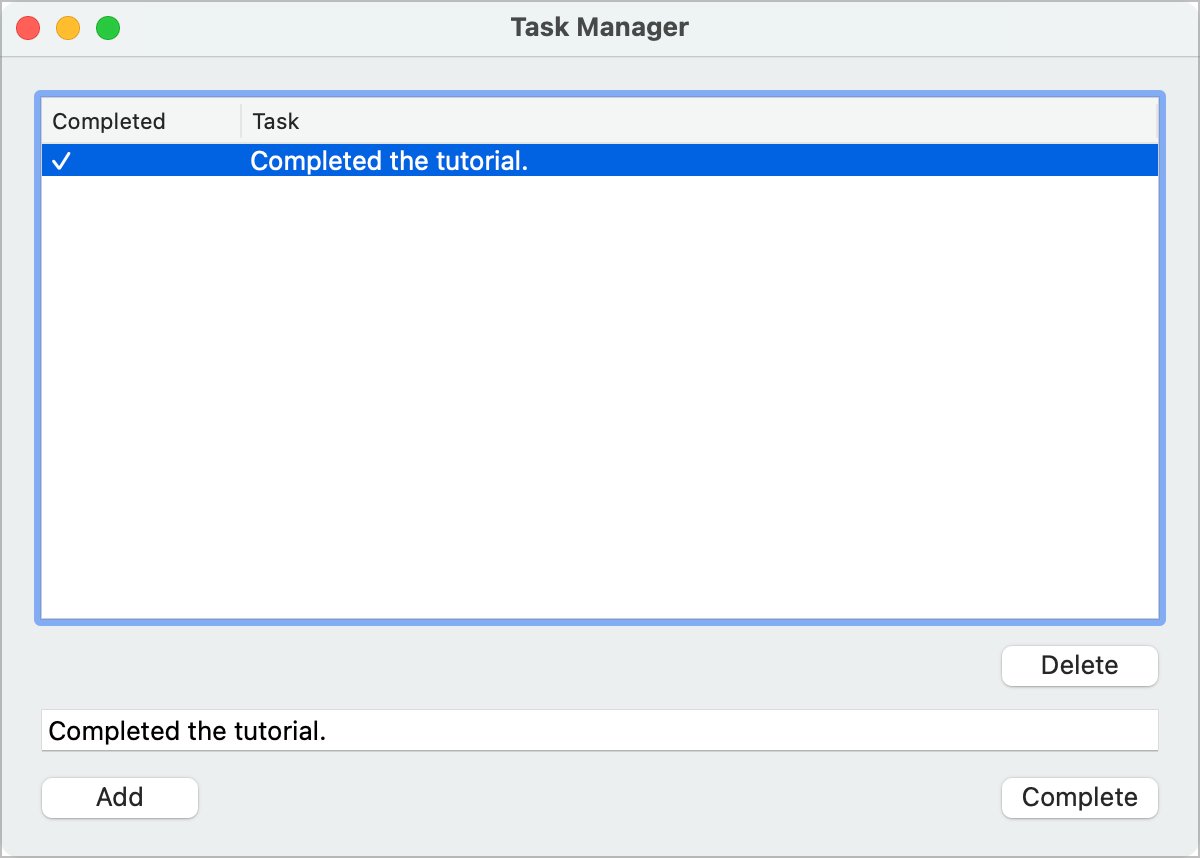
Creating the Task Manager app
For the Task Manager app, you enter tasks in the text field and click Add to add them to the list. You can click on individual tasks in the list to delete them or mark them as complete.
Task Manager uses three types of controls:
List Box: A control that is a scrollable list. It can show both single and multiple-column lists and scroll horizontally and vertically.
Text Field: A control for entering a single line of text.
Button: A standard button. It is most often used to initiate an action.
In the next sections, you'll create this app step-by-step.
Designing the user interface
Creating the task list
You should have Xojo running and Window1 open in the Layout Editor. You are now going to add a Listbox to the window. The Listbox is used for storing the tasks.
In the Control Library, click on the Listbox and drag it to the top-left corner of the Layout Editor. As you get close to the edges of the window, you will see alignment indicators that help you position the control. Drop the Listbox when you are happy with its position.
Click on the Listbox so that the resizing handles appear. Grab the handle in the bottom-right corner and drag it to enlarge the Listbox to fill the top 2/3 of the window.
Adding buttons
Now you will add the three buttons needed by Task Manager to the window.
The Delete button removes tasks from the Listbox, the Add button adds tasks to the Listbox and the Complete button marks tasks in the Listbox as completed.
In the Library, click on the Button control
 and drag it to the window below the lower-right corner of the Listbox. This will be the Delete button. Use the alignment indicators to help you position the button so that it lines up with the right edge of the Listbox.
Drag another Button control it to the window near the bottom-left corner. This will be the Add button. Again, take advantage of the alignment indicators to help you position the button.
Drag another Button control again and drag it to the window near the bottom-right corner. This will be the Complete button.
Adding a text field
The Text Field is where the user types the Task to add to the list.
In the Library, click on TextField and drag it to the window so that it is between what will be the Delete and Add buttons.
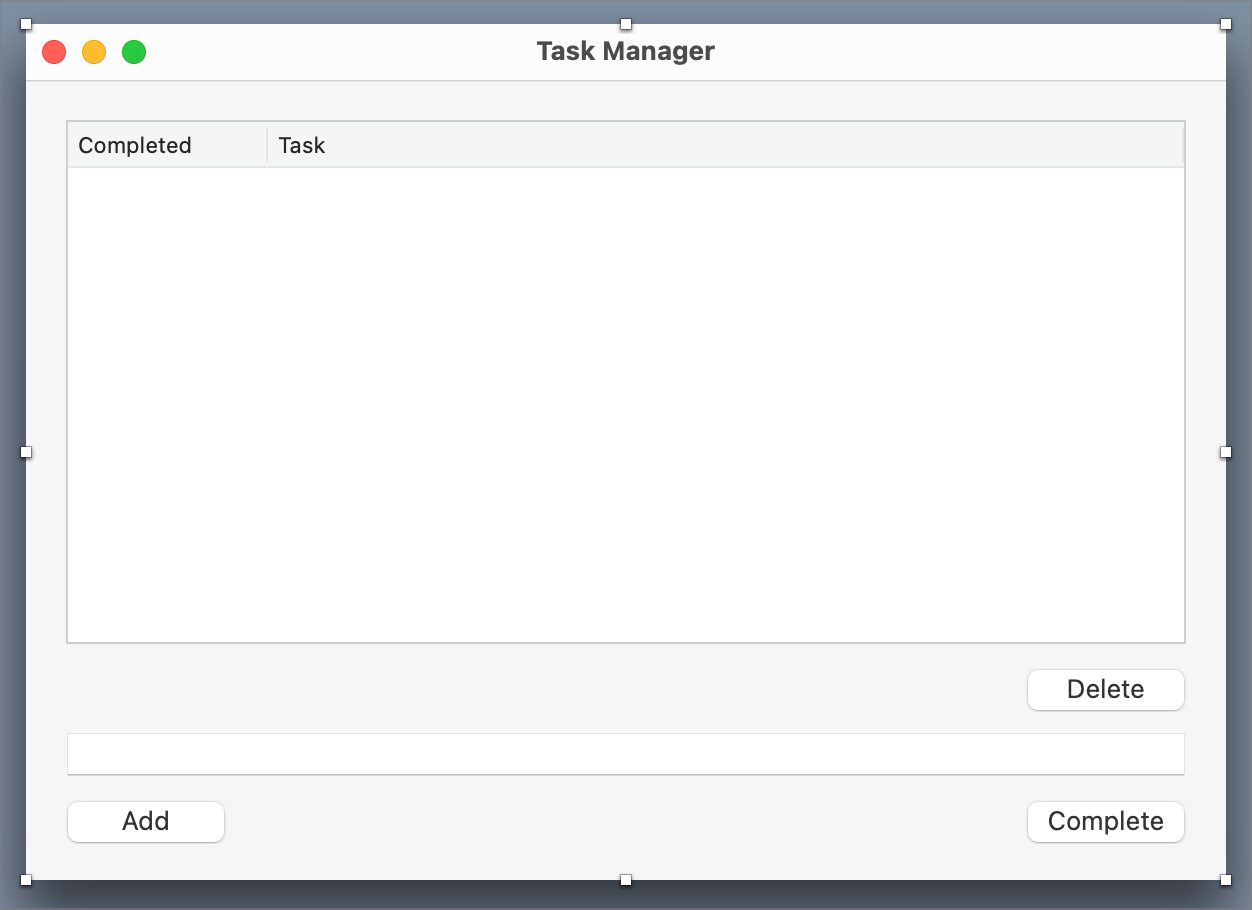
Resize the Task field by selecting the rightmost drag handle and drag-resize it until it's the same width as the Listbox. Use the alignment indicators as guides to help you line everything up correctly.
After adding all the controls, your window layout should now look like this:

Understanding Properties
What is a property?
A property is a value of an object. Changing property values allows you to change the behavior of the object. For this project, you want to change various properties for the view and the controls you added. Some of the things you need to do are:
Rename all controls (and the window) so that they describe their behavior and are easy to refer to in code.
Add Captions to the Buttons.
Set Locking properties so that the controls resize properly when the window is resized.
The Inspector pane
The Inspector is used to change view and control properties. It shares the same area on the right of the Workspace as the Library. In order to show the Inspector, click the Inspector button on the toolbar or press ⌘ I (Ctrl I on Windows and Linux).
Setting Window properties
If you haven't already, display the Inspector by clicking the Inspector button on the toolbar. You need to change the Name and Title properties of the window.
First, in the Layout Editor, click on the window to select it. The Inspector now shows the properties for the window.
Tip
To select the window, click anywhere on the window where there is no control. When you select selection handles appear around the window, you'll know you have selected it.
In the Name field (located in the ID group), change the name from
Window1toTaskManagerWindow.Press Return to see the name change in the Navigator.
In the Title field (located in the Frame group), change the name from
UntitledtoTask Manager.Press Return to see the name change in the title bar of the window.
Setting ListBox properties
The Listbox is where the tasks that your user enters are displayed and stored. You need to change the following properties: Name, Column Count, Initial Value, Column Widths and Locking.
First, in the Layout Editor, click on the Listbox to select it. The Inspector now shows the properties for Listbox.
Change the Name property from
Listbox1toTaskList. Press Return to see the name change in the Navigator.The Listbox has two columns, one to show the completed status and another to show the name of the task. Change the Column Count property from
1to2. Press Return to see the Listbox appear with two columns layout.You want to change the column headers to describe the data in the list. Find the Initial Value property and click the "pencil" icon to its right. This opens a small editor window where you can enter the column heading values.
Type
Completed, press Tab, and then typeTask.Click OK. You'll see the column headings for the ListBox change.
Since the Completed column is only going to contain a simple checkmark when the task is marked as completed, it can be narrower. Set the Column Widths property to
100,*. Press Return to see the column widths change. Using 100,* tells the Listbox that the first column should always be 100 pixels wide and that the rest of the columns share the available width.
Lastly you need to make changes to the locking so that the Listbox gets larger or smaller as the window size changes. In the Locking group look at the image that shows the window with small locked icons for the top and left and small unlocked icons for bottom and right.
Click the locks so that top, left, bottom and right are all locked.
Setting TextField properties
The TextField is where your user will type the task to add to the list. You need to change the following properties: Name and Locking.
In the Layout Editor, click on the TextField to select it. The Inspector now shows the properties for the TextField.
Change the Name property from
TextField1toTaskField. Press Return to see the name change in the Navigator.Now you need to make changes to the locking so that the TextField gets larger or smaller when the window resizes. In the Locking group, click the locks so that left, bottom and right are locked and top is unlocked.
After adjusting all the properties for the window and its controls, your layout should look like this:
Saving your work
Your user interface layout is now complete, so it's time to try it out. But before you go further, you should first save your work.
Save the project by choosing File > Save.
Name the project
“TutorialDesktop”and click Save. Now you can test your app.
Running your app
Click the Run button in the toolbar to run the project.
When Task Manager is displayed, you can interact with the buttons by clicking on them, you can type in the TextField and you can resize the window to see the buttons reposition themselves.
Select Exit (on Linux/Windows) or Quit (on macOS) from the app's menu to return to the Layout Editor.
Of course, Task Manager doesn't do anything yet! For that you need to add some code, which is what you'll do next.
Adding code to your app
Finding and fixing bugs
Finding bugs is part of creating apps. A bug is when the app you've created doesn't behave as you intended. Although your Task Manager app works just fine, there are a couple of lingering bugs that need addressing. Have you figured out what the problem is?
Here's a hint: What happens if you click on the Delete buttons but have not selected a task? Try it.
With the app still running and no row selected, click on the Delete button without doing anything else. Your app will switch to the Debugger with a line of code highlighted. Your code generated an OutOfBoundsException and you are now in the debugger. The error occurred because you attempted to remove a row that does not exist. When no row is selected in the Listbox, the SelectedRowIndex property returns -1. Since this is not a valid row in the Listbox, when it's passed to the RemoveRowAt method, RemoveRowAt cannot use it. As a result, Xojo creates something called an Exception. This means that something unusual or exceptional has happened. In this case, because the value is out of bounds (given that -1 isn't a valid row number) an OutOfBoundsException occurs.
Click the Resume button in the debugger toolbar, to see the actual error message.
Click the button in the dialog to quit the app to return to the Editor.
Nobody wants buggy code. Luckily it is easy to prevent this bug from occurring. Essentially, you want to make sure a row is selected before you attempt to Delete or Complete a task.
The code to do this uses what you have already learned. Update the code for the Pressed event handler of the DeleteButton:
If TaskList.SelectedRowIndex >= 0 Then
  TaskList.RemoveRowAt(TaskList.SelectedRowIndex)
End If
The code for the Complete button is similar. Update the code for the Pressed event handler of the Complete button:
If TaskList.SelectedRowIndex >= 0 Then
  TaskList.CellTextAt(TaskList.SelectedRowIndex, 0) = "✓"
End If
In both cases, the code verifies that a row is selected by checking the SelectedRowIndex property to ensure that it contains a valid row before the actual method is called.
Save the project by choosing File > Save.
Run the project again and click the Complete button without selecting a row in the task list. Because the code now only removes the row if a valid row is selected, no OutOfBoundsException occurs.
When you're done testing, select Exit (on Linux/Windows) or Quit (on macOS) from the menu to return to the Code Editor.
Finishing your app
Testing your app
Just because your app seems to work, doesn't mean you are finished with it. A good developer always thoroughly tests their apps to look for possible problems.
You already found and fixed two problems (pressing the Complete and Delete buttons when no row is selected). Do you think there are other problems to fix? Run the app and play around with it a bit. Make a note of things you want to change. In the next section, you will add some improvements to Task Manager.
Making improvements
Did you notice that there are times when the buttons in Task Manager probably should not do their action? For example, the Complete button should not try to mark a task as completed if one is not selected. Right now you can click it, but nothing happens. Also, you are not going to want to add a task to the list if nothing has been entered in the task field.
There are several ways to accomplish this, but one way is to disable the buttons when they should not be used.
Follow these steps to add this improvement:
In the Navigator, click on TaskManagerWindow to display it in the Layout Editor.
On the window, select CompleteButton, labeled Complete. In the Inspector, turn the Enabled property (in the Appearance group) to Off.
Select AddButton, labeled Add. In the Inspector, turn the Enabled property (in the Appearance group) to Off.
Select DeleteButton, labeled Delete. In the Inspector, turn the Enabled property (in the Appearance group) to Off.
Now you will add code to enable the Add button when there is text in the Task Field.
On the window, double-click the TaskField control. The Add Event Handler window appears.
Here you are seeing yet another list of event handlers. Every control type has its own specific list of event handlers. In this case, we want to disable AddButton when there is no text in the task field and enable it when there is text. The TextChanged event is called whenever the text in the task field is changed, either by the user typing or by your code changing the Text property.
Make sure the TextChanged event is selected in the Event Handler list and click OK.
Note
Notice the Navigator on the left updates to show the TextChanged event underneath the TaskField control and the code editor displays.
You now need code that checks the Text property of the TextField (Me.Text) to see if anything is there. If there is text there, then the AddButton is enabled by setting its Enabled property to True. If there is no text, then it is disabled by setting its Enabled property to False.
Enter this code:
If Me.Text.IsEmpty Then
  AddButton.Enabled = False
Else
  AddButton.Enabled = True
End If
You already added code earlier to prevent the Delete and Complete buttons from doing anything if no row is selected in the Task List. Now you can also make those buttons enable when a row is selected and disable when no rows are selected. This is accomplished with the SelectedRowIndex property of the Listbox.
In the Navigator, click on TaskManagerWindow to display it in the Layout Editor.
Double-click the TaskList control. The Add Event Handler window appears.
Here you are seeing the list of event handlers for ListBox. The SelectionChanged event is called whenever the selection in the TaskList control changes.
Make sure the SelectionChanged event is selected in the Event Handler list and click OK.
Add this code:
If Me.SelectedRowIndex >= 0 Then
  DeleteButton.Enabled = True
  CompleteButton.Enabled = True
Else
  DeleteButton.Enabled = False
  CompleteButton.Enabled = False
End If
Save the project by choosing File > Save.
Run the app to test it out.
When you're done testing, select Exit (on Linux/Windows) or Quit (on macOS) from the menu to return to the Code Editor.
Notice that the Add button is initially disabled. But try typing some text in the Task field. The Add button immediately becomes enabled. And if you remove the text from the Task field, the buttons again become disabled. Similarly, when you click on a row in the Task List, the Delete and Complete buttons become enabled.
Let's make the Add button remove the text from the TaskField after it creates a task out of it:
Select the AddButton in the Navigator to both display the TextManagerWindow in the Layout Editor and select the AddButton at the same time.
Next we need to update the Add button's Pressed event handler so double-click it to get to the Pressed event.
Now you should be staring at the first line of code you wrote. Click at the end of the line and press Return to create new line.
On that brand new line, enter this code to set the Text property of the TaskField to an empty text value.
TaskField.Text = ""
Go ahead and save your project.
Run your app to test out this newest version.
Building a standalone app
Now that you have created this fine app, you probably want to share it with the world. To do so, you need to build a standalone app. Xojo lets you create desktop apps for macOS, Windows, and Linux (including the Raspberry Pi). The first thing you want to do is to decide which platforms you wish to build. You do this using the BUILD section of the Navigator.
First, check the box next to the platforms you want to build. By default, This Computer is checked so that you will at least create a build for the platform you are currently using. To see settings specific to each platform, click on the platform name. The Shared Build Settings contain the version information and other settings.
You can click around on these various build settings to look at them, but you do not need to change any in order to build this app.
Note
To build a standalone app, you must have already purchased a Xojo license.
To build the app, click the Build button in the toolbar (or choose Project > Build Application from the menu). Xojo creates a standalone app for each selected platform.
In the folder containing your project, you will see a folder called Builds - TutorialDesktop and inside this folder will be folders for the builds for each platform. Navigate to the build folder for your current platform and double-click the app file to run it.
Next steps
Congratulations, you have successfully completed the Desktop Tutorial and now have a fully functional app. To continue on your journey of learning Xojo, you should next read the What is Xojo? topic, which covers Xojo in its entirety. You will also want to refer to the API section of the documentation, which covers the specifics of language elements, classes and other details of Xojo.
Download the completed TaskManager project.
Feedback
What did you think of this tutorial? We'd appreciate your feedback, write to us.