iOS apps
iOS apps run on iOS devices such as iPhones and iPads. You have to be using Xojo on a Mac in order to be able to create iOS projects and build iOS apps.
iOS project overview
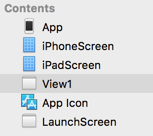
When you create your first iOS project, the following project items are added automatically:
App: The App object works similarly to how it works for desktop and web projects. In the App Inspector, you can set the Default Screen to use for iPhone and iPad-sized devices. Leave a device screen blank if you do not want it to have a native UI for the device. For example, to prevent an app from working on an iPhone, select "None" for the Default iPhone Screen property. If you do not want the app to run natively on an iPad, select "None" for the Default iPad Screen property. Keep in mind that the app will still run on the iPad, but will do so by running the iPhone app in the OS "scaled" mode.
iPhoneScreen: Specifies the initial screen displayed when the app is started on iPhone-sized devices.
iPadScreen: Specifies the initial screen displayed when the app is started on iPad-sized devices.
View1: This the main layout where controls are placed. It is roughly equivalent to a Window or WebPage in desktop and web projects.
App Icon: This item is where the various size app icons for the app are placed. You can use the ImageMaker utility (in the Extras/iOS Utilities folder of the Xojo installation) to create the image files and then drag them into the various sized areas.
Launch Screen: The screen that will be displayed when the app is launched. The LaunchScreen is provides the same functionality as a splash screen in a desktop app. Typically these are screenshots of your empty default screen so that it makes it look like your app is starting quickly, but they can be almost anything.
To prevent an app from working on an iPhone, select "None" for the Default iPhone Screen App property. If you do not want the app to run natively on an iPad, select "None" for the Default iPad Screen App property. Keep in mind that the app will still run on the iPad, but will do so by running the iPhone screen in the iOS "scaled" mode.
To prevent an app from working on an iPhone, select "None" for the Default iPhone Screen App property. If you do not want the app to run natively on an iPad, select "None" for the Default iPad Screen App property. Keep in mind that the app will still run on the iPad, but will do so by running the iPhone screen in the iOS "scaled" mode.
App object
The App object works similarly to how it works for desktop and web projects. For an iOS project, the App object is a subclass of MobileApplication. You use it to specify the default screen layouts for the devices. You can add events, properties and methods to the App object. Use the App prefix to refer to public properties and methods elsewhere in your code. For example, to refer to the property UserName added to the App object in a class of the project, you would write:
App.UserName = "Billy"
Event Handlers
The Application class for an iOS application has event handlers. They are:
LowMemoryWarning: Called when iOS is running low on memory.
Opening: Called when an application is launched.
UnhandledException: Called when an exception was raised but not handled by its own Try block.
Properties
Default iPhone Screen: The Screen to display when an iPhone-sized device is used. Set this to "None" to prevent the app from working on an iPhone.
Default iPad Screen: The Screen to display when an iPad-sized device is used. Set this to "None" when you do not want a native iPad app. The app will still run on the iPad, but will do so by running the iPhone screen in the iOS "scaled" mode.
Usage
The LowMemoryWarning event handler gets called when iOS is running low on memory. Since iOS does not use virtual memory, it has to purge apps from memory when the OS detects memory is running low. Implement this event handler if your app reserves a lot of memory (large Text arrays, for example) so that you can release the memory. If you do not release the memory quick enough, iOS will terminate the app.
The Opening event handler is called when the app is launched (or relaunched if it was removed from memory). It is not called if your app remains in memory and the user switches back to it from another app. The Opening event handler is a great place for app initialization code.
The UnhandledException event handler is called when an exception was raised and not handled by its own Try...Catch block. Return True to allow your app to continue, essentially ignoring the exception (this may cause instability depending on the cause of the exception). This event is commonly used to log error information or maybe save state before the app quits. You might find it useful to put a Break statement in this event handler so that the debugger is displayed when an unhandled exception occurs. In addition, you can add some code to save the stack to an array so you can review it in the debugger:
Var stack() As StackFrame = exc.StackFrames
Break
Screens
In the Inspector for App, you can specify the default screens to use when the app is run on an iPhone or an iPad. A Screen is a project item that specifies the type of layout and supported orientations. Two Screens are added by default with new projects: iPhoneScreen and iPadScreen. When you click on a Screen you are shown a preview of how it might look on the device.
Build Settings
The Build Settings section of the Navigator contains the build-specific settings for your app.
iOS
The section of the Build Settings contains iOS-specific settings, including:
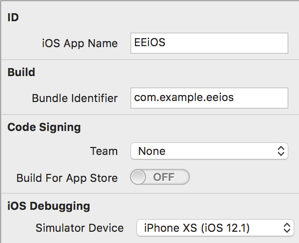
iOS App Name: The actual name for your iOS app. This is the name that appears on the Springboard in iOS and is the name of the actual app file.
Bundle Identifier: The bundle identifier is used by iOS as a unique descriptor for your app. It is usually specified as a reverse domain name, such as com.xojo.myapp. A bundle identifier is required for iOS apps. When submitting to the App Store, this bundle must match the bundle for the app information you created in iTunes Connect.
UI Compatibility Mode: iOS 26 introduced Liquid Glass which changes the look and feel of many user interface elements including most of the controls. Your project will take on the appropriate look and feel of the version of iOS upon which it is running. If you have not yet taken the time to make sure your controls look appropriate with Liquid Glass and iOS 26, you can turn on the UI Compatibility Mode setting in Build Settings > iOS. This will result in all versions of iOS having the same look and feel.
Minimum Version: This is the minimum version of iOS upon which your app will run.
Team: This is the Team to use for certificates when code signing the iOS app. You have to code sign the app before it can be installed to a device or submitted to the App Store.
Build For: This allows you to indicate how the app will be deployed so that Xojo can output the appropriate format (Development, App Store or Enterprise).
Property List: Display the Property List Editor.
Category: The appropriate category for your app when submitting to the iOS App Store.
Setup: Displays the App-Specific Password Setup dialog box for connecting to the App Store.
Tip
Choosing Build For > App Store, will cause Xojo to create a signed package file that can be submitted to the App Store using iTunes Connect and Xcode's Application Loader. You can access this property from IDE Scripting using the name "BuildForAppStore".
Entitlements and additional information
By clicking on the Advanced (Gear) tab in the Inspector you can set the Entitlements for your iOS app. You can specify your own Info.plist that is configured with the entitlements you need or you can turn the invidividual entitlements on using the Inspector properties. Some entitlements have additional settings you will need to make by clicking on the Options button next to the entitlement. Note that turning on an entitlement does not enable features in your app, it only requests permission (from iOS) for your iOS app to make use of the features. Do not enable entitlements for features that your app does not use or your app will likely be rejected when submitted to the App Store. Refer to Apple's Entitlements docs for more information.
Type |
Description |
|---|---|
App Groups |
Allows you to define the app groups your app of which your application is a part. All apps in the same group produced by a single development team can access shared containers and communicate using IPC. Apps may belong to one or more app groups. More information is available in Apple's documentation. The Xojo IDE will automatically add the group. prefix if you don't supply it yourself. |
Apple Pay |
A list of merchant IDs for which your app can accept Apple Pay payments. These are typically in reverse domain notation, starting with the string merchant. For example merchant.com.yourcompany. More information is available in Apple's documentation. |
Associated Domains |
A list of domains for specific services, such as shared web credentials, universal links and App Clips. The domains have the format <service>:<fully qualified domain> with the services being one of:
More information is available in Apple's documentation. |
Background Modes |
These are services provided by your app which require it to run in the background. The modes are:
|
Camera Access |
Allows you to add a message indicating why your app needs access to the user's camera. This is used with the Image Picker control. |
Custom URL Schemes |
Allows you to specify one or more URL schemes to which your app can respond. URLs are received by your app in the App.HandleURL event. |
Data Protection |
Allows your app to protect specific files using the built-in encryption available on some devices. When your applications designates a specific file as protected, the system stores that file on-disk in an encrypted format. For use with Declares. |
File Sharing |
Indicates whether your app shares its Documents folder through iTunes. |
Game Center |
For gaming apps, this allows players to connect to the Game Center service, enabling them to interact with their friends, view leader boards, or play head to head in your game. Note: Toggling this switch also indicates that the device must be capable of running GameKit. |
HealthKit |
Allows your app, with user permission, to store and retrieve personal health information. |
HomeKit |
Allows your app to interact with HomeKit accessories and create home configurations. |
iCloud |
Enables your app to store data and documents in iCloud. |
Inter-App Audio |
Allows your app to send audio and to receive audio from other inter-app audio-enabled apps. Note: This was deprecated by Apple in iOS 13. |
Keychain Sharing |
Allows your app to share passwords from its keychain with other applications made by your team. |
Location |
Allows you to add messages that will be displayed when asking users for access to their location. There is one message each for When In Use and Always. |
Maps |
Allows your routing app to indicate that it can provide specific directions beyond what the Maps app supports by default. The Uber app is an excellent example of an app that would need to provide this information. |
Personal VPN |
Allows your app to create and control a custom system VPN configuration. |
Photos Access |
Allows you to add a message indicating why your app needs access to the user's Photo Library. This is used with the Image Picker control. |
Push Notifications |
Specifies whether the device should use the development or production Apple Push Notification service when registering for push notifications. Xojo will automatically set this value based on whether or not you are building for the App Store. This works with Xojo's NotificationCenter class. |
Shortcut Items |
Allows you to specify the default set of shortcut items. The editor accepts a comma delimited list of SFSymbols, UIApplicationShortcutIconTypes and/or images from your project. |
User Authentication |
Allows your app to use Touch ID/Face ID. Enable this when using Xojo's UserAuthentication class. |
Wallet |
Allows your app to add items to and delete items from the Wallet. |
Wireless Accessories |
Allows your app to configure MFi Wi-Fi accessories which are devices compatible with HomeKit, AirPlay Audio, Find My and CarPlay. |
Build folder names
Type |
Architecture |
Folder Name |
|---|---|---|
Build |
ARM |
iOS |
Debug |
ARM |
iOS Simulator |
iOS app deployment
Refer to this topic for an overview of the various ways that you can deploy iOS apps:
See also
MobileApplication class; Mobile Screens, iOS Deployment Overview topics