Desktop your macOS app yourself
Signing
What you need to do to prepare your app for deployment depends on who will be using it: just you, others you know personally or the general public.
Yourself only
If the app you build will only be used on your own Mac, you can simply press the Build button and use the built app.
Others you know personally
If you are going to distribute the app to others you know personally (friends, family or colleagues), there are two options:
Require that the user give the app permission to launch
Protect your app app from malware and modification
Keeping your user interface consistent between versions of macOS
macOS 26 Tahoe introduced Liquid Glass which changes the look and feel of many user interface elements including most of the controls. Your project will take on the appropriate look and feel of the version of macOS upon which it is running. If you have not yet taken the time to make sure your controls look appropriate with Liquid Glass and macOS 26 Tahoe, you can turn on the UI Compatibility Mode setting in Build Settings > macOS. This will result in all versions of macOS having the same look and feel.
Require the user to give the app permission to launch
If you do nothing and the user of your app is running macOS 15 or later, when they launch your app, they will be told that it cannot be opened because Apple could not verify that it's free of malware. In this case, the user can give macOS permission to launch the app by doing the following:
Open Settings.
Choose Privacy & Security.
Find the message "appname" was blocked to protect your Mac.
Click the Open Anyway button.
When the confirmation dialog box appears, click the Open Anyway button.
Assuming they have administrative access, use Touch ID to authenticate or click the Use Password button to enter your username and password.
Once they complete these steps, the app will launch. However, they will need to go through these steps every time you send them an update.
Protecting your app from malware and modification
To avoid other users having to explicitly give your app permission to run, Apple requires that you sign your app so that they and the user can identify you as the developer and take steps to protect your app against malware and modification (which could be another form of malware). This is done in five steps. Fortunately two of these steps only ever have to be done once and the other three are very simple:
Downloading your Apple Mac development certificates
The first step is to get your Apple Mac Development Certificate. This is used to identify you as the developer of the app. Fortunately this is a one-time process.
To notarize your app, Apple requires that you have an Apple Developer account. You can get such an account at Apple's developer website. Apple charges $99USD per year for this.
This process, once completely, will allow you to complete the process Apple requires for any macOS app you make with just a single click in Xojo. To download your Apple Mac Development Certificate:
Log in to Apple's developer website.
In the Program resources pane, find the Certificates, IDs and Profiles section. If this does not appear, it's because you have not yet paid Apple the yearly developer fee.
In that section, click on Certificates.
On the Certificates page, click on the row that has your name in the Name column and Development in the Type column.
Click the Download button. Your Mac Development Certificate is downloaded to your Mac.
Look in your Downloads folder for a file with the name development.cer and double-click it.
This will launch the Keychain Access app. You may need to authenticate in order to open it.
In the side panel under Default Keychains, click on Login.
In the main panel, click on My Certificates.
In the list of certificates that appears, click to select the the one whose name beings with Developer ID Application:.
You have successfully downloaded our Apple Mac Development Certificate.
Getting your App-Password
Later on in the process you will need a password from Apple so that Xojo can connect to Apple's servers. This is the second of the one-time processes. Once you have this app-password, you should never need to access it again. It will be used for all of the Xojo apps you build and sign. To get this password:
Go to Apple's developer support page for specific instructions on how to get your app-specific password.
Follow those instructions. When you have your app-specific password, copy it to the Clipboard and return to Xojo.
Paste this somewhere for now so you'll have it when you need it. Again, you'll only need it once.
Signing your app
Apple requires that the it be possible to identify the developer that created an app. You do this by digital signing your app. To sign an app:
Open the Keychain Access app.
In the side panel under Default Keychains, click on login to select it.
In the main panel, click on My Certificates.
In the list of certificates that appears, click to select the the one whose name beings with Developer ID Application:.
In the pane above the list that now displays the information about the selected certificate, select all of the text of the first line that begins with Developer ID Application:. Make sure you select all the way through the closing parenthesis.
Copy this text to the Clipboard.
In your Xojo project, in the Navigator, go to Build Settings.
Open the Mac build item and click on Sign to select it.
In the Inspector, Paste the text you copied into the Developer ID field.
When you build your app, it will now be signed with your Apple Developer ID.
Protecting your app from malware
When your app is running, it is possible for malware already on the computer to attempt to breach the memory in which the app is running and make changes. To project against this, by default macOS gives your app has no external access. This means you can't read and/or write files, access the network, the camera, etc. You then indicate what external access your app needs so that it can unlock just those parts. This access permission is done when you build your app. To add access permission:
In your Xojo project, in the Navigator, go to Build Settings.
Open the Mac build item and click on Sign to select it.
In the Inspector, click the switch next to Hardened Runtime to enable it.
Click the Edit button. The Hardened Runtime dialog box appears.
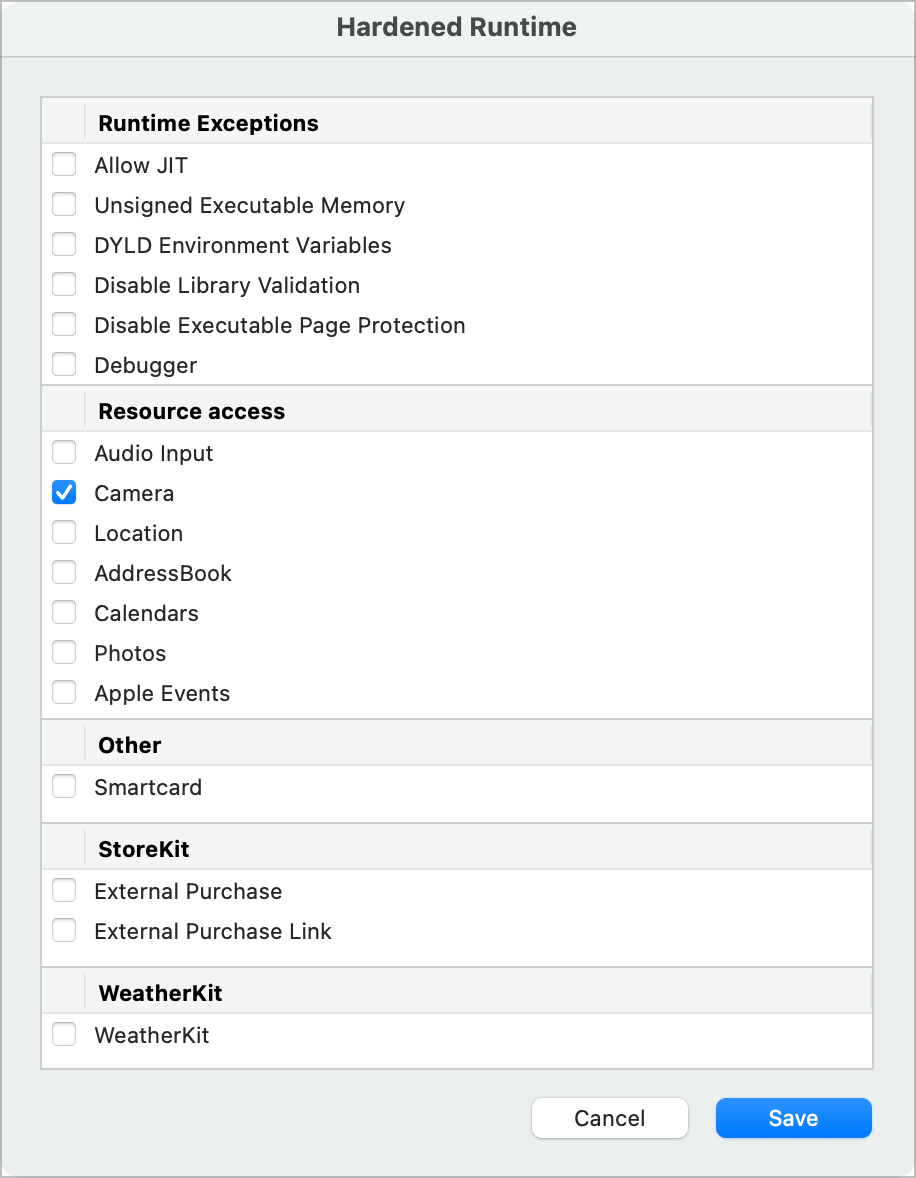
Click the checkboxes for anything that your app may require. It's rare that you will need to select any of these but you need the Hardened Runtime option turned on so that macOS will prevent malware from attempting to access your app through these external access points.
Click the Save button.
Protecting your app from modification
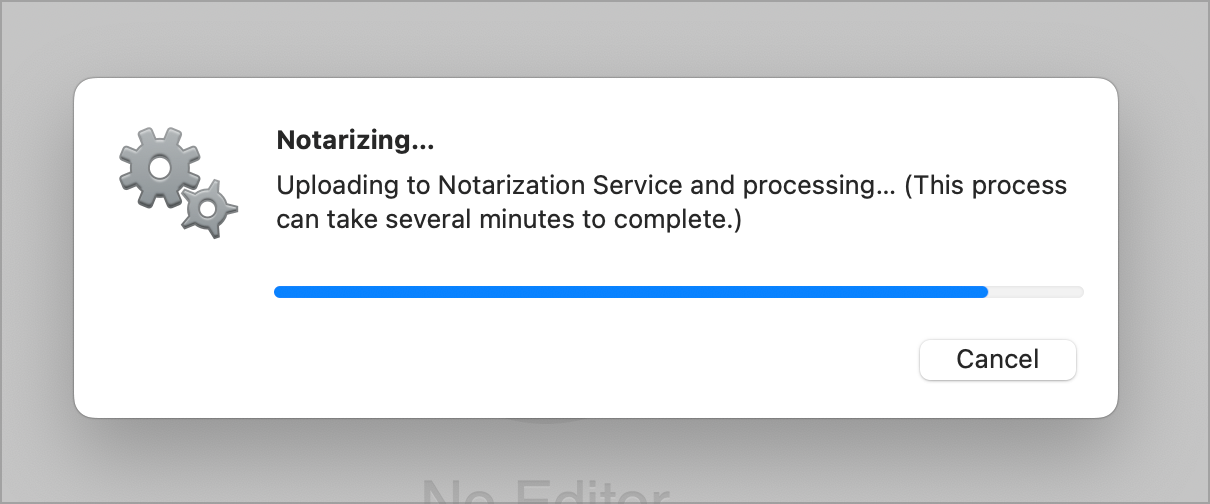
Another form of protection against malware that Apple requires is that you notarize your app. By doing so your app is submitted electronically from Xojo to Apple where it is scanned for malware. This part of the build process can take a few minutes depending on the size of your app and your Internet connection. This step also will prevent the app from launching in the future if it is every modified after being built.
Now that you have an Apple Development Certificate, the actual process of notarizing your Xojo app is easy:
In your Xojo project, in the Navigator, go to Build Settings.
Open the Mac build item and click on Sign to select it.
In the Inspector, in the Developer ID field, copy the 10 digit alphanumeric string between the parenetheses to the Clipboard.
In the Inspector, click the switch next to Notarization to enable it.
Click the Setup button. The Notarize App-Password dialog box appears.
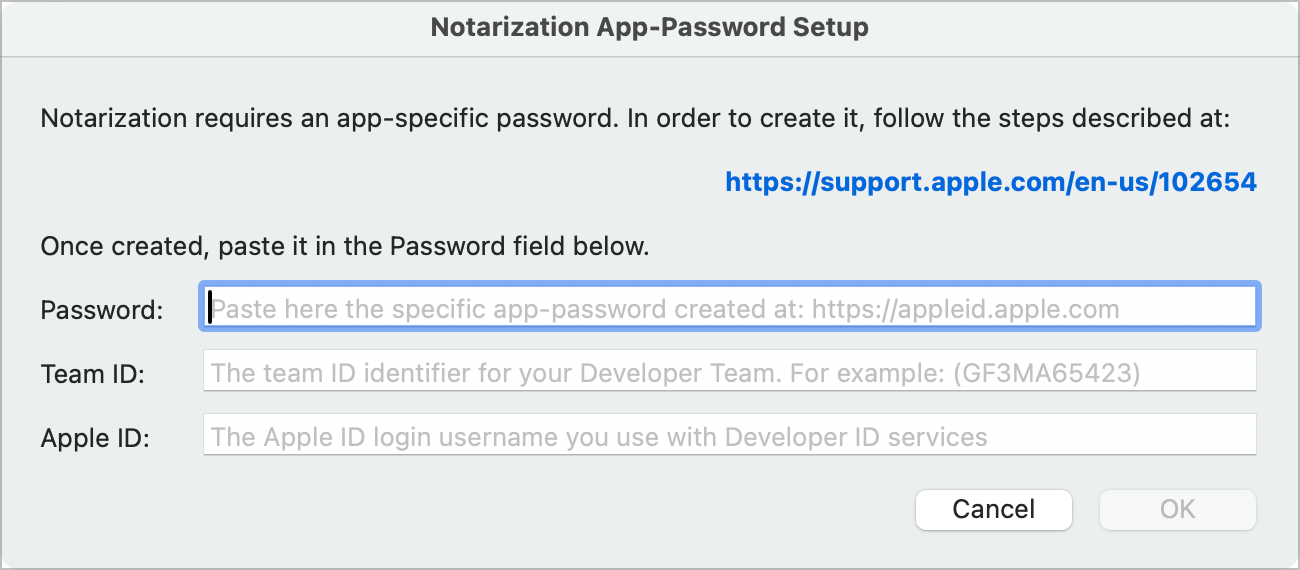
Paste the Developer ID you copied to the Clipboard into the Team ID field.
Copy your app-password from the Apple webpage or from where you store it into the Password field.
Last but not least, enter your Apple ID into the Apple ID field.
Click the OK button.
Simple steps for building your Mac apps
Now that you have completed the one-time setup, building signed and protected apps you can distribute will be simple:
In your Xojo project, in the Navigator, go to Build Settings.
Open the Mac build item and click on Sign to select it.
Paste in your Developer ID into the Developer ID field.
Switch on Hardened Runtime.
If necessary, click the Edit button and select any options that apply to your app if any then click the Save button.
Switch on Notarization.
Once you have done these 6 steps for a project, the information is saved for that project. You will not have to repeat them for this project again.
With Notarization enabled, when Xojo is done building your app, it will send it to Apple so that it can do its requires checks. The Xojo IDE will indicate it is doing this during the build process.
Important
You only need Hardened Runtime and Notarization enabled for builds you are going to send out to end users. You can save yourself time when building by disabling these options when doing your own testing.
The general public
Apps you distribute to the public (whether through your own website, services like DropBox and iCloud or through the Mac App Store) must be signed, the Hardened Runtime options must be selected and the app must be notarized. Under the presumption that you have been through the processes documented above before, to prepare a project to be built for distribution, complete the simple steps for building your Mac apps above.
Distributing your app through the Mac App Store
If you choose to distribute your app through the Mac App Store, there's one extra step you will need to take to make it secure enough for Apple to accept it. You need to set sandbox the app.
Sandboxing means that the app will have no access to the outside world unless you specific request it. To sandbox your app:
In your Xojo project, in the Navigator, go to Build Settings.
Open the Mac build item and click on Sign to select it.
In the Inspector, switch on Sandboxing.
Click the Edit button. The Sandboxing dialog box appears.
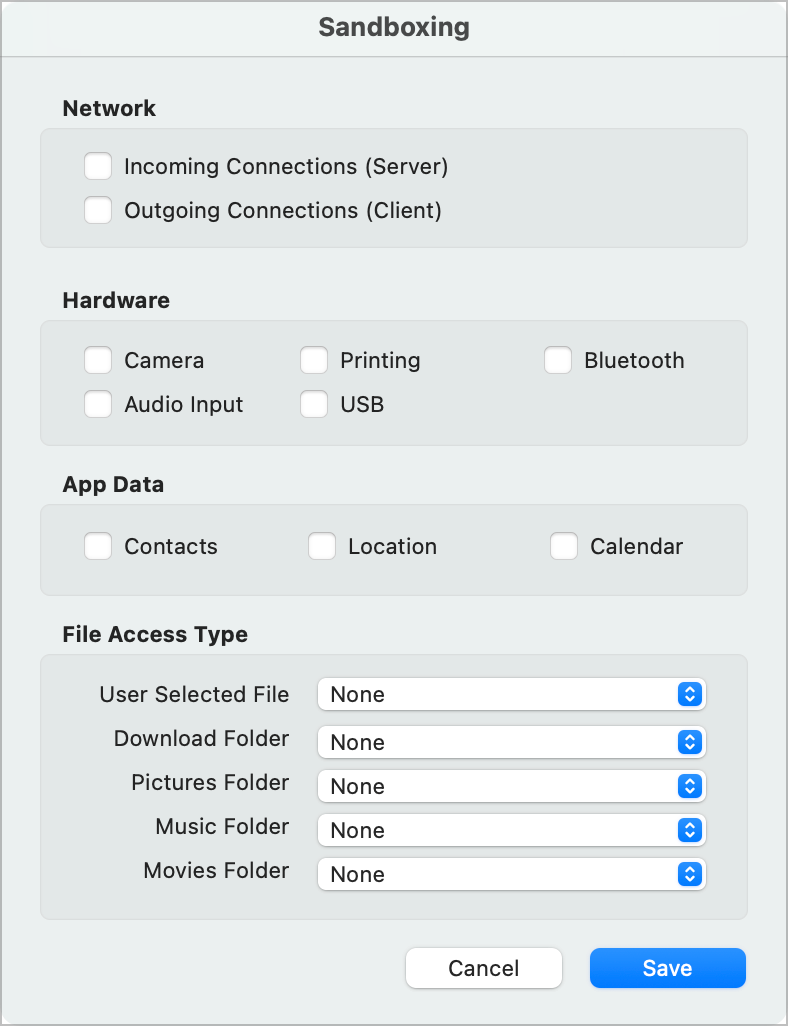
Select any options that represent parts of the OS your app is using then click the Save button.
Note
Should you select a sandboxing option that has a matching option in the Harden Runtime dialog box (Audio Input, Calendar, Camera, Location or Photos), the matching option will be selected for you automatically.
Below is a guide to the Xojo classes that relate to the various sandboxing options.
Sandboxing Option |
Related Xojo Classes |
|---|---|
Incoming Connections (Server) |
|
Outgoing Connections (Client) |
|
Camera |
|
Printing |
|
Bluetooth |
|
Audio Input |
|
USB |
|
Contacts |
|
Location |
|
Calendar |
|
User Selected File |
|
Download Folder |
|
Pictures Folder |
|
Music Folder |
|
Movies Folder |
Important
Make sure to consider any plugins you are using or declares you are making as they may require access to be granted as well.
Notes
User entitlements
The User Entitlements item allows you to add any additional entitlements your app requires that are not listed in the Harden Runtime dialog box.
File formats when distributing apps yourself
To distribute it yourself, you will first need to put it in an easily downloadable form (zip file, disk image or installer) and then make it available from a website or server such as DropBox or iCloud.
Zip file
A Zip file is an archive of your app. A zip is easy to download and most users understand what they are. They can usually be unzipped by double-clicking on them, which reveals the app itself. The app can then be manually copied to the Applications folder.
You can create a Zip by right-clicking on your app in the Finder and selecting Compress.
Disk image (DMG)
A disk image is a file that simulates a disk or drive. After downloading the file (and double-clicking it), it appears in the sidebar of the Finder as a drive. This is called “mounting” the disk image. When the user clicks on the drive in the Finder sidebar, they see your app and typically drag it to the Applications folder to install it.
To create a disk image, you can use the Disk Utility app included with macOS or try one of the many specialized disk image creation tools such as DMG Canvas.
A disk image is probably the most common way to install Mac apps, but keep in mind that some users (especially those new to Mac) may find the concept of mounting a drive and dragging a file to the Applications folder very confusing.
Also consider that if the user mistakenly tries to run the app directly from the disk image, it may not behave as expected because the disk image is read-only.
Installer
You can also use an actual installer to install a Mac app, but it is not common for apps distributed outside the Mac App Store. To create an installer you can use the PackageMaker tool (included with the Mac Development tools) or you can use the free Packages installer.
An installer gives you more control over permissions and other settings, but they can be much more difficult to create than a simple disk image. Also, remember that an installer on Mac (a pkg file) is actually a bundle so you also have to distribute it in a disk image or a Zip.
Mac application structure
Generally, Mac apps consist of a single App file, called the Application Bundle. You can embed other files into the Application Bundle because it is technically a folder that macOS treats as a file. In Finder, you can right-click on any App and select “Show Package Contents” to see the actual contents of the Application Bundle as a folder.
Of course, your app can still have separate files not in the Bundle, in which case you want to make sure that your app is in a folder of its own.
Since apps are technically a folder, you have to include them in some sort of container in order to distribute them, such as disk images (DMG), installers and even simple Zip files.
Important
If you choose to do this, remember that if you are going to be signing the app, you will need to use a Build Step to copy the files into the Application Bundle before it's signed.
Validating the Apple ID
If you are selling your app, you may want to prevent users from copying the purchased app to another computer and running it there (without having to log into their Apple ID). To do this you also need to verify the Apple ID.
Verifying an AppleID requires calling a Cocoa API. The code is far too involved to include here, but the open-source MacOSLib project has classes that you can use for this.