Modules
A module is a collection of project items, usually methods, properties and constants. But a module can also contain other project items such as classes or even other modules. In fact, modules can pretty much contain anything except layouts such as Windows, Web Pages, Views and Container Controls.
When to use a module
In general, modules should be used sparingly in an object-oriented language such as Xojo. In most cases, you will probably be better served by a class.
With that said, here are some common (and valid) uses for modules:
Global constants, particularly for localization
Grouping project items into namespaces
Class extensions
Global properties, but these should be minimal to avoid tightly-coupled "spaghetti code"
Methods
Modules are covered here first since they are easier to use and learn and transition nicely to classes (which are covered in other topics).
In Web projects, module properties and methods are global across all sessions. If you want information to remain specific to a session, use the Session object.
Adding a module to your project
Add a new module to your project by clicking the Insert button on the toolbar and selecting Module (or by using the menu Insert > Module or the contextual menu). The new module appears in the Navigator with a default name (the first module you add will be named Module1, for example). Use the Inspector to rename the module to something more appropriate. For example, if the module contains financial functions, you might name it Financial. You edit modules with the Code Editor: click the module's name in the Navigator. Modules are identified by a "globe" icon in the Navigator.
Modules primarily contain properties, methods and constants so those are covered first.
Adding properties
Properties are variables that belong to the entire module rather than a single method.
There are several way to add a property to a module:
Insert button on the main toolbar
Add button on the Code Editor toolbar
Insert > Property from the menu
The contextual menu
Keyboard shortcut (Option Command P on MacOS or Ctrl Shift P on Windows and Linux)
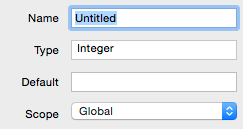
You can set the property Name, Type, Default value and Scope using the fields in the Inspector.
To quickly create a property, you can enter both its name and type on one line in the Name field like this: PropertyName As DataType. When you leave the field (or press return), the type will be set in the Type field.
You can also add computed properties to modules.
Adding methods
Methods are discussed in the Methods topic.
There are several ways to add a method to a module:
Insert button on the main toolbar
Add button on the Code Editor toolbar
Insert > Method from the menu
The contextual menu
Keyboard shortcut (Option Command M on MacOS or Ctrl Shift M on Windows and Linux)
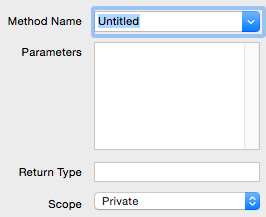
You can set the Method Name, Parameters, Return Type and Scope using the Inspector. The method code is typed in the Code Editor.
Adding constants
Constants added to a module work like constants added to a method except they are accessible anywhere in the module and possibly also available to code not in the module as well (depending on the scope).
There are several ways to add a constant to a module, which all display the Constant Editor:
Insert button on the main toolbar
Add button on the Code Editor toolbar
Insert > Method from the menu
The contextual menu
Keyboard shortcut Option Command C on MacOS or Ctrl Shift C on Windows and Linux)
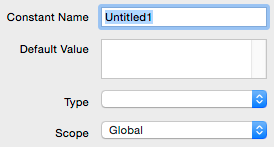
You can set the Constant Name, Default Value, Type (Number, String, Boolean, Color, Text) and Scope using the Inspector. For the Default Value, Constants can be assigned only a literal value, another constant value or the result of a constant expression.
Constants of type String or Text can also be set to Dynamic. A dynamic constant can have values that are specific to an OS or language and is referred to as a Localized String. For more about this, refer to the Localization topic.
Adding other items
You can also add other items to a module, including: Enumerations, External Method, Note, Structure, Using Clause.
Enumeration
An Enumeration is a data type consisting of a set of named values.
External Method
Add a reference to an external method (also called a Declare), which can be a method on a DLL (on Windows), a dylib (on macOS) or a shared library (on Linux).
Note
A Note is essentially a text field that is added to a project item. Use a Note to add comments, description or any other text to the module that is not part of the code. Think of a Note as a giant comment.
Structure
Adds a Structure, which is an advanced data type typically used with Declares.
Using Clause
Adds a Using statement that is applied to the entire module. For more about Using, see Namespaces below.
Scope of items
When you add an item to a module, you need to set its Scope using the Scope property in the Inspector. The Scope is also indicated in the Navigator. The Scope of an item determines its accessibility to other items in the project.
These are the choices:
Global
A Global item can be called from code anywhere in the project. For example, you can use a global property to store a piece of information that needs to be available from several different Windows (or Web Pages or Views). To reference a global item in your code, just use its name. Global can only be used for items added to a top-level module. If you add a global property called MyGlobalProperty As String, then you can refer to it any code just by its name:
Var value As String = MyGlobalProperty
Be careful of extensive use of global values. This can lead to error-prone code that is hard to debug. It would be better to at least use "Protected" module properties as shown below to make it easier to know the owner of the property and to allow auto-complete to be more useful.
Public
The Public scope can only be used for project items (such as classes) that are added to the module. These items are accessible by including the module name as the prefix (similar to Protected). For example if you have added Class1 to Module1 with a scope of Public you can access is like this:
Var c As New Module1.Class1
Protected
A Protected item (such as a property or method) can also be called from code anywhere in the project. To reference a Protected item in a module, you use "dot" notation and prefix it with the name of the module. For example, if in Module1 you declare a Protected property called MyProperty As String, then you call it like this in code outside of Module1:
Var value As String = Module1.MyProperty
For code within Module1 you can just refer to it using MyProperty.
Private
A Private item is available only within the module. It is inaccessible outside the module. To reference the Private item inside the module in which it was created, you use its name:
Var value As String = MyPrivateProperty
Extension methods
An extension method is a special method definition that can be called using syntax that indicates that it belongs to another object. For example, you can add a method that is called from any FolderItem object to save something in a particular format. After you add the class extension method to a module, you can call it as if it were built into the FolderItem class. Using these methods does require an understanding of Classes, which are covered in the Object-Oriented Programming topics.
This feature is useful when you would like to add a method to a class for which you do not have access to the source code. In particular, it allows you to add functionality to built-in framework classes.
To define a method as a class extension method, use the Extends keyword prior to the first parameter. The data type of the first parameter is the object type from which the method must be called. In other words, the use of the Extends keyword indicates that the parameter is to be used on the left side of the dot (".") operator in a calling statement. When you use the Extends keyword, you do not have to pass an object of that type to the method. You can add "normal" parameters to the parameter declaration that follow the Extends parameter.
The Extends keyword can be used only with Global methods that reside in modules.
Creating and Using an extension method
As an example, say you want to add a Clear method that can be called from a DesktopTextArea control to clear all its text. If you don't already have a module in your project, add one.
In the module, add a method and name it Clear. Its parameter is:
Extends ta As DesktopTextArea
And its code is:
ta.Text = ""
You can now call this method on any DesktopTextArea control in the project. For example, a button could have this code to clear TextArea1 on the Window:
TextArea1.Clear
Extension methods for for all classes, including the ones included with Xojo and any that you create.
Namespaces
Modules can also contain other project items, including classes, class interfaces and even other modules.
Modules cannot contain Windows, Web Pages, Mobile Screens or Containers.
When you add other project items to a module, you have created what is called a Namespace. A Namespace is a collection of (typically related) items. Some parts of the framework are included in a namespace, such as Introspection.
The Using statement
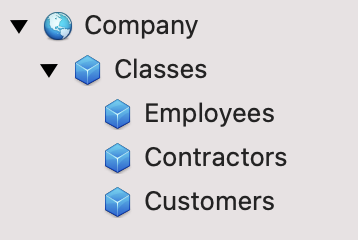
You can use the Using statement to avoid having to write the full namespace name each time you want to access an item within it. For example, you can write code like this to avoid having to use full dot notation to access classes within a module called Company in this case:
Using Company
Var e As New Employee // instead of Company.Employee
e.Name = "Tom Smith"
Alternatively, you can add a Using Clause to a module to apply a namespace to all the methods of the module. To do so, choose Insert > Using Clause and enter the namespace name in the Inspector field.