ODBC
ODBC
ODBC (Open Database Connectivity) is a database driver standard available on Windows, Mac and Linux. Using the ODBC plugin you can connect to any database for which you have an ODBC driver. ODBC drivers are available for almost any database. To use ODBC, you need to copy/move the ODBCPlugin file from the Extras > Database Plugin Resources folder to the Plugins folder.
You can use ODBC with Desktop, Web and Console projects.
Note
Connecting from a mobile app is not supported as holding a connection open is generally not supported by iOS itself due to the constant energy usage that would produce.
ODBC can be a great way to connect to databases that do not have a built-in Xojo database class, such as:
Firebird
IBM iSeries / DB 2
Connecting to a Database using ODBC
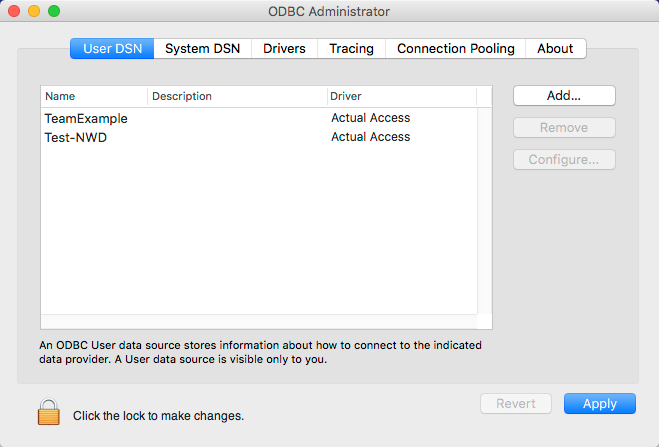
How you connect to an ODBC database depends on the database you are using. The first thing you need to do is configure the ODBC driver using the appropriate ODBC configuration tool for your operating system. On Windows you use the ODBC Data Source Administrator in the Control Panel or Settings. On Mac, you use the ODBC Administrator app in the Application/Utilities folder. In this tool you install the ODBC driver and enter the necessary credentials to connect to the database.
On Linux, you may have to edit configuration files. Consulting the docs for your Linux distribution.
This results in a DSN (Data Source Name). You can use the DSN to connect to the database in conjunction with the ODBCDatabase class in two ways. You can have your app prompt the user to choose a DSN using the operating system browser for selecting a DSN or you can supply the name of the DSN manually. This code supplies a blank DataSource property, which prompts the user for the DSN using the system dialog:
Var db As New ODBCDatabase
db.DataSource = ""
Try
  db.Connect
  ' Use the database
Catch error As DatabaseException
  ' Connection error
  ' or the user selected
  ' Cancel from the ODBC browser
End Try
Alternatively, you can provide a DSN name and supply credentials. This example uses the existing TestDSN to connect to the database:
Var db As New ODBCDatabase
db.DataSource = "TestDSN"
db.UserName = "broberts"
db.Password = "streborb"
Try
  db.Connect
  ' Use the database
Catch error As DatabaseException
  ' Connection error
End Try
Lastly, if you know the precise format used by the ODBC driver, you can create the DSN manually:
Var db As New ODBCDatabase
db.DataSource = "DSN=TestDSN;UID=broberts;PWD=streborb"

Try
  db.Connect
  ' Use the database
Catch error As DatabaseException
  ' Connection error
End Try
Sources for ODBC drivers
Before you can connect to any database using ODBC, you will need to obtain an ODBC driver. Many database vendors make ODBC drivers available for free. Other sources include:
Using Firebird
Firebird is a completely free (cost and license), cross-platform database with some interesting features.
Although Xojo does not have a native plugin for connecting to Firebird, you can use the ODBC plugin in conjunction with the Firebird ODBC drivers to use Firebird with Xojo.
Firebird can be used two ways, as a database server or as an embedded database. This shows you how to use both using Firebird running on Windows.
Connect to the server
Once you download and install Firebird (which should only take about a minute on Windows 10 using the default settings), you can then get the ODBC drivers, which have to be downloaded separately. Note, there are only ODBC drivers available for Windows and Linux on the Firebird site. You can find updated drivers (not free, but they have a 30-day trial), including ones for Mac from devart.
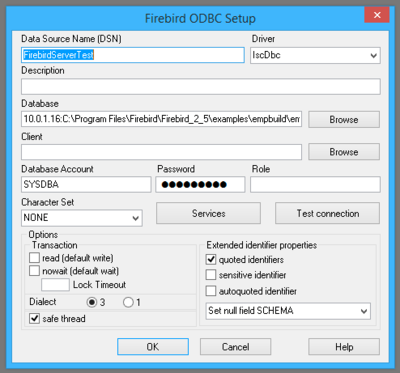
After installing the ODBC drivers, you can go to the ODBC Control Panel and add a data source by selecting the Firebird/Interbase driver from the list.
For the DSN name, use “FirebirdServerTest”.
Use this value for the Database property:
10.0.1.16:C:Program FilesFirebirdFirebird_2_5examplesempbuildemployee.fdb
Use “SYSDBA” for the Database Account and “masterkey” as the password. You don't need to change any other settings.
Use the “Test connection” button in the window to verify that you can connect.
Connect directly to a database file
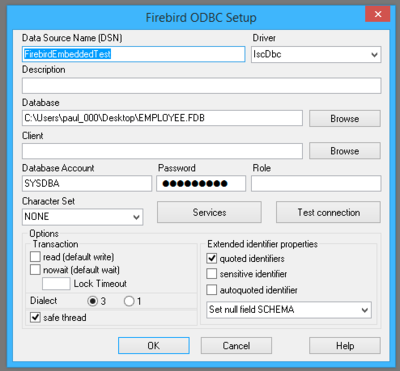
If you did not already install the ODBC drivers from above, you will need to do so now. After installing the ODBC drivers, you can go to the ODBC Control Panel and add a data source by selecting the Firebird/Interbase driver from the list.
For the DSN name, use “FirebirdEmbeddedTest”.
Firebird includes a sample database, which should be located here:
C:\Program Files\Firebird\Firebird_3_0\examples\empbuild\EMPLOYEE.FDB
Copy this file to the Desktop. Use “SYSDBA” for the Database Account and “masterkey” as the password. Click the “Test Connection” button to verify that everything is correct. If so, you are now ready to connect using Xojo.
Connecting using Xojo
Now that you have created your ODBC DSN entries, you can use this with the Xojo ODBC plugin to connect to the database. The code to do this is similar to most Xojo database code. I 'm going to have a single method that is used to connect using the specified DSN. This method is called ConnectToFirebird(dsn As String):
Var db As New ODBCDatabase
db.DataSource = dsn

Try
  db.Connect
  ListBox1.RemoveAllRows
  Var SQL As String = "SELECT emp_no, full_name, job_code, job_country FROM employee;"
  Var rs As RowSet
  rs = db.SelectSQL(SQL)

  If rs <> Nil Then
    For Each row As DatabaseRow In rs
      ListBox1.AddRow(rs.Colum("full_name").StringValue)
    Next
   rs.Close
  End If
Catch error As DatabaseException
  ' a database error occurred
End Try
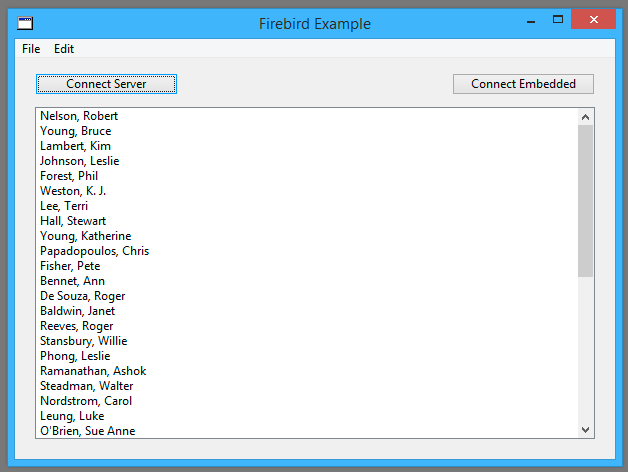
This method connects to the sample database and adds all the names in the employee table to a ListBox. You can call this method and supply the name of the DSN to use to connect.
Add a button to test the embedded connection and add this code to its Pressed event handler:
ConnectToFirebird("FirebirdEmbeddedTest")
Now add a button to test the server connection and add this code to its Pressed event handler:
ConnectToFirebird("FirebirdServerTest")
Run the app and click the buttons to see the ListBox get populated.
Learning more
Now that you know how to use Firebird, you can spend some time with its documentation to learn more about it.
See also
ODBCDatabase, ODBCPreparedStatement classes; ODBCConstant module