Introduction
Web apps have a graphical user interface that runs inside a web browser and a companion server app that runs on (or as) a web server. You can also create web apps that function as web services by utilizing the HandleURL event on the App object.
Web project overview
When you create a web project, you get the following project items added automatically:
App: The App object allows you to specify some initial app settings, including
Session: Each user that connects to the web app gets its own Session instance. Use the Session object to save information that is specific to the user/session and to access session-specific information.
WebPage1: This is the main window layout where you place your controls. You can add your own web pages as well.
App Object
For a web project, the App object is a subclass of WebApplication. You use it to specify the default web page that opens when your app starts and a session connects, default messages, HTMLHeader and the app icon (in various sizes).
Event Handlers
The WebApplication class for a web app has event handlers. They are:
Closed: The Closed event is called when the app quits.
HandleURL: This event fires when an http request comes to your app which would otherwise result in a 404 Page Missing response.
Opening: This event handler is called when your app first starts.
UnhandledException: Called when a runtime error occurs that is not caught by your code. This event gives you a “last chance” to catch runtime errors before they cause your app to quit.
Properties
DefaultPage: This is the web page that is displayed automatically when the app starts.
HTMLHeader: Can be used to add static HTML code to each page.
Icon: This opens the Icon Editor and lets you specify the various size icons that are used by the app. These icons are used by the loading screen and as the browser favicon. This is a design-time-only property.
Session Object
The Session object is a subclass of WebSession. Each user session gets its own instance of the Session object that you can access using the Session method.
Event Handlers
The WebSession class has event handlers. They are:
Closing: The session is ending usually because the user closed the page.
Opening: A new session has been created due to a user accessing the application.
UserDisconnected: The user has closed the browse window that was displaying the application.
You can find all of the events on the WebSession page.
Properties
ConfirmDisconnectMessage: The message the user will see when they attempt to disconnect from the app usually by closing the tab or window in their browser.
Cookies: The cookies associated with this session.
CurrentPage: The web page the user has displayed in the browser in this session.
You can find all of the properties on the WebSession page.
Design considerations
Keep these things in mind when designing and developing your web apps.
Client/Server
All web apps use a client/server design. This means that a web app has two parts: the client user interface and the app that runs on the server. The client is the part that the user interacts with. For a web app, this is the user interface that runs in a web browser. Web apps support recent versions of modern web browsers such as Safari, Chrome, Firefox and Internet Explorer.
The app is where your Xojo code runs and it is typically run on a server. The client and the web app components can reside on the same computer, but they are usually different computers: the user's computer for the web browser/user interface and a server that is running the app.
Latency
When you are testing your web apps locally, both the client (web browser) and server (app) are running on your computer. This means that communication between them is quick. But when you deploy an app to a web server, there can be a longer delay as the web browser has to communicate across the Internet to the app on the server. This delay is called latency and has a lot of factors, including the speed of the user's Internet connection, general Internet congestion and the responsiveness of the server.
It is important when designing your app to keep latency in mind, by not designing your UI as if it expects fast (desktop-like) responsiveness.
Multiple users and sessions
A web app typically has multiple users connected to it at one time. This is handled for you using a concept called Sessions. The Session object is a subclass of WebSession and is automatically added to all web projects. Each user that connects to your web app gets its own Session subclass that you can access using the Session global function.
Use the Session object to store information that is global to the connected session, but not global to the overall app.
Build Settings
The Build Settings section of the Navigator contains the build-specific settings for your app in general and for specific OS targets. You can check the box next to each target in order to build an app for that target. Web targets are: Windows, macOS and Linux.
Shared
The Inspector for Shared settings contains these properties:
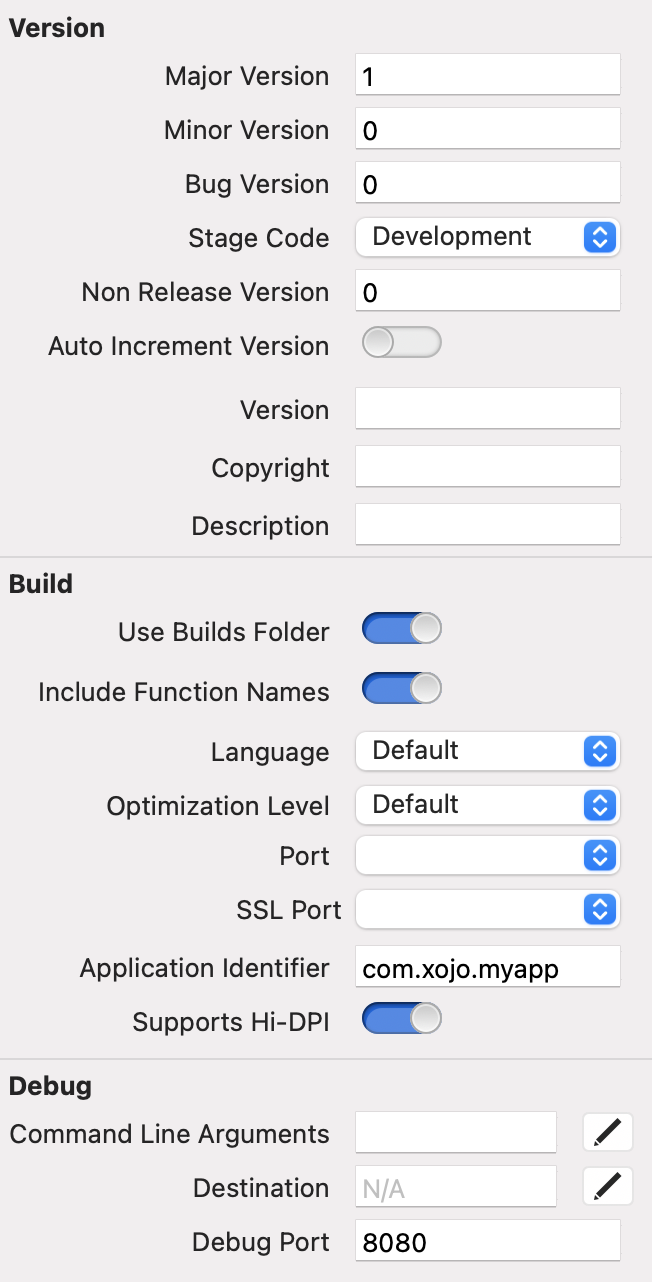
Major Version: The Major version for your app. Version numbers are usually written as 1.2.3.4, where “1” is the major version.
Minor Version: The Minor version for your app. Version numbers are usually written as 1.2.3.4, where “2” is the minor version.
Bug Version: The Bug version for your app. Version numbers are usually written as 1.2.3.4, where “3” is the bug version.
Stage Code: Used to indicate the type of app you are building (Development, Alpha, Beta, Final).
Non Release Version: The Non Release (build) version for your app. Version numbers are usually written as 1.2.3.4, where “4” is the non release version.
Auto Increment Version Info: When ON, the Non Release Version increases by one each time you do a Build.
Version: A short text description for your app. Usually this contains just the version number (such as 1.2.3.4) and is displayed by some operating systems in Get Info or Property windows for the app.
Copyright: A longer text description for your app. Usually this contains the app name, copyright, version and other information. This is displayed by some operating systems in Get Info or Property windows for the app.
Description: A text description for your app that may be displayed by some operating systems in Get Info or Property windows for the app.
Use Builds Folder: When ON, builds are placed in a separate folder alongside the project file. Each platform (macOS, Windows, Linux) also gets its own subfolder within this builds folder.
Include Function Names: When ON, the actual names of your function calls are included in the built app. This is useful for debugging purposes and for getting stack traces.
Language: Allows you to specify the language to use to resolve dynamic constants.
Optimization: Used for all 64-bit builds and 32-bit ARM builds (those that use the LLVM compiler). There are these choices:
Default: Optimized for fast build times.
Moderate: A balance between build times and math-related code execution time.
Aggressive: Longer build times, but code is more optimized for faster math-related code execution time.
Port: Select a specific port to use to connect to the web app or let the web app choose the port automatically.
Application Identifier: This is an unique identifier for the web app. If you deploy multiple web apps on the same server, they must all have unique Application Identifiers.
Supports Hi-DPI: Set to ON to indicate that this app should be built with support for hi resolution dots per inch displays (HiDPI).
Command Line Arguments: These are the command-line arguments that are passed to your app when running it in Debug mode.
Destination: Specifies the path where the app is located when you run it in Debug mode. If not specified, then the app is placed alongside your project file.
Debug Port: This is the port that is used when running your web app in Debug mode. Note: If you ever have difficulty debugging your web app (such as it not starting), make sure the debug port is not in use by another app on the computer. When in doubt, change the Debug Port to another value.
Launch Browser: If set to ON, the your browser will open with the app in it when the project is run. Turning this setting OFF is useful when building web apps that have no webpages such as a REST API app.
Xojo Cloud
The Xojo Cloud section is used to deploy your web app to a Xojo Cloud server.
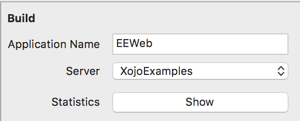
Application Name: The name of your web app. Your web app will be deployed into a folder with this name, which will be of the URL to the app.
Server: The Xojo Cloud server to which to deploy. You will need to have purchased a Xojo Cloud server and be logged in to your account in Xojo in order to see your servers.
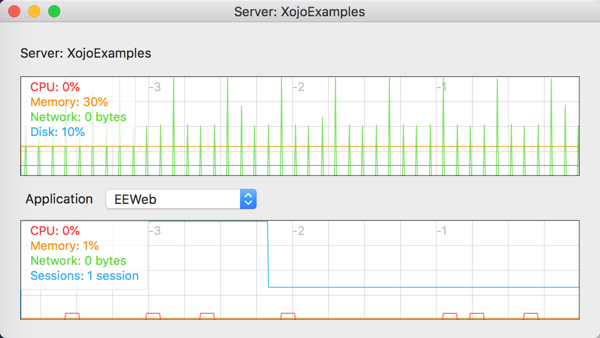
Statistics: Click the Show button to display a window of statistics for the entire server and individual apps that are installed on it.
Last URL: The previously assigned URL for accessing this app from a browser.
Domain Name: The full domain or subdomain used to access this app from a browser.
macOS
The macOS section allows you to specify settings for the macOS web app.
Mac App Name: The actual file name for the macOS app.
Architecture: The CPU architecture for the app. Choices are x86 64-bit, ARM 64-bit and Universal.
Bundle Identifier: This is the same as the Application Identifier.
Windows
The Windows section contains build settings for your Windows web apps.
Windows App Name: The actual file name for the Windows app.
Company Name: The “Company Name” appears in the Copyright section of the app properties in the Details tab.
Product Name: The name of the product as installed in the Windows Start > All Programs menu. This also appears in “Product name” on the app properties Details tab.
Internal Name: This is useful when your product has a different internal name than its external name. This is not shown on the app properties Details tab.
File Description: [TBD]
Include Windows Runtime DLLs: Copies the Universal Runtime DLLs beside your app executable. For more information, refer to Windows Universal Runtime.
Architecture: The CPU architecture for the app. Choices are x86 32-bit, x86 64-bit and ARM 64-bit. The default is x86 64-bit.
Linux
The Linux section contains build settings for your Linux web apps.
Linux App Name: The actual file name for the Linux app.
Architecture: The CPU architecture for the app. Choices are ARM 32-bit, x86 32-bit, x86 64-bit, ARM 64-bit.
Linux ARM apps run on the Raspberry Pi and other similar single-board computers.
Deployment
The easiest way to deploy your Xojo Web apps is to use Xojo Cloud. With Xojo Cloud, you can deploy your web app in a single step by clicking the Deploy button on the main toolbar. Xojo Cloud also adds many additional features which are covered here:
Should you prefer to deploy to your own servers, you can also do so as a standalone app. You create a build by clicking the Build button on the main toolbar or choosing Project > Build from the menu.
For more information about web app deployment: