Desktop apps
A desktop app has a graphical user interface (GUI) and are run directly on the user's computer.
Desktop project overview
When you create a desktop project, you get the following project items added automatically:
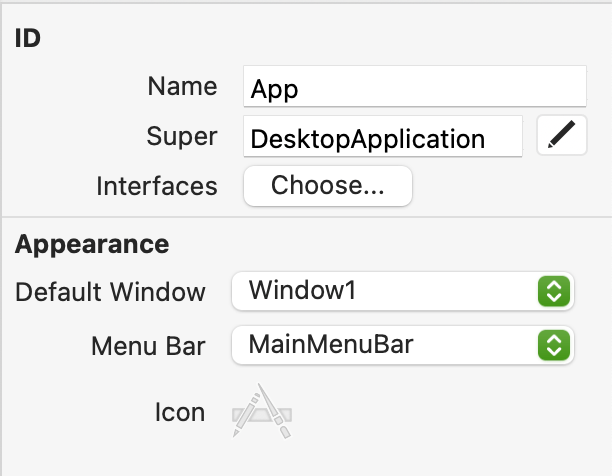
App: The App object allows you to specify some initial app settings, including the default window, default menu bar and app icons.
Window1: This is the main window layout where you place your controls.
MainMenuBar: This is the main menu bar. Most apps only have a single menu bar.
App Object
For a desktop project, the App object is a subclass of DesktopApplication. You use it to specify the default window that opens when your app starts, the default menu bar that is used by the app and the app icon (in various sizes).
The DefaultWindow property shows a list of all the Windows in the project. Select the one you want to automatically appear when the app starts. You can also set it to None so you can then show a specific window yourself from one of the App event handlers.
Event Handlers
The App object has several event handlers:
Opening: This event handler is called when your app first starts, either by running the app directly (in debug mode) or by running a built app.
Closing: The closing event is called when the user quits the app.
DocumentCreated: This event is called when the built app is run without supplying a document.
DocumentOpened: This event is called when one of the app's documents is double-clicked from the desktop causing the app to start. It is also called if you drop a document on the app.
MenuBarSelected: This event is called when the user clicks on a menu in the menu bar but before any menu items are displayed. This event handler executes after the MenuBarSelected event handler of any classes with instances in the frontmost window and after the window's MenuBarSelected event handler. This is the event handler that should be used to enable menu items that should be enabled regardless of whether there is a window open or not (this possibility exists on macOS apps). Note that if a menu item should always be enabled, you should use its AutoEnabled property instead of a MenuBarSelected event handler.
AppleEventReceived: Executes when an AppleEvent is received by the application.
Activated: The app is being activated. This occurs when the app is opening and when it is being brought to the front.
Deactivated: The app is being deactivated. This occurs when another app or a desktop window is being brought to the front or when the app quits.
UnhandledException: Called when a runtime error occurs that is not caught by your code. This event gives you a last chance to catch runtime errors before they cause your app to quit.
Properties
DefaultWindow: This is the window that is opened automatically when the app starts. You can also set this to None.
MenuBar: This is the primary menu bar for the app. It is used as the default menu bar for newly created windows. This property is accessible by the App function (see next topic). You can also set it to None so you can then show a specific window yourself from one of the App event handlers.
Icon: Click the icon image to display the App Icon Editor where you can specify the various sizes of icons used by the OS to display the app.
Build Settings
The Build Settings section of the Navigator contains the build-specific settings for your app in general and for specific OS targets. You can check the box next to each target in order to build an app for that target. Desktop targets are: Windows, macOS and Linux.
Note: Properties in this section that are accessible by the App function are in italics.
Shared
The Inspector for Shared settings contains these properties.
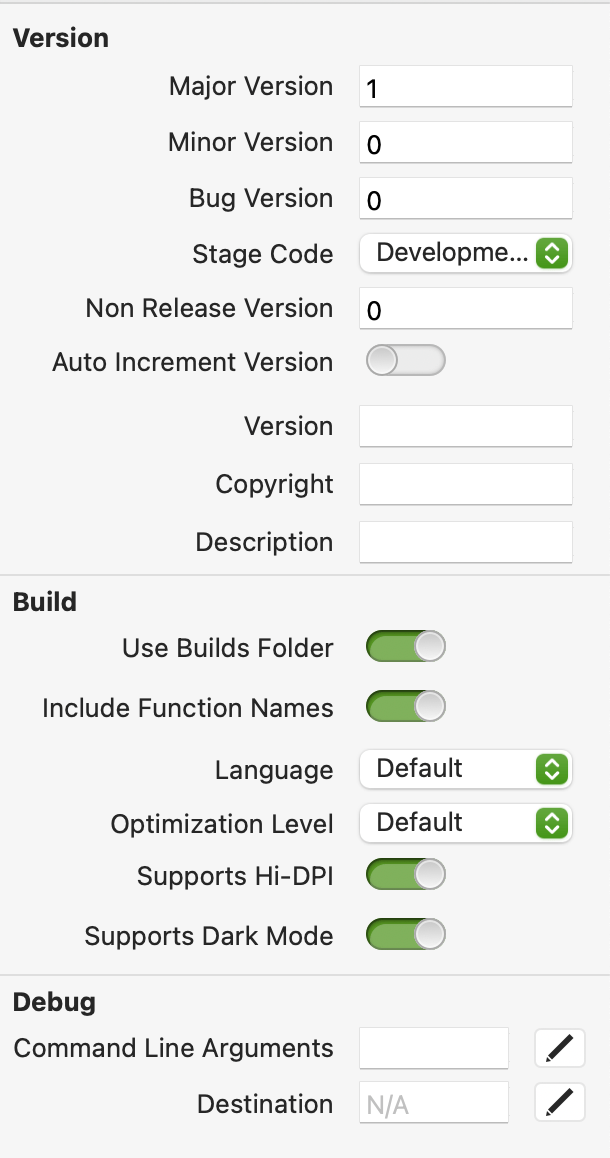
Version
Major Version (MajorVersion): The Major version for your app. Version numbers are usually written as 1.2.3.4, where “1” is the major version.
Minor Version (MinorVersion): The Minor version for your app. Version numbers are usually written as 1.2.3.4, where “2” is the minor version.
Bug Version (BugVersion): The Bug version for your app. Version numbers are usually written as 1.2.3.4, where “3” is the bug version.
Stage Code (StageCode): Used to indicate the type of app you are building (Development, Alpha, Beta, Final).
Non Release Version (NonReleaseVersion): The Non Release (build) version for your app. Version numbers are usually written as 1.2.3.4, where “4” is the non release version. Windows only allows a maximum value of 65535 for the Non Release Version. Entering a larger number will prevent your app from compiling.
Auto Increment Version: When ON, the Non Release Version is increased by one each time you do a Build (but not when you Run).
Version (Version): A short text description for the app. Usually this contains just the version number (such as 1.2.3.4) and is displayed by some operating systems in Get Info or Property windows for the app.
Copyright (Copyright): A longer text description for the app. Usually this contains the app name, copyright, version and other information. This is displayed by some operating systems in Get Info or Property windows for the app.
Description (Description): A text description for the app that may be displayed by some operating systems in Get Info or Property windows for the app.
Build
Use Builds Folder: When ON, a separate folder is placed alongside the project file. Each platform that is built (macOS, Windows, Linux) also gets its own subfolder within this build folder.
Include Function Names: When ON, the actual names of your function calls are embedded in the built app. This is useful for debugging purposes and for getting stack traces.
Language: The language to used to resolve dynamic constants. Use Localization preferences to change the order of the languages.
Optimization Level (OptimizationLevel): Used for 64-bit builds and 32-bit ARM builds/debug runs (those that use the LLVM compiler). Choices are:
Default (0): Fastest build times. This setting is recommended for most apps and should also be used when debugging.
Moderate (6): Math-related code runs faster, but builds take longer.
Aggressive (4): Math-related code is highly optimized for performance, but builds may take a significant amount of time.
Supports Hi-DPI: Set to ON to indicate that this app should be built with support for hi resolution dots per inch displays (HiDPI). Use the DesktopApplication.AllowHiDPI constant to check this in your code.
Supports Dark Mode: Set to ON to indicate that this app works with Dark Mode on macOS Mojave (and later) or Windows. This is ignored on Linux as the app will always take on the OS appearance. Use the AppSupportsDarkMode constant and the Color.IsDarkMode method to check this in your code.
Debug
Command Line Arguments: These are the command-line arguments that are passed to your app when you run it in Debug mode.
Destination: Specifies the path where the app is located when you run it in Debug mode. If not specified, then the app is placed alongside your project file (or in a folder alongside the project file on Windows and Linux).
Usage
You can access some of these properties in your code by referencing the name in italics as a property of the App object. For example, this gets the Major Version:
Var majorVer As String = App.MajorVersion
You can also access/change some of these properties in an IDE Script. This IDE Script code changes the Optimization Level to Moderate:
PropertyValue("App.OptimizationLevel") = "6"
macOS
The macOS section contains settings used when building the macOS app.
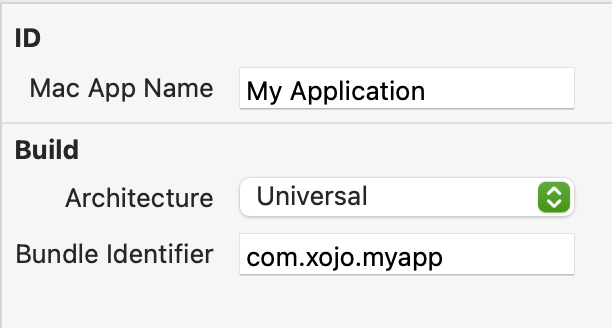
Mac App Name: The actual file name for your macOS app. If not specified, the ".app" suffix is automatically added when the app is built.
File Types: Opens the Accept File Types dialog used to specify the acceptable file types that the app supports. For each file type, you can specify its role as None, Viewer, Editor or Shell.
None: Your app cannot handle the file type.
Viewer: Your app can open and read the file type, but cannot save it.
Editor: Your app can open, read, edit and write using the file type. This is what you should normally choose.
Shell: Not documented by Apple.
Architecture: The CPU architecture for the app. Choices are x86 64-bit, ARM 64-bit and Universal.
Bundle Identifier: The bundle identifier is required by macOS and is used as a unique descriptor for your app. It is usually specified as a reverse domain name, such as com.xojo.myapp. This is added to the CFBundleIdentifier section of the app's plist.
Minimum Version - macOS: Indicates the minimum version of macOS required for the app to run. If the user attempts to run the app on previous version of macOS, macOS presents a dialog box specifying the minimum required version.
Windows
The Windows section contains settings used when building the Windows app.
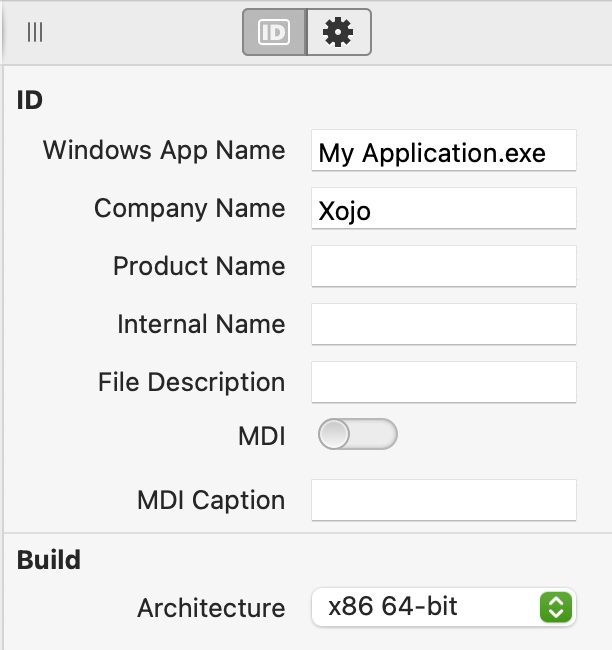
Windows App Name: The actual file name for the Windows app. If not specified, the ".exe" suffix is automatically added when the app is built.
Company Name: The "Company Name" appears in the Copyright section of the File Explorer app properties in the Details tab. You can change this in IDE Script with the propertyvalue of "CompanyName".
Product Name: The name of the product as installed in the Windows Start > All Programs menu. This also appears in "Product name" on the File Explorer app properties Details tab. You can change this in IDE Script with the propertyvalue of "ProductName".
Internal Name: This is useful when your product has a different internal name than its external name. This is not shown on the File Explorer app properties Details tab. You can change this in IDE Script with the propertyvalue of "Internalname".
File Description: This description is displayed in the File Explorer app properties in the Description area of the General tab and on the Details tab.
MDI: When ON, the app's windows will be enclosed in the "parent" MDI window. MDI stands for Multiple Document Interface. Although still supported by Windows, it is not commonly used.
MDI Caption: If MDI is ON, you can enter the caption that appears in the title bar of the MDI window.
Architecture: The CPU architecture for the app. Choices are x86 32-bit, x86 64-bit and ARM 64-bit. x86 64-bit is the default.
These settings are available on the "Advanced" (gear) tab of the Inspector:
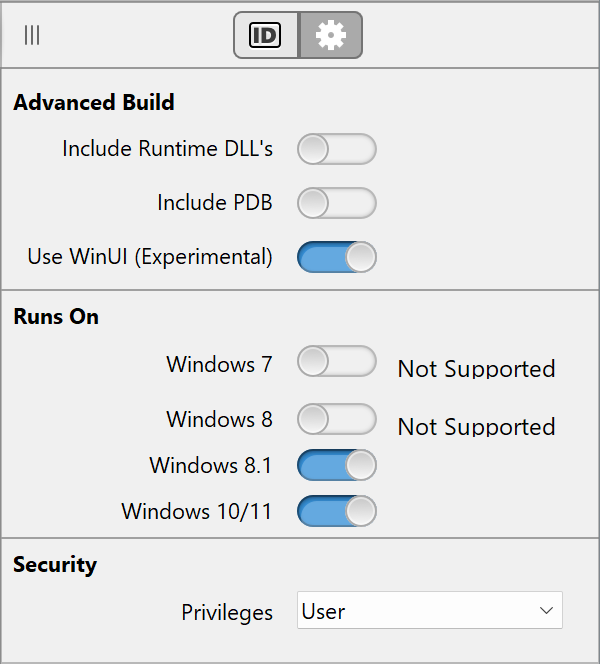
Include Runtime DLLs: Copies the Universal Runtime DLLs beside your app executable. For more information, refer to Windows Universal Runtime.
Include PDB: Generates a Program Database (PDB) file that can be used for advanced debugging. For more information, see the What the PDB is this? blog post.
HTMLViewer uses WebView2: For projects where WinUI is not selected, the DesktopHTMLViewer will use WebView2 rather than CEF.
The following are also available when the Architecture is 64-bit:
Security: This setting indicates the security level that the app runs as. Choices are: "User" (default), "Highest Available", and "Administrator". This would be used if your app needs to run at a higher security level than a regular user, for example if it needed to modify the firewall or install a service. Available when Architecture is 64-bit.
Use WinUI (Experimental): For use with plugins that utilize WinUI when drawing controls.
Native Control Sizes: If true, controls that are smaller in height and/or width than the default control sizes for WinUI apps will be resized to the default size.
Linux
The Linux section contains settings used when building the Linux app.
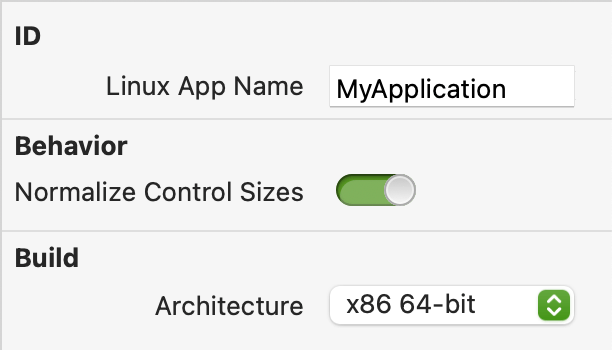
Linux App Name: The actual file name for the Linux app.
Architecture: The CPU architecture for the app. Choices are ARM 32-bit, x86 32-bit, x86 64-bit and ARM 64-bit.
Linux ARM apps run on the Raspberry Pi and other similar single-board computers.
This Computer
The This Computer section shows you the appropriate target settings (macOS, Windows or Linux) for the OS you are currently using. For example, if you are running Xojo on macOS, then This Computer shows the macOS Build Settings.
Building and deployment
To create a stand-alone app for deployment, you create a build by clicking the Build button on the main toolbar or choosing Project > Build from the menu. This creates apps for each of the OS platforms you selected, with separate folders for each (when Use Build Folders is ON).
You can also use IDE Scripting to create builds.
Build folder names
OS |
Architecture |
Folder Name |
|---|---|---|
Linux |
x86 32-bit |
Linux |
Linux |
x86 64-bit |
Linux 64 bit |
Linux |
ARM 32-bit |
Linux ARM |
Linux |
ARM 64-bit |
Linux ARM64 |
macOS |
x86 64-bit |
macOS 64 bit |
macOS |
ARM 64-bit |
macOS ARM 64 bit |
macOS |
Universal |
macOS Universal |
Windows |
x86 32-bit |
Windows |
Windows |
x86 64-bit |
Windows 64 bit |
Windows |
ARM 64-bit |
Windows ARM 64 bit |
Desktop apps are deployed by installing them on a computer and running them on the computer. Once you have created your builds, you'll need to test them on the target OS and possibly package them into a format for distribution (such as an installer).
Always test your apps on the specific target platform!
macOS
macOS apps consist of a single App file, called the Application Bundle. You can embed other files into the Application Bundle because it is technically a folder that macOS treats as a file. In Finder, you can right-click on any App and select "Show Package Contents" to see the actual contents of the Application Bundle as a folder. Of course, your app can still have separate files not in the Bundle, in which case you want to make sure that your app is in a folder of its own.
Since an app is technically a folder, you have to include it in some sort of container in order to distribute it, such as a disk image (DMG), installer or even a simple Zip file.
Refer to Desktop Deployment for macOS for specifics on macOS app deployment.
Windows
Windows apps have a minimum of these parts: the main executable, its resources (contained in a Resources folder) and its libraries (contained in a corresponding Libs folder). All parts are required in order for the app to run.
The Libs and Resources folder can be renamed to just "Libs" or "Resources". This allows several apps in the same folder to shared the Libs and Resources folders. Libs can only be shared for apps built with same version of Xojo.
When building your application, Xojo will create a "resources.pri" file in your build directory. This file contains theming assets for your application. Removing this file could negatively impact your application's appearance, or even cause it to crash.
Generally you should use an installer to deploy Windows apps. With an installer you can create shortcuts in the Start menu or Desktop and copy the files to the appropriate locations. There are many products available for creating installers for Windows apps. Two that work well with Xojo apps are Inno Setup and Advanced Installer.
For simple needs or for testing purposes, you can also just zip the Windows app and its related folders for distribution. You can create a Zip by right-clicking on the parent folder in Windows Explorer and selecting Send To > Compressed (zipped) Folder. Once unzipped, the app can be run from any location. Although this can be useful for testing purposes, it is not recommended for proper Windows app deployment.
When you compile a macOS app on Windows, the resulting app is created as a tar archive file. You can transfer this file to macOS and expand the archive in order to run it.
Refer to Desktop Deployment for Windows for specifics on Windows app deployment.
Linux
Linux apps also have these parts: the main executable and its libraries (contained in a corresponding Libs folder). Both parts are required in order for the application to run. It is also possible that there is a Resources folder that may contain localization files (or other files that you chose to copy there using Build Automation). Additionally, app icon PNG files are placed alongside the built app with these names: appicon_128 (128x128), appicon_48 (48x48) and appicon_32 (32x32).
The Libs and Resources folder can be renamed to just "Libs" or "Resources". This allows several apps in the same folder to shared the Libs and Resources folders. Libs can only be shared for apps built with same version of Xojo.
How you deploy a Linux application varies depending on the Linux distributions you support. Different distributions have different formats for packaging. Common installer formats are deb (used by Debian and Ubuntu) and RPM (RedHat Package Maker) used by RedHat.
For simple needs, you can also just zip the Linux application and Lib folder for distribution.
When you compile a macOS app on Linux, the resulting app is created as a tar archive file. You can transfer this file to macOS and expand the archive in order to run it.
Refer to Desktop Deployment for Linux for specifics on Linux app deployment.