Code Editor
Your app is eventually going to need code, which you write using the Xojo programming language in the built-in Code Editor. Code can be attached to almost any item that is in your project, including windows, web pages, controls, classes, modules and more.
To maximize typing speed in the Code Editor, you should close the Find/Errors/Messages panel when it is not in use. Typing in the Code Editor can force the panel to update so that it shows changed code and this can slow down typing in large projects.
Editing features
You can think of the Code Editor as a text editor that is specially designed for writing Xojo code. It has many features that make it easy for you to program in Xojo.
Syntax highlighting
The Code Editor highlights your source code for you as you type. You can change the default colors for things such as keywords, string, integers, comments and more in Preferences.
Auto indentation
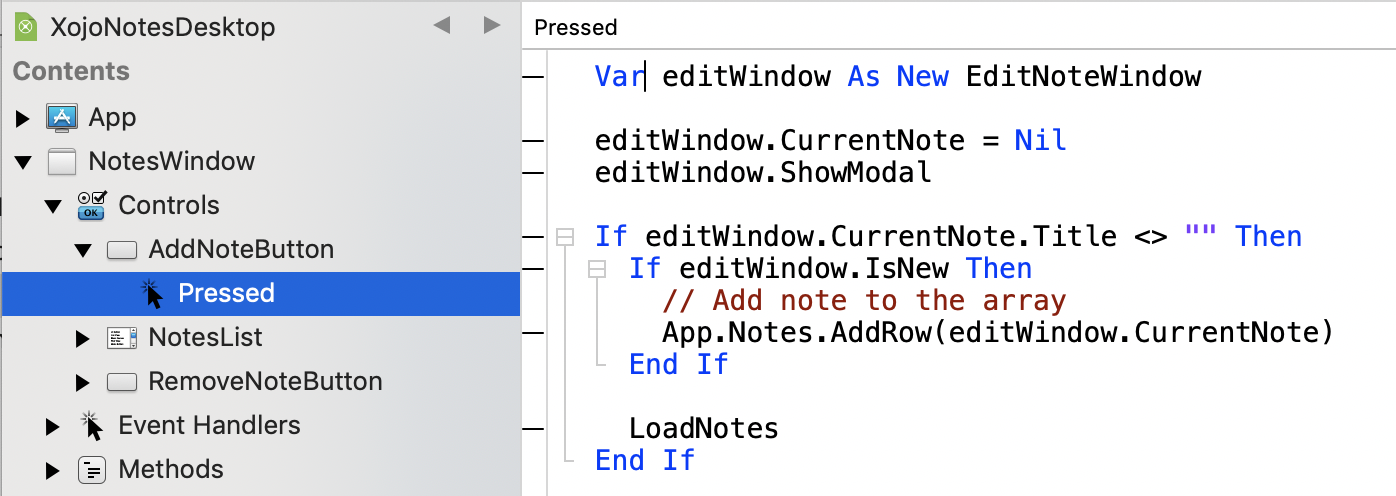
The Code Editor automatically indents your code as you type it. Code such as If...Then, While/Do loops, Select...Case and other commands that group code are indented for you automatically. Code that is indented is referred to as a code block. In the Code Editor, you can see that code blocks have a small “-” sign to their left. When you hover over the "-", the code block lines are highlighted to better identify the code block.
You can click the "-" to collapse the code block (changing it to a “+ '), hiding all the code within it to make your other code easier to read. The code will still run and is part of your project; it is just not visible in the Code Editor. Click the “+” to expand a code block.
Click on the vertical line connecting the code block to select all the code in the block.
Expanding and collapsing code is a great way to hide code that you do not need to see when focusing on other code.
Auto-Complete
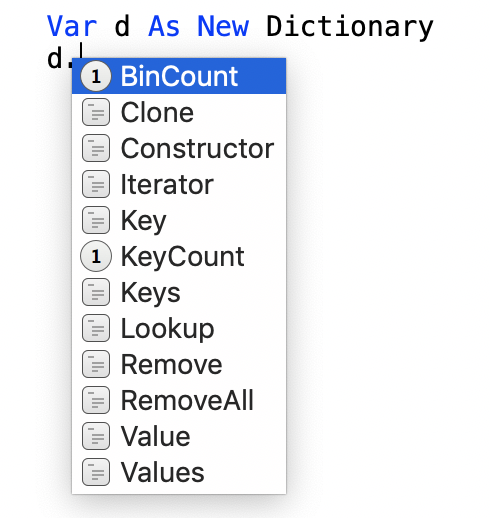
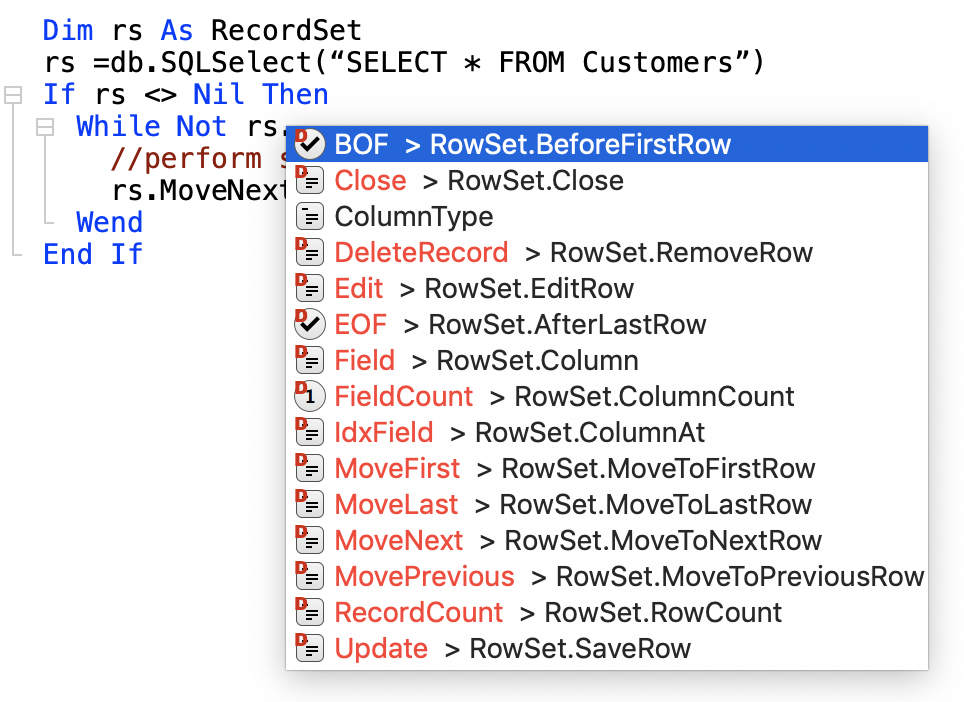
As you are typing in the Code Editor you will often see an ellipsis (three small dots) that appears after the text you are typing. This indicates that the Code Editor has some auto-complete suggestions for you. When you see the ellipsis, press the tab key to display a list of available commands that can be auto-completed. The auto-completion is smart and only tries to show you commands that are relevant based on the context of your code.
When the auto-complete list is displayed, you can choose the item you want using the mouse or you can continue typing to automatically move the selection in the list. When you've reached the selection you want, just press return. Here, "d." was typed and when the tab key was pressed the auto-complete menu appeared showing the methods and properties of a Dictionary that are relevant:

Auto-complete may also show you the remaining part of the text you are typing (in gray). Press tab to have the text fill in automatically. This can be much faster than typing out the name manually, especially if you have long variable, class or method names.
If you are working on a project you created in version 2019r1 or earlier, entering an API that has been replaced with an API 2.0 equivalent will result in the original API displayed in Auto-Complete along with the new replacement API. To insert the new API rather than old one, hold the Shift key while clicking on the item in the Auto-Complete list.
Syntax help
There is a small area at the bottom of the code editor that is used to display syntax help. The Syntax Help Area displays the line number, column number, syntax information, method signatures, declarations and other information about the code that is under the mouse cursor.
Breakpoints and bookmarks
The gutter on the left side of the Code Editor is used to set breakpoints and bookmarks. A breakpoint is a line of code that will stop execution when your app is run in the debugger. A bookmark is a quick way to jump to specific code. Next to each line of code, you will see a dash (“-”) in the gutter indicating that this is a line that can have a breakpoint or bookmark. Click on the dash to toggle a breakpoint on or off. A breakpoint is indicated by a red circle.
Option-click on MacOS (or Control-click on Windows/Linux) to toggle a bookmark on or off. A bookmark is indicated by a bookmark icon. If you have both a breakpoint and a bookmark set for the line, the indicator appears as a red bookmark icon.
The Project > Breakpoint menu has menu items to turn a breakpoint on or off, show all the breakpoints or remove all the breakpoints. Similarly, Project > Bookmarks has menu items to turn a bookmark on or off, show all the bookmarks or remove all the bookmarks. When you Show All bookmarks or breakpoints, they appear in the Find panel at the bottom of the Workspace.
Line numbers
In addition to displaying breakpoints and bookmarks, the gutter can also show line numbers (as see in the image above) when the Show line numbers in gutter checkbox in the Coding pane of the Preferences window is selected.
Go To location
To go to a specific line of code, select Project > Go To Location to display the Go To Location window. Enter the line number (with or without a # prefix) you want to jump to and press Return (or click Go). The Code Editor will then scroll that line into view.
Code Assistants
In addition to built-in functions above, you can also add your own code assistants. This is done using XojoScript. If you haven't used XojoScript before, don't panic. It's the Xojo language but without access to framework functions. You write your code assistants using the IDE Script editor.
Your Code Assistant must implement three functions:
Name - Returns the name you wish to appear in the Code Editor's contextual menu.
CanEdit - Indicates whether or not your Code Assistant is designed to edit the code selection that will be passed into it as a parameter. Return True if it can and False if it cannot.
Edit - This is where your Code Assistant does its work. It's passed the code selection as a string. Your assistant manipulates that string and returns a replacement.
Here's an example of a Code Assistant that wraps the selected text in an If isDarkMode Then statement:
Function Name() As String
  Return "Wrap In IsDarkMode"
End Function

Function CanEdit(selection As String) As Boolean
  Return True
End Function

Function Edit(selection As String) As String
  Var lines() As String
  lines.Add("If isDarkMode Then")
  lines.Add("")
  lines.Add("Else")
  lines.Add(selection)
  lines.Add("End If")
  Return String.FromArray(lines, EndOfLine)
End Function
Because a Code Assistant is a XojoScript, they only parts of the Xojo framework it can access are:
Clipboard class
RegEx class
EncodeBase64 method
EndOfLine method
DecodeBase64 method
A Code Assistant also has the following built-in methods it can use to determine the type of project in which it's running:
ProjectConsole method
ProjectDesktop method
ProjectiOS method
ProjectMobile method
ProjectWeb method
Unfortunately, the IDE Script Editor does not have access to the debugger making writing Code Assistants challenging. Fortunately there is a way to write your Code Assistants using the Xojo Code Editor and Debugger. Open the Code Assistant Tester example project located at Example Projects > Advanced > IDE Scripting > Code Assistants > Code Assistant Tester.
The Tester window in this project has the three methods mentioned above along with a TextArea you can use to test your Code Assistant. Just implement the three methods and run the project to test and debug. When you're sure your Code Assistant is ready, create an IDE Script from the template included in the Code Assistants folder and copy your code from Code Assistant Tester project into your script.
When your script is ready, save it with the file extension xojo_code_assistant. Next, copy it into the Scripts folder next to the Xojo application itself. The scripts are loaded when the IDE is launched. However, you can force the Code Editor's contextual menu to refresh by holding a modifier key (Command key on macOS, Control key on Linux and Windows) while clicking to open it.
Tip
If you instead create a Scripts folder at Documents > Xojo > IDE then save your scripts there, Xojo will load them regardless of which version of Xojo you use.
Useful keyboard shortcuts
While working in the code editor, there are several keyboard shortcuts that will help make you more productive.
Shift + Return: Completes the code block. For example, typing “If True” and pressing Shift + Return will automatically fill in the “Then” and the “End If” and place the cursor between them. This works for other code blocks such as Select, While, Do, For, #If, etc.
Ctrl + Enter (Option-Enter on MacOS): Extends code to a new line by automatically adding the “_” character.
Ctrl + \ (⌘-\): Toggles the breakpoint on the line on or off.
Ctrl + ' (⌘-'): Comments or uncomments the selected code lines or the line the cursor is on if no code is selected.
Also refer to the Full Keyboard Shortcuts.
Command bar
The Code Editor has its own command bar with the following features, in order from left to right:
Add
The Add button is used to add code-related items to the window or web page. This includes:
Menu Handler (desktop projects only)
Code Editor
View layout
This button is grouped with View Code and is a toggle. When viewing code, you can click this button to quickly switch back to the Layout Editor to see the last item you were working on.
View code
This button is grouped with View Layout and is a toggle. When viewing code, this button is selected. When not viewing code, you can click this button to quickly switch back to the Code Editor to see the last item you were editing.
Comment/uncomment
Use this button to comment out the selected code in the code editor. If no code is selected, then the current line is commented out. If the code is already commented, then this will uncomment the code.
This uses the comment character you have specified in Coding Preferences.
Toggle Line Numbers
Use this button to toggle the display of line numbers in the gutter to the left of the code editor as shown above.
Analyze item
Use Analyze Item to validate the source code for the current project item. Analyze checks the project item for compile errors and warnings (such as unused variables). Refer to Analyzing the Project for more information.
Notes Editor
The Notes Editor is a simple text editor where you can enter notes related to the project item. Uses for Notes:
Technical documentation
Long comments
Commonly used source code snippets
Design documentation