The Xojo Cloud control panel
Overview
You can access the Control Panel from your Accounts page on the Xojo web site.
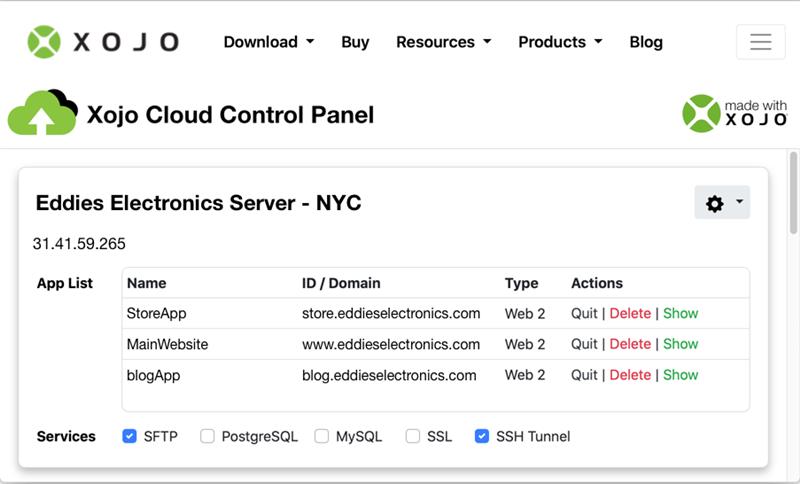
The Control Panel displays your servers (including the IP addresses).
From the Action menu, you can:
Restart: Restarts the Xojo Cloud server.
Rename: Give the server a new name.
Delete: Deletes the Xojo Cloud server.
Refresh Apps: Displays all the Xojo apps that have been deployed to the Xojo cloud server.
Manage Users: Allows you to allow other xojo users to manage and/or deploy to your Xojo Cloud server.
From the App List, you can:
Quit: Causes the app to quit. The app will then automatically restart.
Delete: Deletes the app from the server.
Show: Displays the running app in the browser.
Services you can enable/disable:
SFTP: SFTP access to the server, providing you with a username and password. To reset the password, disable and then re-enable.
PostgreSQL: Access to the PostgreSQL database server, providing you with a username and password. To reset the password, disable and then re-enable.
MySQL: Access to the MySQL database server, providing you with a username and password. To reset the password, disable and then re-enable.
SSL: Walks you through the process of using Let's Encrypt to enable SSL for your server.
SSH Tunnel: Access to an SSH tunnel (providing you with a username and password) to allow you to connect to PostgreSQL/MySQL from your own computer. To reset the password, disable and then re-enable.
Manage users
Choose Manage Users from the Action menu displays a dialog box that allows you to decide who has what level of administrative access to your Xojo Cloud Server.
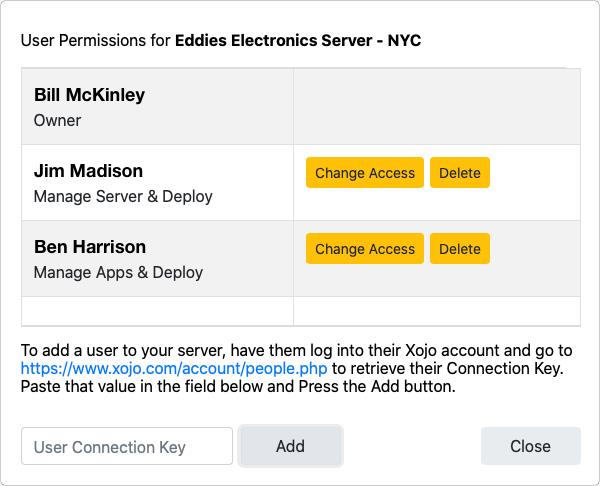
There are four levels of access:
Deploy: User can only deploy and doesn't have access to the server in the control panel
Manage Apps & Deploy: User can deploy, has control panel access, but can only manage apps and can restart the server.
Manage Server & Deploy: All of the above plus can manage users and apps and enable/disable services (SSH, SFTP, databases, etc).
Owner = All of the above plus renaming and deleting the server.
SFTP
Xojo Cloud uses SFTP (instead of FTP) for its added security. SFTP is a secure variant of FTP which is transmitted over the internet using strong encryption. That way you don't have to worry about anyone intercepting your username and password or your files as they're sent to your server. When choosing a client, keep in mind that SFTP is different than FTPS or FTP w/ SSL. They are not interchangeable with one another.
Once you enable SFTP in the Control Panel, you can access the contents of your server using your favorite SFTP client. If you don't have one, there are a number of options available including:
FireFTP: A plugin for the Firefox browser. Free: Mac, Windows & Linux.
Filezilla: An FTP/SFTP-only Client. Free: Mac, Windows & Linux.
Cyberduck: A donation-ware client which supports multiple protocols including SFTP. Free (donation recommended, $24 Mac-App Store): Mac & Windows.
ExpanDrive: A simple drag and drop Finder or Explorer type experience. No support for changing file permissions (although it does work if sending from a Mac). $49: Mac & Windows. (Free 7-Day Trial)
Command-Line (Linux): sftp://username@serverip/
Note
Xojo does not endorse any 3rd-party SFTP client.
Even with SFTP access, you should still use the Deploy feature in the Xojo IDE to deploy your apps to Xojo Cloud. When you use the Deploy feature you also get access to additional Xojo capabilities such as the XojoCloud.FirewallPort class and the proper locations available to the SpecialFolder function.
PostgreSQL and MySQL usage
Once you enable PostgreSQL or MySQL database on your Xojo Cloud server, connecting to the database in a deployed app works exactly as if the DB was on your local computer. You do not have to install anything yourself.
In the Services section of the Xojo Cloud Control Panel, click the "PostgreSQL" or "MySQL" buttons to enable either or both databases. Be sure to note the username and password that are displayed to you.
Uncheck the corresponding "PostgreSQL" or "MySQL" checkboxes to turn off the appropriate database.
PostgreSQL
To use PostgreSQL you will need to use the PostgreSQLDatabase class as shown in the examples below. To display the version of PostgreSQL being used by Xojo Cloud, after you have connected using a DB Tool (as shown below), run this query:
SELECT version();
Xojo Cloud uses PostgreSQL 9.2.24.
MySQL
To use MySQL you will need to use the MySQLCommunityServer class as shown in the examples below. To display the version of MySQL being used by Xojo Cloud, after you have connected using a DB Tool (as shown below), run this query:
SELECT VERSION();
Xojo Cloud uses 5.5.65-MariaDB.
Setup SSL
Xojo Cloud uses Let's Encrypt to allow you to freely set up SSL for your server. You will need to have a domain name pointing to your server in order for this to work. Enter the domain name in the field and click Submit to enable SSL. If you require manually configuration of an SSL contact support. You can go back to the Setup SSL area to disable SSL if desired or to provide a different domain name.
If you have your own SSL certificate, please feel free to contact us at hello@xojo.com to install it for you.
Setting up a tunnel
If you want to access a DB on Xojo Cloud from your computer, you will have to enable the Tunnel and then connect to the tunnel from the computer. An SSH tunnel is a secure connection, between your computer and another (in this case your Xojo Cloud server) which is used for transmitting data on a particular port. In essence, it creates a private connection through the internet which allows you to see into your server on the other end and connect to a particular service there.
To create a tunnel between your computer and your Xojo Cloud server, you first need to turn on the tunnel capability on your server. Go to your control panel and click the "Enable Tunnel" button. You will be presented with a username and a password which you will use later for establishing the connection.
On macOS and Linux, you can use a terminal command to access the tunnel (replace ipaddress as appropriate; you'll be prompted for the password).
Use this command to tunnel to PostgreSQL:
ssh -L 5432:localhost:5432 dbadmin@ipaddress -N
Use this command to tunnel to MySQL:
ssh -L 3306:localhost:3306 dbadmin@ipaddress -N
If you are using Windows, you will need to use an external app such as PuTTY. There are a number of tutorials available on the internet, just put “putty ssh tunnel” into your favorite search engine.
Using database server management tools with Xojo Cloud
Most database server management tools have the capability to directly connect using an SSH tunnel. In the dialog used to set up the connection to the DB, look for something that says SSH or SSH Tunnel. In most cases, you will need to fill out four fields:
Host Name or IP Address: Enter the IP address for your Xojo Cloud server
Port: Enter 22. This is the SSH port number.
User Name: Enter the user name that was provided to you in the Xojo Cloud control panel when setting up the tunnel.
Password: Enter the password that was provided to you in the Xojo Cloud control panel when setting up the tunnel.
Now, as far as setting up the connection to the database itself, you will have another set of fields to fill out:
Host Name or IP Address: Enter "localhost". The reason you enter localhost for the server name (and not the server IP address) is that you want to connect to your side of the tunnel. SSH will do the job of hooking things up on the other end for you.
Port: 5432 for PostgreSQL, 3306 for MySQL
Database: Enter the user name that was provided to you in the Xojo Cloud control panel when setting up the database server.
User Name: Enter the user name that was provided to you in the Xojo Cloud control panel when setting up the database server.
Password: Enter the password that was provided to you in the Xojo Cloud control panel when setting up the database server.
Connect to PostgreSQL or MySQL from your Xojo app
To connect to your database from a Xojo app you just do it normally. If you use a tunnel or a web app running on Xojo Cloud the method is the same.
For PostgreSQL:
Var db As New PostgreSQLDatabase
db.UserName = "username"
db.Password = "password"
db.Host = "localhost"
db.Port = 5432
db.DatabaseName = "your database name"
Try
db.Connect
  // You're connected!
Catch error As DatabaseException
  MessageBox("Cannot connect to Postgres database.")
End Try
For MySQL:
Var db As New MySQLCommunityServer
db.UserName = "username"
db.Password = "password"
db.Host = "127.0.0.1"
db.Port = 3306
db.DatabaseName = "your database name"
Try
db.Connect
  // You're connected!
Catch error As DatabaseException
  MessageBox("Cannot connect to MySQL database.")
End Try