OOP design concepts
This topic covers some of the important object-oriented design concepts that apply to classes: Encapsulation, Overloading, Inheritance and Polymorphism.
Encapsulation
Encapsulation is the process of hiding information that does not need to be exposed to other parts of the code. With classes, you can control this using the scope of your properties and methods. In order from least visible to most visible, there are: Private, Protected and Public.
Private
Setting the scope to private means that the item is only accessibly from with the current class instance (or class for shared items). This makes it inaccessible to the rest of your code.
Private is the most restrictive setting. It is good coding practice to get into the habit of setting your items to Private if they are not needed outside the class instance. Private items can be referenced by their name.
Protected
A scope of protected means the item is accessible from the current class instance (or the class itself for shared items) and its subclasses.
A Protected method, property, or constant is available only to other code within the class and subclasses based on the class. It is inaccessible to the rest of your code. When other code in the class needs to access a Protected method, property, or constant, you reference it by name. If you try to access a Protected method, property, or constant outside of the class, you will get an error message indicating that the item is out of scope when you try to run your project.
Public
A Public method, property, or constant is available to code throughout the project. Within the class, you can refer to the item by its name. In code outside the class, you reference it using dot notation using the class reference and the name, such as:
car.Model
How scope affects access
Given ClassA as an Object and ClassB is a subclass of ClassA.
ClassA defines a public method, MyPublicMethod. That method can be called from any code.
ClassA defines a protect method, MyProtectedMethod. Code in ClassA or ClassB can call that method.
ClassA defines a private method, MyPrivateMethod. Only code in ClassA may call the method.
Overloading
Overloading is the term for methods that have the same name, but have different method signatures (such as a different number of parameters or different data types for the parameters).
You cannot overload methods based on different return types, although overloads do distinguish between having any return type and not having a return type at all.
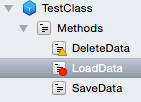
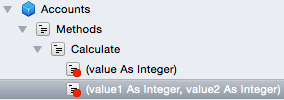
To overload a method in your own classes, add a new method to the class and give it the same name as an existing method, but with different parameters. The method appears in the Navigator with the overloaded parameters shown below the method so that you can tell them apart.
To overload methods in built-in framework classes, you first need to create a subclass using inheritance.
You can also overload operators using a variety of specially implemented functions. A good example of a built-in overloaded operator is the “+” operator. If its arguments are numbers, it computes the sum; if the arguments are text, it concatenates the text. Refer to Operator Overloading for more information.
Inheritance (subclassing)
Inheritance a feature of object-oriented programming where you create a new class that is based on an existing class. The new class is called the subclass and the existing class is called the super class. The subclass "inherits" and can thus use all the public and protected properties and methods of its superclass.
Why is this useful? You may find situations where you would like to have an object that is a slightly altered version of one of the built-in classes. For example, you might want a version of the TextArea control that disables the Cut and Copy items on the Edit menu, preventing the user from putting sensitive data on the Clipboard. You might want to create a List Box that, by default, has the months of the year in it. You can create your own versions of these built-in classes by creating subclasses that you add to your project.
There's an important difference between adding an instance of TextField to a window versus adding a subclass based on TextField to your project. In the latter case, you can customize the subclass based on TextField itself and use instances of the customized subclass in several places in the application. You can also save the customized subclass so that you can reuse it in other projects.
What is a subclass?
A subclass is a class that has a super class. A super class is a class the subclass is based on, also sometimes called the parent class. Subclasses inherit all of their super's (public or protected) properties, methods and constants. The subclass can also implement any event handlers that were not implemented on the super class or it can implement event definitions on the super class.
In fact, a subclass works identically to its super class until you start modifying it. After that, it's different from its super class only in the ways you make it different by adding properties, modifying events, or adding or modifying methods.
A subclass can use any of the public or protected properties and methods on the super class by default.
Creating a subclass from an existing class
There are a several ways to create a subclass from an existing class in your project or from an existing framework class.
If want to subclass a built-in control class, you can drag the control from the Library to the Navigator.
You can select a class in the Navigator and use the contextual menu option “New Subclass” to create a new subclass based on the selected class.
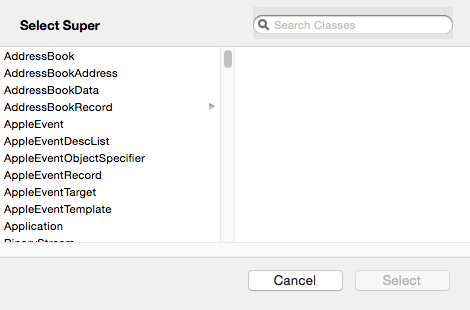
You can add a class to your project (using the Insert button on the toolbar or the Insert menu) and then manually change its Super property to the name of the class that it is based on. You can just type the name of the superclass in the Super field or you can click the small "pencil" button icon next to the field to display the Select Super Class window where you can choose a class.
Creating a superclass from an existing class
If you have an existing class that you have determined should really be a subclass, you can create a super class from it. Use the contextual menu for the class and select “Extract Superclass”. This opens a window that allows you to specify the name of the super class and to choose the method and properties to move from the class to the super class.

If you extract a superclass from an existing subclass, the new class will be added between the old superclass and the current subclass.
Virtual methods (overriding)
Virtual methods provide a way for a subclass to override its own version of a method that its super class has. Ordinarily, a subclass inherits the methods belonging to its parent.
When a subclass has a method that has the same name (and parameters) as a method on the super class, the subclass method is instead called. This is referred to as “overriding”. You can still call the method on the superclass by calling it specifically using the Super prefix with the method call:
Super.MethodName
Polymorphism
Polymorphism is the ability to have completely different data types (typically classes) behave in a uniform manner. You can do this using inheritance and overriding, inheritance and events or class interfaces.
Animal example
A simple example of this is the Animal, Cat and Dog relationship. If you want to have a generic animal object that knows how to speak “Meow!” or “Woof!” depending on whether it is actually a Cat or Dog, you could implement it using inheritance and overriding.
First, create a new class called Animal. Add to it a Speak method that returns String. Now create a subclass of Animal, called Cat. Add to it a Speak method that returns String. This means you are overriding the unimplemented Speak method on Animal. The code for this method is:
Return "Meow!"
Next, create another subclass of Animal, called Dog. Add to it a Speak method that returns a String with this code:
Return "Woof!"
To test this, add a button to a layout. In the Action event of the button add code to create an array of Animals and then to loop through the array calling the Speak method:
Var animals() As Animal
animals.AddRow(New Cat)
animals.AddRow(New Dog)
For Each a As Animal In animals
  MessageBox(a.Speak)
Next
When you run this code, you will see “Meow!” and then “Woof!”. Because Cat and Dog are both subclasses of Animal, they are allowed to be assigned to a variable (the animals array) with a type of Animal. So an Animal can be either a Cat or Dog.
And when you call the Speak method of Animal (in the loop), because of polymorphism, your code calls the Speak method of the actual subclass type that was added to the array.
You can also achieve the same effect by using Inheritance with Events or with Class Interfaces.
See also
Advanced OOP Features topic