OOP classes
In its simplest form, a class is a container of code and data much like a module. But unlike a module, a class provides better code reuse. Classes are the fundamental building blocks of object-oriented programming.
Classes offer many benefits, including:
Reusable Code - When you directly add code to a DesktopButton on a Window to customize its behavior, you can only use that code with that one DesktopButton. If you want to use the same code with another DesktopButton, you need to copy the code and then make changes to the code in case it refers to the original DesktopButton (since the new DesktopButton will have a different name than the original). Classes store the code once and refer to the object (like the DesktopButton) generically so that the same code can be reused any number of times without modification. If you create a class based on the DesktopButton control and then add your code to that class, any usage (instances) of that custom class will have that code.
Smaller Projects and Apps - Because classes allow you to store code once and use it over and over in a project, your project and the resulting app is smaller in size and may require less memory.
Easier Code Maintenance - Less code means less maintenance. If you have basically the same code copied in several places of your projects, you have to keep that in mind when you make changes or fix bugs. By storing one copy of the code, when you need to make changes, you'll spend less time tracking down all those places in your project where you are using the same code. Changes to the code in a class are automatically used anywhere where the class is used.
Easier Debugging - The less code you have, the less code there is to debug.
More Control - Classes give you more control than you can get by adding code to the event handlers of a control in a window. You can use classes to create custom controls. And with classes, you have the option to create versions that don 't allow access to the source code of the class, allowing you to create classes you can share or sell to others.
Understanding classes, instances and references
Before you can use a class in your project, it is important to understand the distinction between these three concepts: the class itself, the instance of the class and the reference to the class.
The Class: Think of the class as a template for a container of information (code and data), much like a module. And like a module, each class exists in your project only once. But unlike a module, a class can have multiple instances that each contain different data.
The Instance: Classes provide better code reuse because of a concept called instances. Unlike a Module, which exists only once in your running app, a class can have multiple instances. Each instance (also called an object) is a separate and independent copy of the class and all its methods and properties.
The class
There are many built-in classes for user interface controls. Some commonly used ones are DesktopButton, WebButton, MobileButton, DesktopLabel, WebLabel, MobileLabel, DesktopTextField, WebTextField, MobileTextField, DesktopListBox, WebListBox and iOSMobileTable.
By themselves, control classes are not all that useful; they are just abstract templates. But each time you add a control class to a layout (a DesktopWindow, WebPage or MobileScreen) you get an instance of the class. Because each button is a separate instance, this is what allows you to have multiple buttons on a Window, with each button being completely independent of each other with its own settings and property values.
This is an example of a Vehicle class that will be used in later examples:
Class Vehicle
  Property Brand As String
  Property Model As String
End Class
Note that this above code is for reference. You do not actually write code like this to create a class. To create a class in Xojo use the Insert menu or toolbar and choose Class.
The instance
These instances are what you interact with when writing code on the window and is what the user interacts with when they use your app.
For example, when you drag a TextArea from the Library to a Window, you create a usable instance of the TextArea on the Window. The new instance has all the properties and methods that were built into the TextArea class. You get all that for free — styled text, multiple lines, scroll bars, and all the rest of it. You customize the particular instance of the TextArea by modifying the values of the instance's properties.
When you add a control to a window (or web page), the Layout Editor creates the reference for you automatically (it is the name of the control). However, when writing code you create instances of classes using the New keyword. For example, this create a new instance of a Vehicle class that is in your project:
Var car As New Vehicle
The reference
A reference is a variable or property that refers to an instance of a class. In the above code example, the car variable is a reference to an instance of the Vehicle class.
You interact with properties and methods of the class using dot notation like this:
Var car As New Vehicle
car.Brand = "Ford"
car.Model = "Focus"
Here the Brand and Model were defined as properties of the Vehicle class and they are given values for the specific instance. Having an instance is important! If you try to access a property or method of a class without first having an instance, you will get a NilObjectException likely causing your app to quit. This is is one of the most common programming errors that people make and is typically caused by forgetting the New keyword. For example, this code might look OK at first glance:
Var car As Vehicle
car.Brand = "Ford"
car.Model = "Focus"
But the 2nd line will result in a NilObjectException when you run it because car is not actually an instance. It is just a variable that is declared to eventually contain a Vehicle instance. But since an instance was not created, it gets the default value of Nil, which means it is empty or undefined.
If you are not sure if a variable contains an instance, you can check it before you use it by using the Nil keyword like this:
If car <> Nil Then
  car.Brand = "Ford"
  car.Model = "Focus"
End If
When the variable is not Nil, then it has a valid reference. And since it is a reference, it has important considerations when assigning the variable to another variable: When you do an assignment from one reference variable to another, the second variable points to the same reference as the first variable.
This means the second variable refers to the same instance of the class as the first variable and is not a copy of it. So if you change a property of the class with either variable, then the property is changed for both. An example might help demonstrate this:
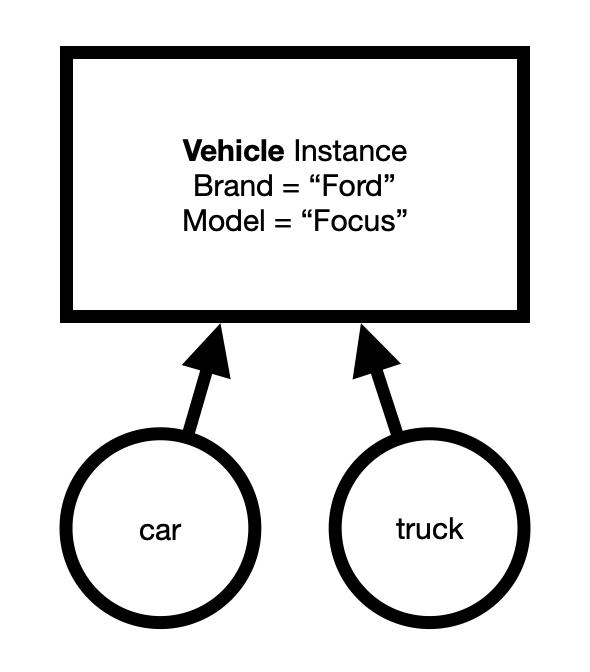
Var car As New Vehicle
car.Brand = "Ford"
car.Model = "Focus"
Var truck As Vehicle
truck = car
// truck.Model is now "Focus"
car.Model = "Mustang"
// truck.Model is now also "Mustang"
truck.Model = "F-150"
// car.Model is now also "F-150"
In this diagram you can see that the variables for both car and truck point to the same instance of Vehicle. So changing either one effectively changes both.
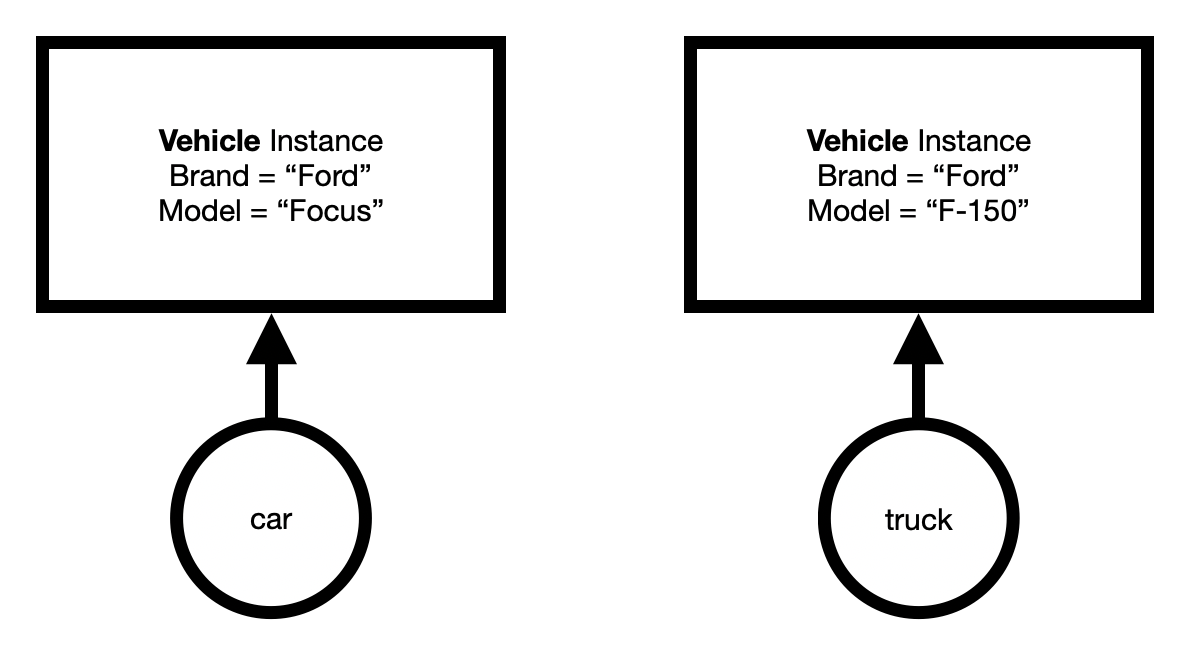
If you want to create a copy of a class, you need to instead create a new instance (using the New keyword) and then copy over its individual properties as shown below:
Var car As New Vehicle
car.Brand = "Ford"
car.Model = "Focus"
Var truck As New Vehicle
truck.Brand = car.Brand
trunk.Model = car.Model
// truck.Model is now also "Focus"
truck.Model = "F-150"
// car.Model remains "Focus"
When you do it this way, you get two separate instances. Changes to one do not affect the other as you can see in these diagrams:
Adding classes
To add a class to your Xojo project, use the Insert menu or toolbar and choose Class. Your class will appear in the Navigator.
Note: You do not directly create classes in code. They are always added using Insert as described above.
Adding properties to classes
Properties are variables that belong to an entire class instance rather than just a single method. To add a property to a class, use the Add button on the Code Editor toolbar, Insert > Property from the menu, the contextual menu or the keyboard shortcut (Option Command P on macOS or Ctrl Shift P on Windows and Linux). You can set the property name, type, default value and scope using the Inspector.
To quickly create a property, you can enter both its name and type on one line in the Name field like this: PropertyName As DataType. When you leave the field, the type will be set in the Type field.
Properties added in this manner are sometimes called Instance Properties because they can only be used with an instance of the class. You can also add properties that can be accessed through the class itself without using an instance. These are called Shared Properties.
Adding methods to classes
To add a method to a class, use the Add button on the Code Editor toolbar, Insert > Method from the menu, the contextual menu or the keyboard shortcut (Option Command M on macOS or :kbd:`Ctrl Shift M on Windows and Linux). You can set the method name, parameters, return type and scope using the Inspector.
When typing the method name, the field will autocomplete with the names of any methods on its super classes.
Methods added in this manner are called Instance Methods because they can only be used with an instance of the class.
You can also add methods that can be accessed through the class itself. These are called Shared Methods.
See also
OOP Design Concepts topic