Connecting to a serial device
Using Xojo, you can control any hardware with a serial interface. This Tutorial will walk you through creating an application in Xojo that can communicate with a serial device.
Watch the tutorial video or follow the steps below.
This tutorial assumes you have gone through the Xojo Desktop QuickStart and Desktop Tutorial and thus have a basic understanding of how to navigate around a simple project, get to the Inspector, the Library, the Code Editor, etc. If you haven 't gone through the Xojo Desktop QuickStart and Tutorial yet, you should do so first.
About the barcode scanner
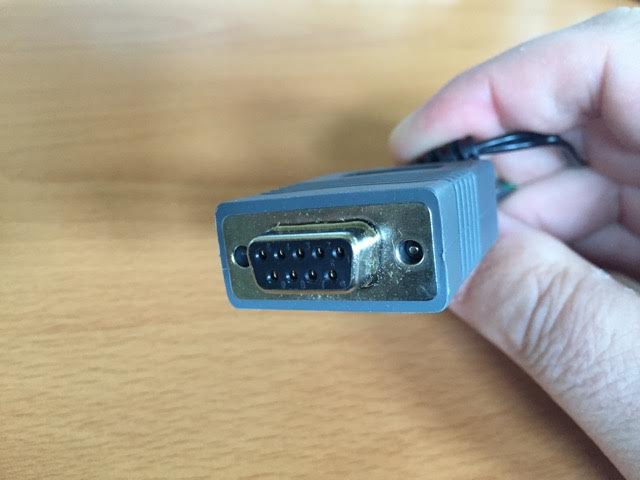
It makes sense to first start with the serial device. For this tutorial, the serial device must be an RS-232 device. That means it has a connector like this:
Computers no longer have RS-232 ports so you 'll also need an RS-232 to USB adapter like this:
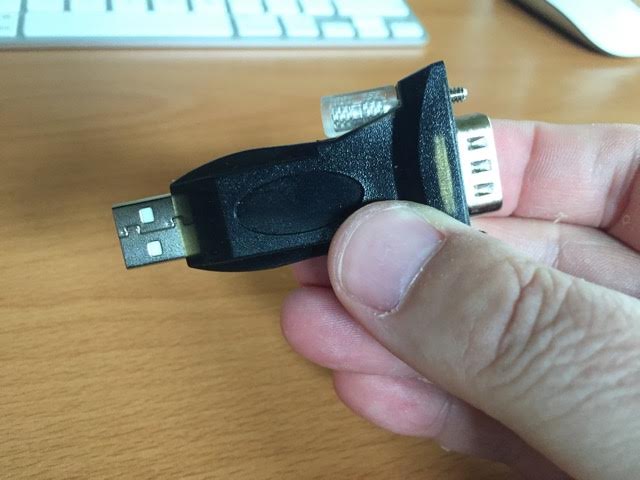
This allows your serial device to connect to your computer through USB. There are some devices that combine these two so you don 't need the adapter. What is important is that the device makes it clear that it's a serial device.
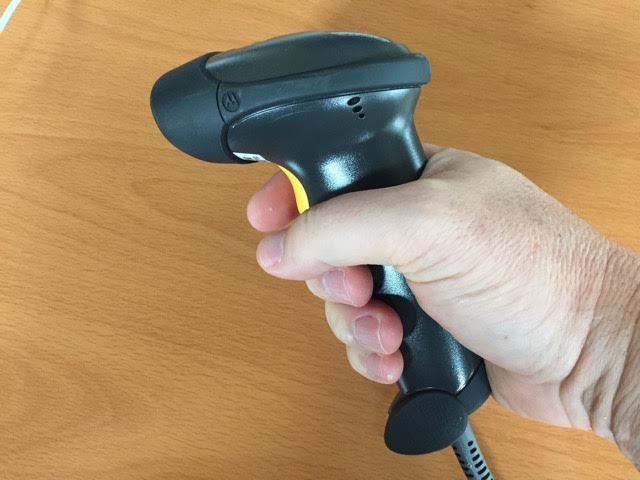
This tutorial uses a Motorola LS2208 barcode scanner but you can connect to and communicate with any serial device. This particular barcode scanner is popular and available from Amazon for about $100 new or less than $40 used.
Many bar code scanners pretend to be a keyboard. You scan a barcode and they convert that to a value then inserts the value into the keyboard buffer as if the user typed it. That's fine for some purposes but it means the user must have the cursor in the field where they want the barcode value to appear. You may not want to depend on that or you may be using a device that doesn 't pretend to be something else and you must communicate with it directly.
Create the project
Launch Xojo (if you haven 't already) and create a new Desktop project.
Serial devices connected to a computer are identified numerically with 0 being the first device. If you know the number, you can just hard-code it. If you know the name the device uses, you can loop through all of the serial devices and look for the index that has the matching name.
Unfortunately, operating systems don 't provide an easy way for a typical end user to find out which devices are assigned which numbers. The best thing to do is add a Popup Menu to your app that lists the serial devices so the user can choose one.
Drag a Label from the Library and title it "Serial Devices:".
Drag a Popup Menu from the Library and set the Name property of the control DevicesPopupMenu.
Your window should now look like this:

This Popup Menu will automatically update to show devices that have been added or removed. When you plug in your device, you 'll want it to appear in this menu and disappear when you unplug it. To do that, you will need a Timer control that will periodically update the DevicesPopupMenu control.
Drag a Timer control from the Library and drop it anywhere in the Layout Editor.
Because a Timer control has no user interface, it appears in the tray at the bottom of the Layout Editor in what is called the Shelf.
Set the Timer's Name property to DeviceListUpdater.
Set the DeviceListUpdater's Period property to 500.
This will cause the DeviceListUpdater to fire over and over again every half second.
Double-click the DeviceListUpdater, select the Action event and click OK.
In the Action event copy and paste the following code:
Var count As Integer = DevicesPopupMenu.RowCount

If SerialDevice.Count <> count Then
  // The number of serial devices has changed so update the menu
  DevicesPopupMenu.RemoveAllRows
  For i As Integer = 0 To SerialDevice.LastIndex
    DevicesPopupMenu.AddRow(SerialDevice.At(i).Name)
  Next
  If SerialDevice.Count < count Then // a device has been removed
    DevicesPopupMenu.SelectedRowIndex = 0
  Else // one has been added so select the new device
    DevicesPopupMenu.SelectedRowIndex = DevicesPopupMenu.LastRowIndex
  End If
End If
This code first gets the count of the number of rows in the DevicesPopupMenu. It then compares that to the number of connected serial devices and if they are not the same, it knows that either a new device has been connected or an existing device has been disconnected. In either case, it removes all the rows from the popup menu then loops through the connected serial devices, adding the name of each device connected to the popup menu. Finally, it checks to see if the number of connected serial devices is less than the number of rows the DevicesPopupMenu previously had. If that's the case, a device was removed so the code selects the first row (row 0) from the list of serial devices. If not, then a device has been added and it makes sense the user would want that device selected so the code selects the very last row of the DevicesPopupMenu.
Click the Run button to run the project.
If you get a syntax error, it's likely to be the result of one or more names of the controls not matching those in the code so check them over carefully and update your control names to match the code.
On macOS with no new devices plugged in, the popup menu may list a few internal system devices.
Windows, the Popup Menu will likely be empty. If you happen to be running Windows on macOS via VMWare or Parallels, you may have an item titled “COM1” in the popup menu.
On Linux it varies. With the Mint distribution you may see a long list of numbered device locations all beginning with “/dev/ttyS”.
With the app still running, plug in your serial device and you should see it appear in the popup menu and be selected. Depending on the OS, you will get different device names when you plug in this barcode scanner:
macOS: usbserial-FTHI8S8F
Linux Mint: /dev/ttyUSB
Windows: COM3
Experiment with unplugging the device and plugging it back in to see that the popup menu automatically updates.
Now it is time to add the SerialConnection control. Quit the running app and return to the IDE.
Drag a SerialConnection control from the Library and drop it anywhere in the Layout Editor. Because it's not a visible control, it will be added to the Shelf.
Click Inspector in the toolbar to view it.
You 'll see the default values for the SerialConnection control in the Behavior section. You 'll have to look at the manual for your device to determine how to set the baud rate, bits, parity, etc. For the Motorola barcode scanner, you only need to change the Baud property to 9600. It will connect at a higher speed, but it won 't work properly.
If you're using the same barcode scanner I 'm using, set the Baud property to 9600. Otherwise, set this property accordingly.
Before you start programming the SerialConnection control, add a button the user presses to connect to the serial device. You could of course choose to make this occur when the user selects a device from the popup menu. However, to keep things nicely separated for the purposes of this tutorial, add a Connect button.
Switch to the Library and drag a Default Button to layout, positioning it to the right of the popup menu.
Change the button's Caption property to Connect.
Change the button's Name property to ConnectButton.
Because we don't want this button enabled until the user selects a device from the popup menu, set the ConnectButton's Enabled property to False.
At this point, your layout should look like this:
Next, you need to make the ConnectButton enable if a device is selected and disable otherwise. Double-click on the DevicesPopupMenu and add the SelectionChanged event to it.
In the SelectionChanged event, copy and paste the following code:
If Me.SelectedRowIndex = -1 Then
  ConnectButton.Enabled = False
Else
  ConnectButton.Enabled = True
End If
Next we need to make the Connect button work. The button will change to “Disconnect” once a connection is made. When the user clicks the button, if the caption is Disconnect, it will:
Close the connection to the serial device
Change the caption back to “Connect”
Enable the popup menu
Tell the DeviceListUpdater timer to start firing again
Otherwise, the user wants to connect so it will:
Set the serial device to the number of the row selected in the popup menu
Connect to the serial device
Set the caption of the button to “Disconnect”
Disable the popup menu
Turn off the DeviceListUpdater timer
Select Window1 in the Navigator on the left-hand side.
Double-click on the Connect button and add the Pressesd event handler.
Copy and paste the following code into the Pressed event handler:
If Me.Caption = "Disconnect" Then // Disconnect from the serial device
  SerialConnection1.Close
  Me.Caption = "Connect"
  DevicesPopupMenu.Enabled = True
  DeviceListUpdater.RunMode = Timer.RunModes.Multiple 'turn it on
Else // Connect to the serial device
  // Set the serial device to the index of the one chosen in the popup menu
  SerialConnection1.Device = SerialDevice.At(DevicesPopupMenu.SelectedRowIndex)
  Try
    SerialConnection1.Connect
    DevicesPopupMenu.Enabled = False
    DeviceListUpdater.RunMode = Timer.RunModes.Off
    Me.Caption = "Disconnect"
  Catch error As IOException
    System.Beep
    MessageBox("The selected serial device could not be opened.")
  End Try
End If
Before reading the data from the device, there needs to be a place to show it.
Click on Window1 in the Navigator to select it.
Drag a TextArea control from the Library to the window.
The Position and size the TextArea control so that your layout looks like this:
In the Inspector, locate the ReadOnly property in the Behavior section and set it to ON.
Last but not least, you need to add the code that will actually read the data from the serial port (through the Serial1 control) and append it to TextArea1.
Double-click on SerialConnection1 and add the DataReceived event.
Copy and paste the following code into the DataReceived event:
Var data As String
data = Me.LookAhead(Encodings.ASCII)
If data.IndexOf(EndOfLine.Windows) > -1 Then
  TextArea1.Text = TextArea1.Text + Me.ReadAll(Encodings.ASCII)
End If
By default, the Motorola LS2208 barcode scanner provides a value with no terminating character. That means you have to keep reading from the serial device until you no longer get any data. That complicates things. If your device works this way, you can add a timer that keeps checking the length of the incoming data and when it sees it hasn 't changed, it assumes the full value has been received. Fortunately, the LS2208 can be programmed to append a carriage return and line feed to the end of the value. Conveniently, EndOfLine.Windows in Xojo provides just that. If you have a LS2208 to experiment with, take a look at the quick start guide that came with it. You will see a section titled, "Add an Enter Key (Carriage Return/Line Feed)" with three bar codes. Just scan those three in order and your scanner will be programming to append carriage return and line feed to the end of any value.
The code above calls the SerialConnection's LookAhead function to get the data from the serial device. It's calling the IndexOf function of the data variable to see if the value returned by EndOfLine.Windows can be found. If it can, you have the entire value so you call the SerialConnection's ReadAll method to read the data and append it to the TextArea.
Lastly, add an error handler just in case something goes wrong.
Click on the SerialConnection1 control to make sure it's selected.
Click the Add button in the Layout Editor's toolbar and choose Event Handler.
Add the Error event handler and add the following code to it:
System.Beep
MessageBox("An error occured while reading data from the device.")
If you have a Motorola LS2208 bar code scanner and have programmed it as instructed, you can now run your project and give it a try. If you have another type of device that terminates the incoming data with other characters, you should be able to modify the code above accordingly.
This tutorial went through a bunch of set up to make the UI display the connected serial devices, update automatically, enable and disable when it should, but most of that in a real world scenario could probably be avoided. The meat of this example is the SerialConnection control and its DataReceived event code above which is only 5 lines.
Next steps
For more information on Serial devices, refer to these topics:
SerialConnection class
Examples Projects:
Communication/Serial/Line State Change Tester
Communication/Serial/Serial Port Bar Code Reader Example
Communication/Serial/SerialLineIndicator