Testing and debugging your iOS apps
You can test/debug your iOS apps in the iOS Simulator or directly on the the device itself. The iOS Simulator is part of the Xcode download, so you’ll need to make sure it is installed before trying to run your Xojo iOS projects.
Refer to the Installing Xcode and Apple Certificates topic for information on how to install Xcode.
Running your app in the iOS Simulator
To run your iOS app in the iOS Simulator, click the Run button on the Xojo toolbar. Your project is compiled and the app starts the iOS Simulator.
Tip
By default, Xojo runs your app on the smallest simulator screen available. It’s best to test your app on a small screen to make sure your user interface design works well on small screens.
When you run the app in the Simulator, you can use the Xojo debugger where you can set breakpoints to stop at the line of code, and then step through the code and look at variable values.
Running in the Simulator is fast and convenient, but you should also always test your apps on actual devices as the Simulator does not work exactly like a device. Some differences when running in the Simulator include:
Apps built for the Simulator use the 32-bit x86 compiler, not the 64-bit ARM compiler. This can result in different app behavior.
Not all device features are available in the Simulator.
Keyboard may work differently in the Simulator.
You may have noticed that the iOS entry in Build Settings has a build step called “Sign”. This build step is used to code-sign your iOS app when you build it for deployment. You cannot change its properties and you should not remove it.
Running your app on-device
To test on-device, first go to Settings > Personal Hotspot on your device and turn that on.
Next, you will need to complete four steps in Apple’s Developer Portal:
Create a developer certificate, download it then double-click it to install it.
Create an app identifier that matches the one in your project.
Register the device you intend to use for on-device debugging.
Create a Development Profile and add your device or devices to it. Download the profile and double-click it to install it.
Next you need to set the Team and Build For properties in your project:
Team should be set to the Team to whom the app belongs.
Build For must be set to Development.
Warning
The first time you run an app on-device (or after you delete the app from your device should you do so), you’ll get a warning about the app wanting to connect to the WIFI network. This is required for debugging. At the moment, this causes the first run to fail. Press Run again and the app will run to test on the device.
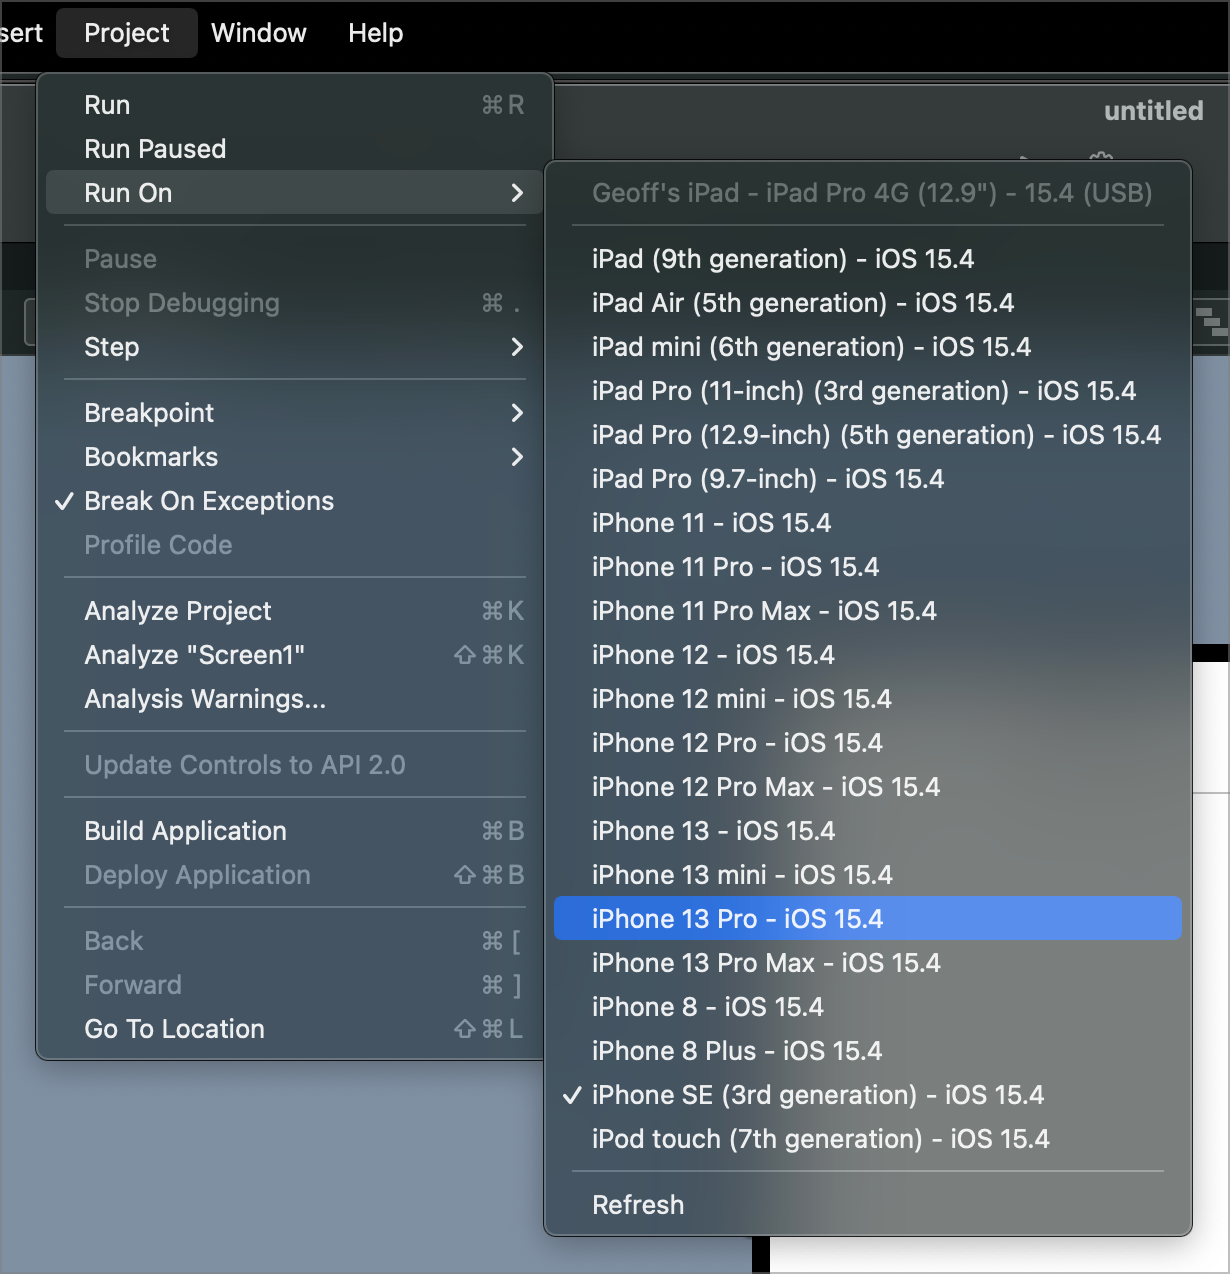
Once you’ve set up all of that, in Xojo choose Project > Run On then choose a device from the menu. If you have a device plugged into your Mac, you can run directly on it.
Note
When testing on-device, make sure not to let your device go to sleep or you’ll have to reconnect it.
Tips
When you use Copy File Steps to copy files to your iOS app on the Simulator, the files are copied to special locations on the Mac itself. These files are not removed between runs of your app.
For complete information about the iOS Simulator, refer to the official Apple iOS Simulator User Guide. The tips below are from the section Interacting with the iOS Simulator:
Gesture |
Description |
|---|---|
Two Finger Drag |
1. Place the pointer where you want the two-finger drag to occur. 1. Hold down the Option key. 2. Move the circles that represent finger touches to the start position. 3. Move the center of the pinch target by holding down the Shift key, moving the circles to the desired center position, and releasing the Shift key. 4. Hold down the Shift key and the mouse button, move the circles in the direction you want to drag, and release both the Shift key and the mouse button. |
Pinch |
1. Place the pointer where you want the pinch to occur. 1. Hold down the Option key. 2. Move the circles that represent finger touches to the start position. 3. Move the center of the pinch target by holding down the Shift key, moving the circles to the desired center position, and releasing the Shift key. 4. Hold down the mouse button, move the circles in and out to the end position, and release the Option key. |
Rotate |
1. Place the pointer where you want the rotation to occur. 1. Hold down the Option key. 2. Move the circles that represent finger touches to the start position. 3. Move the center of the pinch target by holding down the Shift key, moving the circles to the desired center position, and releasing the Shift key. 4. Hold down the mouse button, rotate the circles to the end position, and release the Option key. |
Removing unused devices from the iOS Simulator
You may find that the list of iOS devices and iOS versions for the iOS Simulator contains many more information than you need. For example you may not really need to have iPhone 5, 5s and SE listed in the iOS Simulator.
To remove older devices that you no longer need from the iOS Simulator, you ‘ll need to go to Xcode and open the “Devices and Simulators” window (in the Window menu). Select the “Simulators” tab to see all the iOS Simulator devices that are installed. If you have multiple iOS versions installed then you’ll see devices listed more than once since each device is listed for each version of iOS. For example you may see iPhone 8 listed for both iOS 11.0 and iOS 10.3.1.
To remove a device, such as iPhone 7 running iOS 10.3.1, select it from the list, right-click on it and from the menu select “Delete”. Choose “Delete” again from the “Are you sure?” prompt. The device will no longer appear in this list and the next time you open Xojo the device will no longer appear in the iOS Build Settings Simulator Device pop-up menu.
This Terminal command can also removed all unavailable devices that are left over from older versions of Xcode:
xcrun simctl delete unavailable
Troubleshooting
If your app launches in the Simulator but has a blank screen, be sure to verify that all your image paths are correct.
If your app is immediately crashing on launch, add the UnhandledException event and put code there (or a Break command) to see if that provides additional information.
iOS System logs
If you app crashes while running in the iOS Simulator, you can view the system logs for the crash by selecing Debug > Open System Log from the menu. You can also open the Console app to look at the All Messages view, which will also have additional information, including a link to the crash log itself. If you find a crash, please create a bug report and attach the crash log.