Creating screens that auto-resize using Auto Layout
Auto-Layout describes the ability for the controls on the layout to resize and reposition them as the layout size changes. It consists of a collection of rules that allow you to specify controls in relationship to other controls, making it possible to have layouts that work in all these situations:
Different device screen sizes
Changing device orientations
Language translations
User-specific settings such as font size
OS changes such as control sizes, fonts and spacing
Without Auto-Layout, you typically would have to create multiple UI screens to account for different possibilities and then also add code to handle other situations. With AutoLayout, you can more easily design a single UI whose controls have constraints that allow them to adjust for the above situations.
For example, the Auto-Layout rules for a button could indicate the following:
The Left margin of the button should match the Left margin of the TitleLabel control (at the same scale with no offset)
The Top of the button should be 10 points below the bottom of NoteTitleField (at the same scale).
The Height is fixed at 40 points
The Width is fixed at 100 points
Should you adjust the layout to change the position of TitleLabel or NoteTitleField, the button will be repositioned on the screen as defined by the rules. This is handy when designing you layout, but is even more important when you want your layouts to appropriately use the available screen area of the many different size iOS devices.
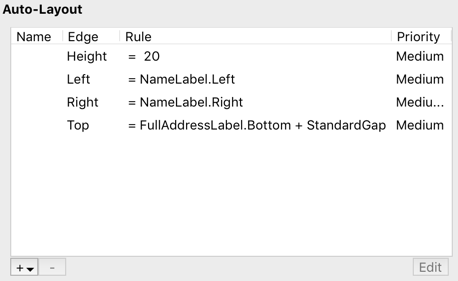
You can see in the above set of rules that the label is set to have the same Left and Right edges as another label on the Screen (NameLabel). This means that if NameLabel is repositioned, then this label is also adjusted. You can also see the Top is set to be the bottom of FullAddressLabel plus a gap. So if FullAddressLabel is repositioned then this label is also adjusted accordingly.
Some Auto-Layout rules are set for you automatically as you move and drag the control on the layout. But you can also set any of the rules manually. To edit a rule, click on its name and then click the Edit button. To add a new rule, click the "+" button and choose the rule from the list.
To add and move a control around on the layout without auto-layout being applied, hold down the Command key as you drag the control. This adds the control using only offsets.
The following Auto-Layout rules can be added, although not all controls have every rule available:
Left: The left position of the control.
Right: The right position of the control.
Top: The top position of the control.
Bottom: The bottom position of the control.
Horizontal Center: The centered horizontal position for the control.
Vertical Center: The centered vertical position for the control.
Width: The width of the control.
Height: The height of the control.
Baseline: Refers to an invisible line, offset from the bottom of the alignment rectangle, along which glyphs of characters are laid out.
Leading: Refers to the edge of the alignment rectangle where words and sentences begin. For left-to-right languages such as English, Leading is the same as Left, whereas in a right-to-left environment such as Hebrew or Arabic, Leading is the same as Right.
Trailing: Refers to the edge where words and sentences end. Trailing is the same as Right for English, but Trailing is the same as Left for Hebrew and Arabic.
You should use Leading and Trailing to make sure your interface is laid out appropriately in all languages, unless the horizontal position should remain fixed at left or right regardless of the language.
You do not need to specify every rule for a control. In fact, sometimes that would be confusing. For example, if you specify a Left and Right rule for a control, then also specifying a Width is not necessary as the Width can be inferred by the Left and Right rules.
Auto Layout rules
Each Auto-Layout rule has the following properties that can be set:
Is (Equal To, Min or Max)
Relative To (None, Containing Screen, TopLayoutGuide, BottomLayoutGuide or any other control on the layout)
Edge (None, Left, Right, Top, Bottom, Horizontal Center, Vertical Center, Width, Height, Leading, Trailing, Baseline, Top Constraint, Bottom Constraint)
Scale %: The percentage of the Edge property to use.
Offset (points): The offset to use with the Edge property.
Priority (Low, Medium, Medium-High, High, Highest): Specifies the importance of the Auto-Layout rule and thus the order that they are applied.
In left to right writing systems Left is the same as leading and Right is the same as trailing. In right to left writing systems, like Arabic, Right is Leading and Left is trailing as the normal flow of layout is from right to left or from the leading edge to the trailing edge.
Example projects for Auto Layout
Examples/Platforms/iOS/Auto-Layout/Auto-Size Label
Examples/Platforms/iOS/Auto-Layout/Add and Edit Layout Constraints from code
Examples/Platforms/iOS/Auto-Layout/Proportional Spacing without code
Examples/Platforms/iOS/Auto-Layout/Switching Constraints
Technical information
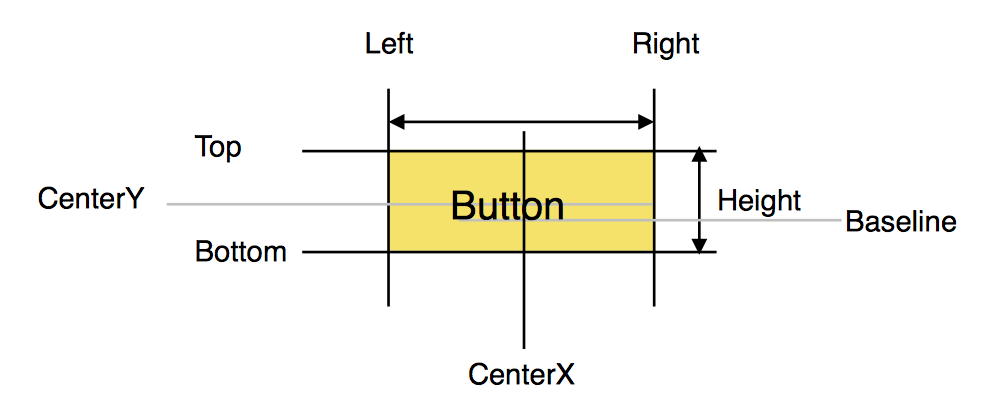
For any single control there are a number of attributes which can be used to refer to its position and size.
In left to right writing systems Left is the same as leading and Right is the same as trailing. In right to left writing systems, like Arabic, right is Leading and left is trailing as the normal flow of layout is from right to left or from the leading edge to the trailing edge.
There are other positional and sizing attributes that are very useful as well.
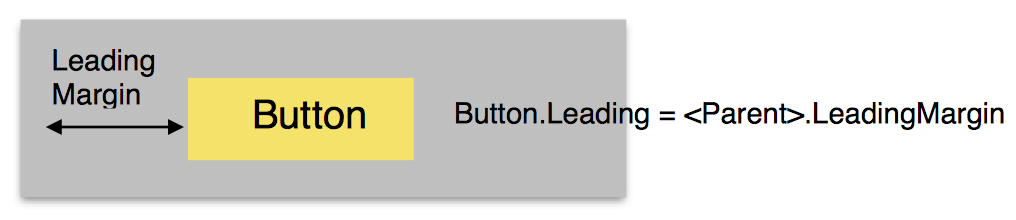
Suppose you have an Screen (seen below in grey) and a button placed on that screen where the left guide line appeared. That gap between the Screen and the button is the LeadingMargin. There is also a trailing margin, top margin and bottom margin.
Suppose you have buttons positioned close to each other and you placed the right most after the left most. When you did this you snapped it to the guideline that appeared offset from the left most button. Something like below.
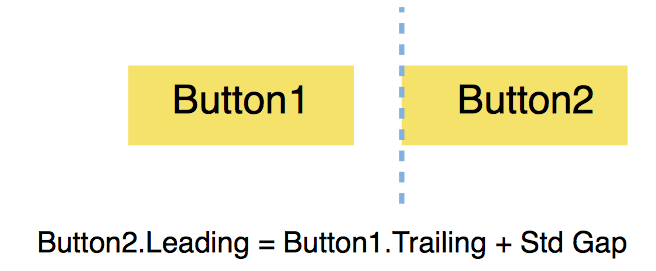
That gap between the two buttons is a “Standard gap” and is appropriately sized for the version of iOS that you are using.
Setting iOSLayoutConstraint in code
You can use the iOSLayoutConstraint class to add new constraints to a control or modify existing constraints. Constraints are mathemetical expressions but are not written in mathematical form.
So say you want to express that ControlA's edge is equal to ControlB's edge. Here is the expression:
ControlA.EdgeA = ControlB.EdgeB * factor * offset
To configure that using an iOSLayoutConstraint, these are the values that would be passed in the Constructor:
Parameter |
Value |
|---|---|
firstItem As Object |
ControlA |
firstAttribute As AttributeTypes |
EdgeA |
relation As RelationTypes |
iOSLayoutConstraint.RelationTypes.Equal |
secondItem As Object |
ControlB |
secondAttribute As AttributeTypes |
EdgeB |
multiplier As Double |
factor |
addend |
offset |
priority |
1000 (typically) |
Adding a constraint to a control
This code adds a right constraint to a TextField with an offset of the StandardGap and the highest priority to the containing Screen (Self):
Var rightConstraint As New iOSLayoutConstraint( _
  MyTextField, _                              ' firstItem
  iOSLayoutConstraint.AttributeTypes.Right, _ ' firstAttribute
  iOSLayoutConstraint.RelationTypes.Equal, _  ' relation
  Self, _                                     ' secondItem
  iOSLayoutConstraint.AttributeTypes.Right, _ ' secondAttribute
  1.0, _                                      ' multiplier
  iOSLayoutConstraint.StandardGap, _          ' gap
  1000)                                       ' highest priority
Setting a specific attribute without a relation
Typically you do not specifically set the width or height for a control, you instead set them as relative to some other edge of the containing screen or another control.
The reason to set a relation that says "keep this edge this far from some other edge" is so that if you rotate the screen, the control remains in its original relative positioning (say 20 pixels from the edge of the screen it's in).
Now if you want to specifically say "keep this to 10 pixels high", remember the original expression:
ControlA.EdgeA = ControlB.EdgeB * factor + offset
This is how you would configure an iOSLayoutConstraint to set the height of a Label to 10:
Var heightConstraint As New iOSLayoutConstraint( _
  MyLabel, _                                   ' firstItem
  iOSLayoutConstraint.AttributeTypes.Height, _ ' firstAttribute
  iOSLayoutConstraint.RelationTypes.Equal, _   ' relation
  Nil, _                                       ' secondItem
  iOSLayoutConstraint.AttributeTypes.None, _   ' secondAttribute
  1.0, _                                       ' multiplier
  10,  _                                       ' addend
  1000)                                        ' highest priority
The key here is to specify Nil for the secondItem as you are not actually relating to another control, but instead setting a specific offset (addend) value. This essentially creates this expression:
MyLabel.Height = (Nothing.NoEdge) * 1.0 + 10
Which evaluates to
MyLabel.Height = 10
Modifying an existing constraint
You can also modify existing constraints that you have configured using the Auto-Layout properties in the Layout Editor. Before you can do this, you first have to give the constraint you want to modify a name. To do so, select the control, then select the specific constraint in the Auto-Layout section of the Inspector and click Edit. In the topmost field (that has the name of the constraint as its label), give it a name and click Done. This is the name you will use to refer to the constraint in code.
For example, a TextField with a Width constraint named TFWidth can be modified at runtime with this code:
Var c As iOSLayoutConstraint = Self.Constraint("TFWidth")
c.Offset = 100
See also
iOSLayoutConstraint, MobileScreen classes