SQLite basics
Learn the foundations to using Xojo with SQLite - the universal, public domain and embedded database engine used for all kind of apps and solutions. No previous experience with database management needed. Once you have finished this tutorial, you 'll have the foundations to create your own multiplatform database apps and to better explore and understand the related Xojo classes.
In this tutorial, we will create a basic but functional database app to manage customers and invoices. Read each section and download the companion Xojo Project.
Introduction
SQLite and Xojo are a great team for managing large amounts of information easily. Users of these Xojo apps don 't have to install any additional components or libraries. In addition, Xojo solutions using SQLite can be easily deployed to any of the supported platforms without the need of making changes in the base code (or with minimal changes).
What Xojo licenses support the use of SQLite in your products? Absolutely all of them: Xojo Lite, Desktop, Pro, Web, iOS, Pi and Enterprise!
A few reasons the SQLite a database engine so popular is:
It is an embedded library. This means that the users of the apps don 't need to use additional hardware or install additional or external components in order to use them. What's more, thanks to Xojo you can forget about the need to include or add any SQLite libraries to the deployed executable package. Xojo takes care of everything, offering the same behavior in all the supported platforms!
It is Public Domain. This means that you will not have to pay a license or royalties for using SQLite in your developed solutions, even if they are commercial.
SQLite has a low footprint, so your deployed executables will not need a lot of storage; this is paramount if you need to deploy your Xojo solutions on embedded hardware with strict requirements.
It is truly Universal. SQLite is included by default in a wide range of devices, even in the main Operating Systems used for Desktop, Smartphones, tablets, Smart TV, etc.
The databases generated with SQLite are common files, whose size is only limited by the Operating System used to store them.
Xojo + SQLite offers great flexibility:
We can connect with one or several already existing SQLite databases, working with the data contained in their respective tables.
We can design an SQLite database from scratch, using the integrated Database Editor in the Xojo IDE.
We can create an SQLite database from scratch via code from the app.
In order to accomplish these operations, among others involved with database management, Xojo offers a Class that makes everything simpler:
SQLiteDatabase. This is the class we need to use for Console, Desktop, Web and iOS apps.
Xojo adds the most stable, tested and trustable SQLite release to the framework, avoiding some of the problems, backwards compatibility issues or bugs that may arise when adopting the latest available releases.
In addition, sharing the same database library (or engine) release also means that our apps will be 100% portable between all the supported platforms. Thus, the most important fact we have to remember is that, while we may not be using the latest available SQLite release, we will not be using a release far away either; and with the assurance that we will get the same behavior no matter that the solution will be running under macOS, Windows or Linux, for example.
Of course, Xojo also updates the implemented SQLite library nearly every new release. For example, when this course was published, we already knew that the Xojo 2018.1 release will support 256 bits ciphering, being significantly more strong in comparison with the 128 bits used until Xojo 2017r3 release.
Anyway, if you find yourself in a situation where you need additional features not included in the Xojo provided SQLite implementation, you can turn to any of the available third parties add-ons and components that expand the use of SQLite even more. For example, Monkeybread Software offers two Multiplatform plug-ins. The first of these is the MBS Xojo SQL Plugin; and the second one is MBS SQLite Extension, adding the following features over the ones you can find in the default SQLite implementation:
Additional mathematical functions as Round or Pow
Functions to save Blob values (large Binary Objects) in files, outside of the own database file; something that is always preferred and even a good practice.
Functions to calculate Blob values checksums in the server
String functions as SoundEx or not using accented characters for text search
Use of Regular Expressions for search
Independent of the SQLite implementation you decide to use, notice that all the database operations made on SQLite use the SQL language, in fact the SQL/92 and SQL/99 subset.
Multiuser support
Unlike other database engines that offer a Client/Server architecture, SQLite was not developed from its inception to support several simultaneous accesses over a database file residing under a network server. However, you may be surprised to know that through the WAL (Write Ahead Logging) feature activation —also supported by Xojo— it is possible to provide this functionality if there are not too many simultaneous accesses, and the use from the clients (apps) is done not directly accessing the database file residing in a network server, but through an app, residing in the same server network that the database file. In fact, that it is better to act as an intermediate, communicating between the clients and the database file itself.
An example of this configuration can be a Web app created with Xojo that communicates with a SQLite database located in the same server, or any other Xojo app acting as a server to one (or more) SQLite databases.
You also can find third parties products able to serve SQLite database files from a server, as for example CubeSQL from SQLabs and Valentina Server from Valentina, among others.
In-memory databases
A peculiarity to SQLite databases is that they don't necessarily need to be create or saved as files on physical storage; in fact, we can create them as in-memory databases. This gives us an idea about the kind of uses, the flexibility and performance you can get… if the hardware you use has enough memory to support them! (as probably is the case with the current available hardware).
You can also create and use this kind of in-memory databases in Xojo apps, with the advantage that you will find the features that enables the apps to dump, save or backup these in-memory databases to physical files.
SQLite database anatomy
What makes a SQLite database after all? As we have seen, it's no more than a regular file whose content represent one or more tables. At the same time, these tables are composed of a series of columns whose label or name (identification) and type are used to define their structure. Then, we will populate these columns, or some of them, through the creation of records (or rows) for the defined tables in our database file.
If you think about it, this representation doesn 't differ too much from the typical spreadsheet, while it is true that the database files have other aspects that separate them from this other kind of software. Anyway, it helps to visually understand the underlying basic structure of a SQLite database. In fact, it is through the table definition as we start to give structure to the database. For that, during the table definition it is mandatory to name or label for every column; once done that, we can start creating new records for the newly created table.
However, the same way we have at our disposal several kind of Types in Xojo that we can use in order to define our variables or labels, and that will be used both to identify and limit the kind of data we can assign to them, or in combination with other variables, properties and method parameters or events, SQLite also offers their own Types set, but with a main and very important difference:
Xojo is strict in the management of their Types. This means that, once you declare a variable, for example as Text, you will not be able to assign a different type to it, just other Text values or previously converted to Text values.
Under SQLite the Type declared in association with a column is just intentional. This is, when we create the SQLite database tables we can assign any of the supported types to the columns, but this will not impede to insert or update the columns of the records using values with completely different types to the expected or declared ones. However, when possible, the SQLite engine will try to implicitly convert the received value to the one declared for the column, but this behavior is not guaranteed at all!
Once we know this, we also have to notice that the available data Types are:
Null
Integer
Real
Text
Blob
As you can see, SQLite lacks for example the Boolean type, while internally manages it as 1 or 0 for the columns defined as Integer, or as True and False for the columns defined as Text. In addition, Xojo provides the mechanism (as we will see in next sections) that allows us to expand, in certain way, the amount of types we can work with when dealing with SQLite databases, easing this way the retrieval and saving of data into the records with the expected results.
When it comes to the structure creation for a database, it is possible to add new tables to an already created database, delete any of the existing ones, and modifying any of the already defined tables in the database, but in this last case only by adding new columns and not deleting any of the previously defined columns.
Creating our first database
As we have seen, we can create the SQLite database structure using any tool we want to, ranging from any of the existing commercial or free SQLite database Editors, or even using the command line from the Terminal or system prompt. However, the Xojo IDE includes its own database Editor, and this will be the one we will use in order to create our first SQLite database! For that, choose the Insert > Database > New SQLite Database… from the menu.
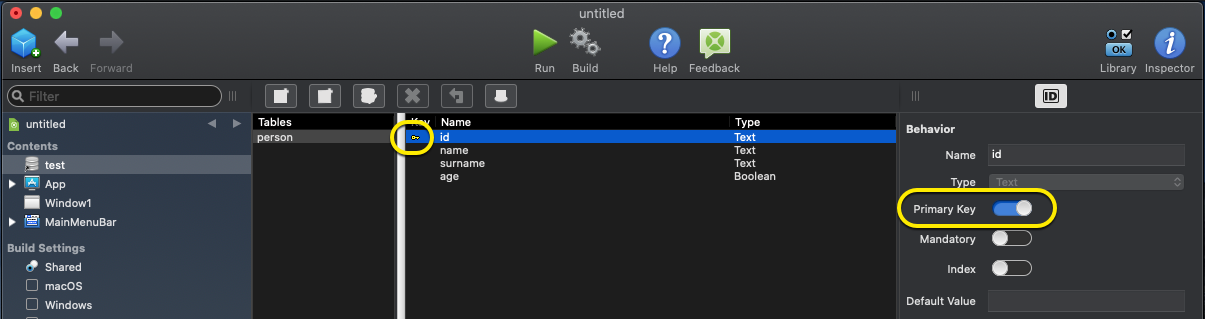
As result, we will get a Dialog to enter the name of the database file and select the path or folder to save it (for this tutorial we will save the file on the same folder that our Xojo Project). After confirmation, Xojo will present the Database Editor, adding the corresponding object reference as a Database Type —i.e.: an alias to the file on disk— to the Navigator (1), showed in the following screenshot. If we want, we can even change the name of the referenced object from the Inspector (A), but notice that we will be renaming the internal reference used by the Xojo code and not the name of the real file on disk:

Warning
The database files created and added to the Xojo project in this way will expect to always find the database file in the same absolute path. This means that, when deploying the apps using database files added in this way, we will have to be sure that the deployed SQLite file will be reachable using the same path (or location), and the final user has the proper read and write privileges to access the database file.
The operations available in the Database Editor are not as complete as those found in the dedicated SQLite management apps, but they are good enough to put the main wires to our database in order to prototype our apps, or to define the structure of really simple SQLite database based apps. For these cases, we will be able to add new tables (2), new column definitions for the selected table (3), and apply the changes made on the Database (4); using the buttons found in the upper toolbar.
Warning
Don 't forget to apply the changes made after adding or modifying new tables or columns. It may seem something trivial, but the flexibility to change between the objects listed under the Navigator will result in losing the changes made to the database if they are not previously saved.
As we add new columns (or fields) to the database, we 'll see that the Inspector Panel will bring a new range of options we can use to define the name of the column, the associated Type and other attributes. Let's see what they mean and which of these make sense when used in combination with a SQLite database:
Type. You will notice that this popup menu offers more types that the ones supported by SQLite seen in the previous section. It is recommendable to always adhere to the only types officially supported by SQLite.
Primary Key. All the SQLite tables have one or several columns to uniquely identify every record in the table. In fact, all the tables include implicitly and by default a column named rowid that, if there is no other column doing the same function, will act as the Primary Key for the table. If during our table definition we create a column of Integer type, also activating this checkbox in the Inspector Panel, then rowid will become an alias for the column defined by us. Notice that, in our example, the id column is acting as the Primary Key, being visually indicated with the icon of a little key under the Key column in the Editor.
Mandatory. When we activate this Constraint, we are telling SQLite that we don 't want to admit the creation of new records that omits a valid value for this column. It's a good way to make sure that the record will have all the needed information we expect to find in future operations on it. Thus, if SQLite finds that the operation omits a value for this column, the operation will not be completed and we will get an error that we can catch from the Xojo code.
Index. When this option is activated for a Column, the associated table will create an Index based on it. The purpose of this index is improving some operations, like the queries' performance, or those resulting from combining data, as we can get when using the SQL instruction Join. A table may create indexes from just one column or multiple columns. In the second case, the order we use to include the columns in the index is very important because SQLite will sort the data based on the first defined column for the index. The assignation, quantity or kind of indexes created for the tables in the database is kind of an art, and will depend mostly of the operations and queries we will expect to do on the stored data.
Default Value. We also can define the default value assigned to a column when it's not provided as result of the new record creation and insertion. This is a good way to make sure that we will not have empty fields; also to get a known and expected value if none is provided. We only need to be sure of assigning a default value compatible with the Type defined for the column.
Length. This has no relevance when working with SQLite database because SQLite doesn 't accept field length restrictions, in comparison to what's doable when using other database engines. Having said this, SQLite imposes length limits for Text and Blob columns, but they are big enough to not be considered a real limitation for most of the SQLite based solutions.
Creating the schema with SQL … from the editor
We can create the database schema (tables structure) adding the tables and columns as we have shown in the previous section, but this has two main downsides: it is slow and doesn't allow access to all of the flexibility of SQL.
The good news is that if we have enough SQL syntax knowledge, we can use the toolbar button to execute complex SQL sentences. This button will not be enabled until we have added and selected a Table.
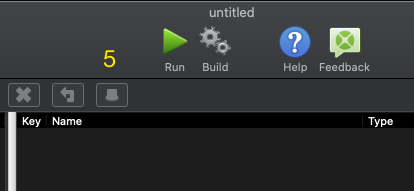
However this is not a big issue, mainly because the newly added tables are not saved to the database until we expressly push the corresponding button. Thus, in order to create the same schema for our example database, we only need to add a new empty table (we don 't have to change its name either), clicking the SQL Statements button (5) after that, and writing the following sentence in the resulting Dialog box:
CREATE TABLE person(id INTEGER PRIMARY KEY AUTOINCREMENT, name TEXT, surname TEXT, age INTEGER);
Push the Execute button, close the dialog and you will see how the database will reflect the just created table, with the structure and column definitions as result of the operation. This requires less time in comparison to the same procedure using the Database Editor buttons combined with the Panel Inspector attributes.
Let's take advantage of this feature again to create a second table. While the last table is still selected, use the SQL Statements button again and enter this sentence:
CREATE TABLE invoices(id INTEGER PRIMARY KEY AUTOINCREMENT, customer TEXT NOT NULL, amount INTEGER);
Execute the sentence and be sure that the database has the two tables: person and invoices. Once this is done, we will have finished our example database. Remember: while the integrated database editor is useful to define simple database or for prototyping, you 'll probably want to use specific tools or apps devoted to the creation, edition and management of more complex SQLite databases projects.
Nevertheless, the integrated Database Editor doesn 't offer options to add new records to the database. This is something we will take care of in the next section!
Creating a reference to the database file
In this step we are going to create an internal reference to the SQLite database file created in the Database Editor. For that, select the App item in the Navigator and add a new property to it using the following values:
Name: db
Type: SQLiteDatabase
Scope: Public
We will use this property to refer (and operate with) the database along all our application windows.
In order to assign and Connect to the database file, add the Opening Event Handler to the App item from Insert > Event Handler… Once added, put the following snippet of code in the resulting Code Editor:
db = New SQLiteDatabase
db.DatabaseFile = New FolderItem("test.sqlite")

Try

  db.Connect

Catch e As DatabaseException

  MessageBox(e.Message)

End Try
The first line of code creates a new SQLiteDatabase instance and assigns it to our db property. Then, we need to inform our db property (keep in mind that is a SQLiteDatabase) what is the real database file we want to work with. For that we assign a new FolderItem instance, initialized with the name of the database we created and saved previously from the Database Editor. In this case, we are using just the name of the file for the FolderItem constructor, because it will default to search for it in the same folder where our Xojo project is saved.
The most important thing here is the db.Connect line, in charge to "connect" and open the database. If everything goes ok in the call to this method, then we will be able to start to do things like insert, update or delete records, create new tables… or any of the SQLite supported operations.
Designing the UI for our database app
In order to see how we can work with our example database, we will go through an example app that will offer a set of basic features reflecting the database schema: we will be able to add new customers, new invoices and also access all the invoices for the currently selected customer, calculating the sum. The best part is that, along the way, we will learn how to use other methods from the SQLiteDatabase class, and other related database classes, with a minimum amount of code.
Layout the user interface for our example app as shown in the following screenshot. This is the same desktop example that we previously added to the SQLite database. Don't forget to name the highlighted controls via the Inspector Panel. The remaining controls will have their default names:
All buttons are DesktopButton instances.
All the labels are, well, Label instances (including the one placed at the right of "ID", and whose default text has been deleted).
We will use three DesktopTextField instances, both for showing and capturing the data associated with their respective labels: "Name", "Surname" and "Age" (all of the with their Enabled property set to False).
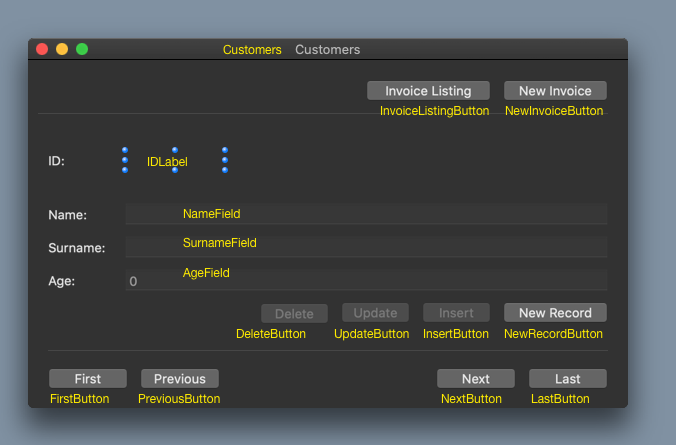
At this point, we have all the UI elements our app will use for the following operations:
Add New Records
Insert Record
Update Record
Delete Record
Move to the First Record
Move to the Previous Record
Move to the Next Record
Move to the Last Record
Of course, at first our database is empty, without records. But it will no be always the case! After we have added some records into it, the next time we run the app probably expect that the window displays (for example) the last record in the database! So let's get rid of that adding the Opening ** Event Handler to the **Customers window, and adding the following code in the resulting Code Editor:
Try
  ' Check if we have existing records in the database
  ' If so, then fill the fields with the data from
  ' the last one.

  Var rs as RowSet = App.db.SelectSQL("select * from person where id = (select max(id) from person)")

  UpdateUI(rs)

  nameField.Enabled = True
  surnameField.Enabled = True
  ageField.Enabled = True

Catch e As DatabaseException
  MessageBox(e.Message)
end try
Some interesting things about this fragment of code:
We instruct our database instance (through the db property) to get a selection of Rows (records) by calling the SelectSQL method on it. As you can see, the parameter is a string with a proper SQL sentence.
As result of calling the SelectSQL method, we get a RowSet instance whose contents will be the rows matching the SQL sentence (or no rows at all if there are not matches, for example). We assign this RowSet to our rs variable.
Then will update the UI with the name, surname, age and ID of the matching record. This is something that we need to do in several places, so it's better to create a method for that in the Customers window (let's call it UpdateUI) passing along the rs variable, instead of writing repetitive code "here" and "there". So, after adding the new UpdateUI method we can add the following code in the resulting Code Editor:
Try

  If rs.AfterLastRow = False Then

    IDLabel.Text = rs.Column("id").StringValue
    nameField.Text = rs.Column("name").StringValue
    surnameField.Text = rs.Column("surname").StringValue
    ageField.Text = rs.Column("age").StringValue

    InsertButton.Enabled = False
    updateButton.Enabled = True
    deleteButton.Enabled = True

  End If

Catch e As DatabaseException

  MessageBox(e.Message)

End Try
The interesting thing here is the if rs.AfterLastRow = False comparison. A RowSet instance can be a valid one even if it has no rows on it! So, if the AfterLastRow property is set to False, that does means that we have (at least) a valid row whose columns we can access to retrieve his associated data.
Adding new records, inserting, updating and deleting rows
Once we update the App UI on every run, is time to implement the functionality that will let us to Add new records, Update or Delete them.
Let's start selecting the New Record button and adding the Pressed Event Handler to it. Instead of adding a new record to the database, the action from this button will reset the UI fields and other button status using the following code:
' enable fields and restart their values

nameField.Enabled = True
surnameField.Enabled = True
ageField.Enabled = True

IDLabel.Text = ""
nameField.Text = ""
surnameField.Text = ""
ageField.Text = ""

' Enable the buttons so they are active
' When a new record has been created

InsertButton.Enabled = True
UpdateButton.Enabled = False
DeleteButton.Enabled = False
Insert record
Select now the Insert button in the Layout Editor and add the Pressed Event Handler to it. This will be in charge of adding a new record to the database, using the fields data to fill-in the expected columns in the record. Write the following code in the associated Code Editor:
Var PersonRecord As New DatabaseRow

PersonRecord.Column("Name").StringValue = nameField.Text
PersonRecord.Column("Surname").StringValue = surnameField.Text
PersonRecord.Column("Age").IntegerValue = ageField.Text.ToInteger

Try

  App.db.AddRow("person", PersonRecord)

  IDLabel.Text = App.db.LastRowID.ToString

  Me.Enabled = False

  deleteButton.Enabled = True
  UpdateButton.Enabled = True

Catch e As DatabaseException

  MessageBox(e.Message)

End Try
In the first line of code we create a new instance of DatabaseRow, so we can use the associated variable to populate the columns we are interested in with the data entered by the user in the respective TextFields. Observe that, in order to add a new record in the database, we only need to call the AddRow method passing along the name of the database table ("person") and the database row instance.
Updating record
Let's see now how we can update a record. Select the UpdateButton button and add the Pressed event to it, writing the following code in the resulting Code Editor:
Try

  Var rs As RowSet = App.db.SelectSQL("select * from person where id="+idLabel.Text)

  rs.EditRow
  rs.Column("name").StringValue = nameField.Text
  rs.Column("surname").StringValue = surnameField.Text
  rs.Column("age").StringValue = ageField.Text
  rs.SaveRow

Catch

End Try
For updating, we retrieve a RowSet matching the record whose ID column is the same as the record we are showing in the UI (and displayed by the idLabel control). So here, we only need to call the EditRow method before assigning new values to the columns we are interested in, and call then the SaveRow method to make that changes permanent on the database. That easy!
Deleting records
The last CRUD (Create, Read, Update, Delete) operation related to databases is the one in charge of deleting the current record. So, add a the Pressed Event Handler to the DeleteButton button and write the following code in the resulting Code Editor
Try

  Var rs As RowSet = App.db.SelectSQL("select * from person where id="+IDLabel.Text)

  rs.RemoveRow

  ' Display last available row

  rs = App.db.SelectSQL("select * from person where id = (select max(id) from person)")

  Var name, surname, age, id As String

  If rs <> Nil And rs.AfterLastRow <> True Then

    UpdateUI(rs)

  Else

    ' no more rows in the database

    pbUpdate.Enabled = False
    pbInsert.Enabled = False
    me.Enabled = False

    nameField.Text = ""
    surnameField.Text = ""
    ageField.Text = ""
    idLabel.Text = ""

  End If


Catch e As DatabaseException

  MessageBox(e.Message)

End Try
As you can see in the two first lines of code, deleting the current record is as easy as retrieving it from the database (getting a RowSet matching the SQL query), and calling then the RemoveRow on the own RowSet.
However, when we delete the current record, we expect the UI to update displaying a new existing record from the database. It could be the previous one or the next one. In this case, we are retrieving the last one. After that we call our UpdateUI method, passing along the RowSet with the last record (if any). If there are no more records in the database, the we delete
Working with two tables
In this section we will add a second window to the project. This window will be in charge of adding new records to the Invoices table. It will also serve to show us how to relate values from two tables, because the new invoice records have to be paired to the id of an existing customer from the "person" table.
Add a new window to the project. Next, set the Type property to Modal Dialog, and the Title property to New Invoice, both of them under the Frame section of the Inspector Panel. Change also the Name property to Invoice, under the ID section.
Next, layout the new window as showed in the following screenshot, leaving all the names for the control instances as their default values, except the ones highlighted in red.

The record insertion itself will be done via the code associated with the Pressed event added to the AddButton button:
Try

  Var invoiceRecord As New DatabaseRow

  invoiceRecord.Column("customer").StringValue = lbCustomerID.Text
  invoiceRecord.Column("amount").StringValue = amountField.Text

  App.db.AddRow("invoices", invoiceRecord)

Catch e As DatabaseException

  MessageBox(e.Message)

End Try

Self.Close
We said that our new invoice has to be associated with an id from the current customer in the main window; so we have to assign that information to the Label control named lbCustomerID from the Invoice window. How we can do this? Really easily!
Again select the main window (Customers), choose the button labeled New Invoice and add the Pressed Event to it with the following code in the resulting Code Editor:
Invoice.Show
Invoice.lbCustomerID.Text = IDLabel.Text
With the first line of code we will show the Invoice as a modal Window. Once active, we just need to assign the content from the Label control named lDLabel, from the main window, to the Label control named lbCustomerID.
Iterating a RowSet
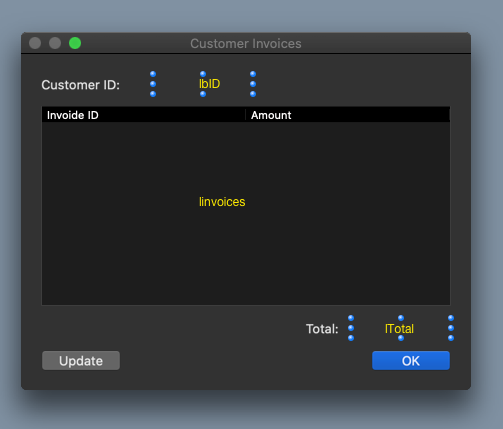
Let's add a third (and last) window to the project. This is the one in charge of listing all the invoices for the current customer, displaying every item in its own ListBox row, and providing the total accumulated amount at the end of this list.
Once the window has been added to the project, use the following settings in the Inspector:
Name: Invoices.
Type: Movable Modal.
Title: Invoices Listing.
Next, layout the user interface as shown in the following screenshot, leaving all the controls' identifications with their default names, except for those highlighted in red color for the Label and the ListBox:
Add a new method to the window using the following signature:
getInvoicesForCustomer(id As String)
Next, write the following fragment of code in the resulting Code Editor:
lInvoices.RemoveAllRows

lbID.Text = id

Var rs As RowSet = App.db.SelectSQL("SELECT id, amount FROM invoices WHERE customer=" + id)

Try

  Var total As Double
  Var t As String

  For Each row As DatabaseRow In rs

    lInvoices.AddRow row.Column("id").StringValue
    t = row.Column("amount").StringValue
    lInvoices.CellTextAt(lInvoices.LastRowIndex, 1) = t

    total = total + t.CDbl
  Next

  lTotal.Text = Format(total, "##########.00")

Catch e As DatabaseException

  MessageBox(e.Message)

End Try
The first thing we can see is that we are assigning the value from the received parameter to the Label control named lbID. This is the one matching the ID of the current record from the Customers window.
The most interesting thing, however, is what we find in the next lines of code:
In first place we get a RowSet with all the records from the "invoices" table whose "customer" column matches the id we got from the displayed record in the Customers window.
Then, we iterate all the records in the "For each row As DatabaseRow in rs" loop, adding their fields to both columns of the ListBox1 instance, accessing the record fields as we have seen in the previous section. Remember that AfterLastRow will be false if the RowSet is not pointing beyond the last row in the set.
We will take advantage of iterating the records to total the amount from every invoice, using for that the CDbl command that returns a Double type from a text String. Then, we show the total addition using the Format function for that.
We will want to update the displayed values in the case the user adds a new "Invoice" to the same customer while this window is still open. To solve that, we will add a new Pressed Event Handler to the button labeled "Update", and putting the following code in the resulting Code Editor:
getInvoicesForCustomer(lbID.Text)
Finally, add the Pressed Event to the Button1 control and insert the following instruction in the corresponding Code Editor: self.Close.
We just need to select the main Customers Window, select the pbInvoicesListing, adding the Pressed Event to the button and putting the following code in the resulting Code Editor:
Invoices.Show
Invoices.getInvoicesForCustomer(idLabel.Text)
The first line of code will show the Invoices window and the second line of code will call the method we have created, previously passing as argument the ID for the current record.
The last word
Throughout this course we have reviewed the main foundations of SQLite database, their structure and the available Types for tables definition. We have seen how we can use the integrated Database Editor to create from scratch new, basic, SQLite databases and the way we can create and define their tables and their fields. Lastly, we have seen one simple way to create a functional database front-end or user interface able to Create, Insert, Modify and Delete records from the database.
We also have introduced the RowSet and DatabaseRow classes, and how we can access a Row columns using the available methods; and how we can execute complete queries using SQL sentences in order to retrieve a RowSet with the matching records in the database.
Quizzes
Take these quizzes to test your knowledge of SQLite basics with Xojo. Check your answers on the SQLite Basics Quiz Answers page.
Quiz 1: Introduction to SQLite
Use this Quiz to check what you have learned about SQLite database foundations. Notice that the questions may have more than one right answer.
Question 1.1: Check all the right affirmations.
SQLite is a Client/Server database engine.
SQLite can be used for free.
SQLite doesn 't requires additional installations.
SQLite doesn 't support multiple users.
Question 1.2: Xojo always implements the latest available SQLite Library.
No.
Yes.
Question 1.3: Xojo supports multiple SQLite databases use.
No.
Yes, they always have the same number of Tables in their structure.
Yes.
Question 1.4: What Xojo Licenses offer support for SQLite?
Desktop Lite, Desktop, Console and iOS.
All of them, except Web.
All of them, you pay the required royalties for each deployment platform.
All of them.
Question 1.5: SQLite supports in-memory databases.
Yes, they are always saved to disk before exiting the app.
No.
Only if it is also backed by a database on disk.
Yes.
Question 1.6: Xojo supports saving an in-memory database to disk.
No. We have to have previously created a new database in disk, backing the in-memory data to it.
Yes.
Question 1.7: What is the name of the Class (or Classes) in Xojo we can use to work with SQLite databases?
XQLite.
SQLiteDesktopBase.
SQLiteDatabase.
iOSDatabase.
Question 1.8: Is it possible to place a SQLite database in a Server? Check all the right answers.
Only using third-party products.
Using third-party products.
The access to the database file is always made from an app located on the same server.
We need to activate the WAL feature.
No.
Question 1.9: What are the advantages of using the WAL feature on SQLite?
Multiple simultaneous accesses from multiple users.
A better integrity protection for the stored database data.
Reduced memory consumption.
It is mandatory in order to create and use in-memory databases.
Question 1.10: Can we use RegEx (Regular Expressions) in the SQLite queries?
Only if we add third-party components or add-ons.
Yes, Xojo includes RegEx support for SQLite.
No.
Quiz 2: SQLite Database Structure
This quiz lets you check the knowledge acquired about SQLite databases structure. Notice that the questions may have more than one right answer.
Question 2.1: Does SQLite use strict Types checking for columns definition?
Yes.
No.
In some cases.
Question 2.2: A table definition consist fundamentally of…
Cells.
Rows.
Columns and Rows.
Columns.
Question 2.3: The SQLite data Types supported by SQLite are:
Nil.
Integer.
Double.
Text.
Null.
Boolean.
Real.
Picture.
Bolb.
Blob.
Question 2.4: Once a table has been created, we can…
Delete columns.
Modify some of the current columns.
Add new columns to the table.
Question 2.5: SQLite admits creating columns that will be empty during the database use.
Yes.
No.
Quiz 3: Integrated Database Editor
Verify with this quiz the acquired knowledge about SQLite database creation using the integrated Database Editor. Notice that the questions may have more than one right answer.
Question 3.1: Xojo just supports adding already created SQLite databases to the project.
That's true for databases using a different SQLite library version than the one used by Xojo.
No.
Yes.
Question 3.2: Once we have created a new SQLite database using the integrated Database Editor, the path to the database file will be resolved at execution time; so we can rely on this for our products' deployment.
No. It is an absolute path that we can 't modify.
Only for multiplatform deployments.
Only if the database file has been moved from its original location.
Question 3.3: Xojo automatically saves every change made using the integrated Database Editor, so we can rely on this.
Yes.
Only when changing from table in the same database.
No, we have to make sure to manually save all the changes.
Question 3.4: We can limit the field length for SQLite tables using the Length property.
This has no effect in SQLite.
Of course, we can find this ability under the Inspector Panel and it is applied to the database file schema.
It only applies to Integer Type columns.
Question 3.5: Index creation for a Table…
Allows ordering alphabetically the records.
Extends the kind of queries we can make on the database.
Improves the queries performance over columns included in indexes.
Quiz 4: RowSet
This quiz lets you verify the acquired knowledge about the RowSet associated to a database query. Notice that the questions may have more than one right answer.
Question 4.1: A RowSet is…
The class we use to get the rows (records) from a database query.
A way to insert new records in a database table.
A way to update records.
Something we can use to create new tables in the database.
Question 4.2: How can we get a fresh RowSet?
Getting a new instance as result from a database query.
Through the Column method.
Calling the EditRow method.
Setting it to Nil.