Moving To API 2.0
When you create applications with Xojo, you use the Xojo framework. This consists of classes and modules that provide things like windows, access to files, and more. When you use things like FolderItem and MsgBox, you 're using the APIs that make up the Xojo framework.
API 2.0 is our effort to make the way in which you write code easier and faster by introducing new APIs that are more intuitive and consistent. This document will provide an overview of API 2.0 and explain how you can move to it when you are ready.
Note
There's no need to rush to change code to API 2.0. We expect that most of you will upgrade parts of your code only when doing so provides some advantage like a bug fix or new functionality. The APIs that have been replaced with new ones will likely be around for many, many years. For more information, check out our Your Path Forward with API 2.0 blog post about transitioning to API 2.0.
Overview
Creating Variables - The Dim keyword is short for “dimension” and is left over from the original BASIC language of the 1960 's. While you may have become accustomed to it, it's not intuitive for most people. Now you can use the Var keyword, which is more obviously short for "variable" and also commonly used in other languages.
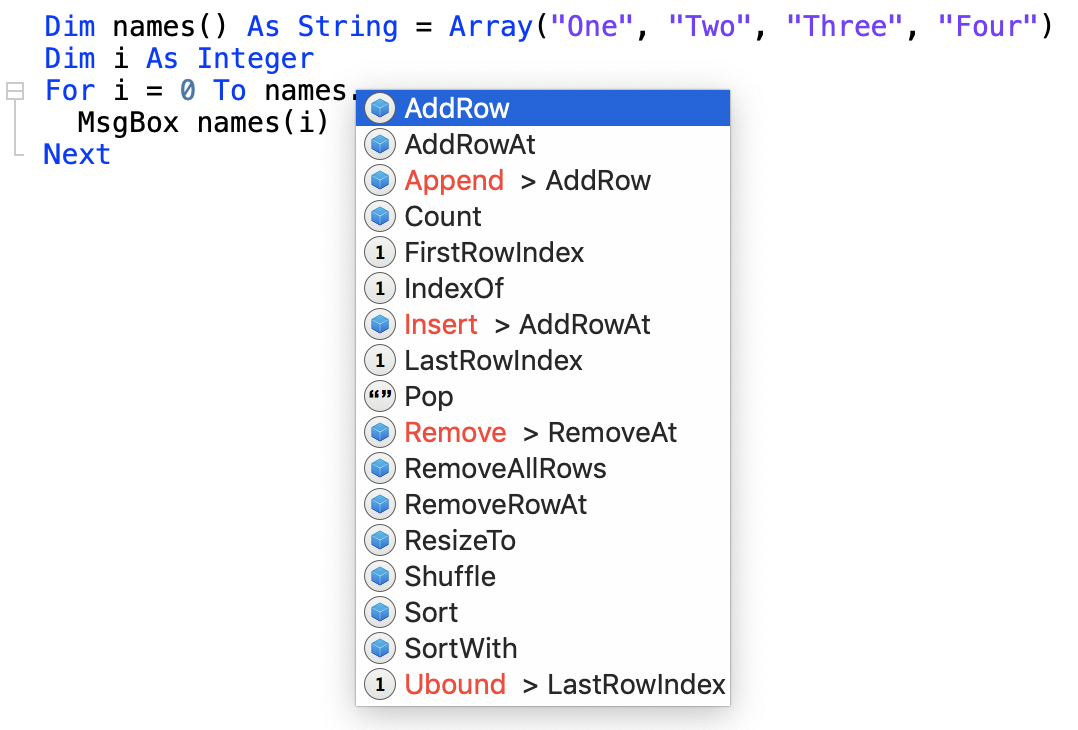
Adding/Removing Rows - Working with lists of data is now more consistent. Adding rows to arrays, a ListBox, a PopupMenu, a ComboBox and more is done using an AddRow method. Removing rows is done with RemoveRow or to remove all rows, the aptly named RemoveAllRows method.
Working with Indexes - All indexes are now 0-based. Methods ending with the word “At” signify that the first parameter will be an index. For example, AddRowAt indicates a row will be added at the index you provide. RemoveRowAt removes a row at the supplied index. The index will always be the first parameter.
Data Looping - This is a very common operation. The easiest way to do this is with an iterator which passes through a list of data without requiring you to keep track of the index to access the current item. For example, when looping through an array, you must make sure to remember to start at 0 and then continue to the last row of the array. Such a loop might look like this example:
For i = 0 To students.LastIndex
  If students(i) = "Sally" Then SallyCount = SallyCount + 1
Next
With an iterator, it's assumed you will be looping through the entire array and you create a variable to access each row:
For Each name As String In students
  If name  = "Sally" Then SallyCount = SallyCount + 1
Next
The following classes or properties now support iterating:
Dictionary
Arrays
RowSet
URLConnection.ResponseHeaders
OpenFileDialog.SelectedFiles
The ability to iterate through lists will be added to more of the framework in future releases.
Avoiding Literal Mistakes - Often when writing code you must deal with numbers that are returned by functions where each possible value has a different meaning. This can result in code that is difficult to read as the purpose of the magic value is not immediately obvious. Enumerations solve this problem by providing an obvious and meaningful keyword that replaces the magic value.
For example, in previous versions of Xojo when setting the text alignment of a TextField, you might have previously written the code to center-align the text like this:
TextField1.Alignment = 2
It's not obvious what 2 means in this case. The replacement for TextField.Alignment is TextAlignment. This property is an enumeration. As a result, using the enumeration is required which makes the code more readable:
TextField1.TextAlignment = TextAlignments.Center
It's now absolutely clear what the code is going to do. Also because the old Alignment property is an integer, should you have chosen to use a literal value (2 for example), a typo (typing 22 by mistake) would not be caught by the Xojo compiler or by any kind of error when you app runs. Enumerations solve this problem because the only way to assign values is via the enumeration itself.
Enumerations are also easy to auto-complete as in almost all cases, the name of the enumeration is the plural form of the name of the property with which it's associated. For example the property TextAlignmment is an enumeration of type TextAlignments.
Handling Errors - In the past, many functions in Xojo returned error codes when a function could not succeed. While errors are usually the exception not the rule, good software design dictates that your code be prepared for this possibility. Take this example (written how you would write it prior to API 2.0) that connects to a database to find a record, updates it and then returns the shipping status:
If db.connect Then
  Var rs As RecordSet
  rs = db.SQLSelect("SELECT ShipStatus WHERE TrackingNumber = " + TrackingNumber)
  rs.edit
  If db.Error Then
    MsgBox("The record cannot be updated due to an error.")
  Else
    Var today As New Date
    rs.Field("LastChecked").StringValue = Today.SQLDate
    rs.Update
  End If
  Var ShipStatus As String = rs.Field("ShipStatus").StringValue
  rs.close
  Return ShipStatus
Else
  MsgBox("Database Error: " + db.ErrorMessage)
End If
Notice the IF statements required to do the error checking. With API 2.0, nearly all error checking is handled with exceptions. This cleans up the code nicely and puts all the error checking in one place.
Try
  db.connect
  Var rs As RowSet
  rs = db.SelectSQL("SELECT ShipStatus WHERE TrackingNumber = " + TrackingNumber)
  rs.EditRow
  rs.Column("LastChecked").StringValue = DateTime.Now.ToString
  rs.SaveRow
  Var ShipStatus As String = rs.Column("ShipStatus").StringValue
  rs.close
  Return ShipStatus
Catch error As DatabaseException
  MessageBox("Database Error: " + error.Message)
End Try
It's cleaner, easier to read, all of the error handling is in one place and it's 25% less code! With API 2.0, nearly everything that used to return an error code has a new API 2.0 method that throws an exception. Put your code into a Try Catch structure like you see above and you can clean up your code quite a bit.
Updating Your User Interface From a Thread - When you have a long operation that must run but don't want your app to be unusable while it does, you put that long-running code into a Thread. If this long operation was initiated by the user, it's good practice to provide the user with some feedback such as a DesktopProgressBar or DesktopProgressWheel. In previous versions of Xojo, updating these controls from the Run event of a Thread was complicated because (for reasons too complex to discuss here) threads cannot be used to directly manipulate any part of your apps user interface.
This process, however, has been made a lot easier in API 2.0. You still can't update your user interface controls from a thread's Run event, but you can update them from the new Thread.UserInterfaceUpdate event. To trigger this event, you simply call Thread.AddUserInterfaceUpdate from within the code in your Thread.Run event (likely inside a loop) and pass to it the data you need to update your user interface controls. For example, if you're updating a ProgressBar, perhaps you'd pass along a number between 1 and 100 representing the percentage of the long operation that is complete. This will cause the Thread.UserInterfaceUpdate event to execute and receive the information you passed it. From this event you can then update your user interface. See the Thread.UserInterfaceUpdate event for an example.
Improvements
There are a number of under-the-hood improvements to classes as well. For example:
FolderItem - On macOS, the FolderItem class has been rewritten from scratch using the latest and greatest Mac APIs to ensure compatibility now and in future macOS releases.
URLConnection - The new URLConnection class (which is part of API 2.0 but was added in Xojo 2019r1), replaces the HTTPSocket class and provides support for HTTP 1.1 and above. It also now relies on the underlying OS's implementation so as operating systems are updating, your apps that use URLConnection will automatically improve. Should the user have a proxy configured, your app will automatically take advantage of it.
Easier, More Secure SQL - the new Database.SelectSQL and Database.ExecuteSQL methods have built-in support for prepared statements without the need for you to directly use the PreparedSQLStatement classes.
Transitioning
Existing Projects - Transitioning to API 2.0 can be done at your leisure. Even though many of the functions your projects are using today are now deprecated, they won't be going away any time soon. The first step is to make sure your project runs as-is in 2019r2 prior to making any changes. If it does, then you are ready to transition to API 2.0.
Desktop projects created before 2021r3 will continue to use the legacy desktop controls. However, if you wish to use any of the new Desktop-prefixed controls in a project you created prior to 2021r3, you can do so by using the Inspector to change the Super of that control to its Desktop equivalent. For example, a PushButton would be changed to DesktopButton.
Desktop projects can also be updated automatically to use the new desktop controls. To update:
The entire project, choosing Project > Update Controls to API 2.0.
A class (including the Application class), right-click on it and choose "Update to <New Class Name>".
A Window and all of its controls, right-click on the window in the Navigator and choose "Update to DesktopWindow".
A ContainerControl and all of its controls, right-click on the ContainerControl in the Navigator and choose "Update to DesktopContainer".
A specific control on a window, right-click on the control and choose "Update to <New Class Name>".
The menubar or a specific menu or menu item, right-click on the menubar or item and choose "Update to "Update to DesktopMenuItem".
New Projects - New projects will only show API 2.0-compatible items. That means you will only see API 2.0-compatible events in the New Event Handler dialog box, see only API 2.0-compatible methods and properties in auto-complete and only see API 2.0-compatible items when you browse the Documentation. You can go directly to a deprecated item in the Documentation by typing the complete name in the Search field. For example, typing "FolderItem.Item" will take you to the Item method even though it's been deprecated. These deprecated items will remain accessible both in the framework and in the Documentation for many years to give you plenty of time to transition.
New desktop projects created in 2021r3 or later will use the new Desktop-prefixed controls. If you prefer to use one of the legacy controls, simply drag out the control you wish and then change its Super property in the Inspector. For example, DesktopButton would be changed back to PushButton.
Updating Desktop Control Subclasses - If you decide to update a class in your project that subclasses a desktop control, you will need to review any event definitions you have added as some may need to be renamed. For example, if you added an event definition called "Action" to a subclass of Pushbutton and then called that from the PushButton's Action event handler, after converting the project to use the new API 2.0 desktop controls, because the Action event has been changed to Pressed, your code won't compile because it's looking for a Action event that no longer exists. The solution is to change your event definition name to Pressed and update the code in the Pressed event to call Pressed instead of Action.
Auto-Complete - The first place you will likely notice API 2.0 is when using Auto-Complete. Projects created in versions of Xojo prior to 2019r2 will still show methods, properties and other items that have been deprecated along with their API 2.0 replacements. Projects created in 2019r2 or later will not.
Finding Things To Update - Xojo won't tell you which classes, properties and methods you're using that can be replaced by their API 2.0 counterparts until you ask it. You do this by using the Analyze Project feature. You'll first need to go to Project->Analysis Warnings and check the warning for "Item1 is deprecated. You should use Item2 instead." Once you do this you can select Analyze Project from the Project menu to analyze the entire project or you can click the Analyze Item button in the Code Editor toolbar to analyze a single item. This will produce a list of items in that class or module that can be updated. Depending on the size of your project, the list of things that need to be updated could be quite long. Don't be overwhelmed by this. You project will continue to run as-is so you can take your time and update your project as you need or want to do so.
When You're Ready to Start - There's no rush your existing code will continue to function for many years. You can update one function, one class or perhaps the entire project at once. It's up to you.
The Nitty-Gritty Details - For more details on specifics of transitioning, see the Updating Older Projects page.
See also
Updating Older Projects topic